In this article, you will learn how to migrate your http to https in IIS. Google urge website to use https for security reason and site that use https will be ranked higher. In previous post, we have written article about how to setup Let’s Encrypt on IIS. Now, we will continue how to bind it on IIS. This applied to free SSL or you purchase SSL. Let’s get started!
How to Get Certificate
You can get free certificates from LetsEncrypt.com, but they have a 3 month lease. The renewal process can certainly be automated, or you can purchase SSL from us too. Our SSL starts from $60/year for single website.
When ordering the certificate, a CSR (Certificate Sign Request) will be requested. The CSR can be obtained from IIS through the menu Generate Certificate Request. A few questions about who you are will be asked, the most important being the Common Name, which will be typically www.yourdomain.com (or, better, use a wildcard, as in *.yourdomain.com). If the Common Name doesn’t match the web site domain, the user will get a warning at browsing time, so this is a sensitive step.
How to Install Certificate in IIS
Once you have purchased certificate, the SSL registrar will provide you a .crt or .cer file (just make sure you have generate this CSR via IIS as explained above). This .crt file will be setup on your IIS via Complete Certificate Request.
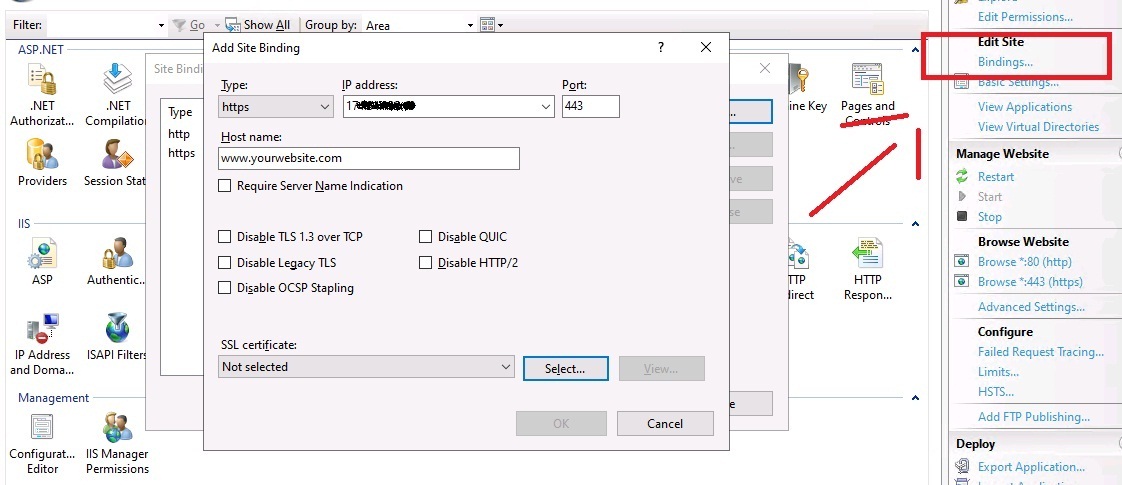
How to Bind SSL in IIS
At that point the certificate is installed on the server. The certificate needs to be bound with your website port 443. First make sure that the port 443 is opened on your server, and second, use the binding IIS menu on your website. A binding entry will have to be added as shown in the picture below.
Once added just restart the website. Normally, you can now access your website through HTTPS urls. If not, you may have to tweak the DNS pointers somehow, but I cannot comment since we didn’t have a problem with that.
At that point, both HTTPS and HTTP are browsable. HTTP requests need to be redirected to HTTPS to complete the migration.
How to Renew Your SSL
When renewing your certificate you will obtain a new certificate with an extended expiration date but with the same common name (remember common name is like www.yourdomain.com). When importing the new certificate in your IIS server store, you will end up with two certificates with the same common name.

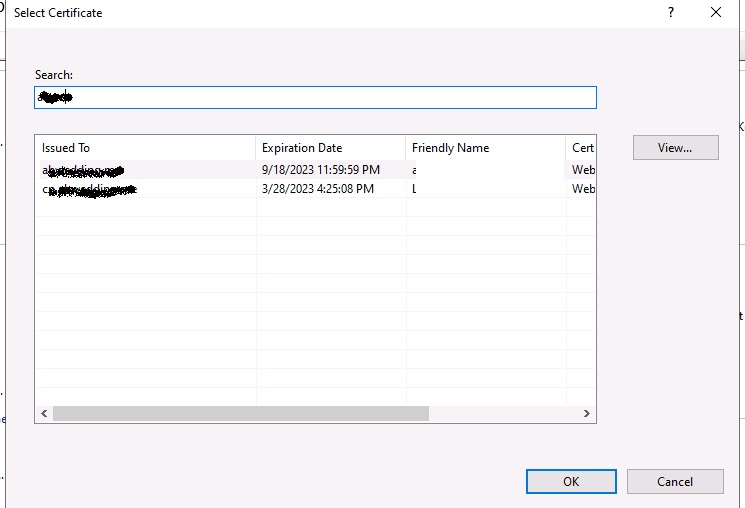
To bind your site with the new certificate, in the site binding form you will have to select the new certificate. However the old and new certificate are both shown with the same common name (www.yourdomain.com in the screenshot below). This is awkward since there is no expiration date to tell you which one is the newer!!
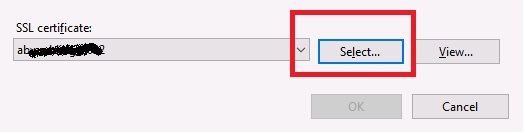
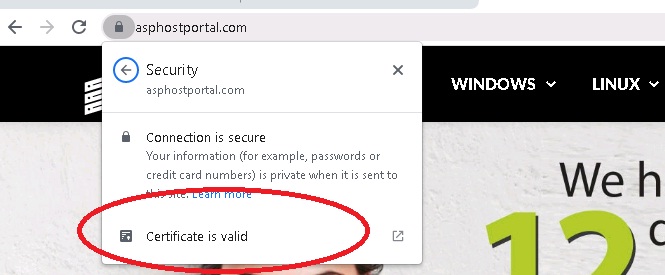
Click select certificate and please kindly choose the SSL that you have installed. Once you choose one, double-check from your browser that your site certificate date has been updated with the new one. To do so, as shown by the screenshot below click certificate and check the expiration date. Once checked you can then safely delete the old certificate from your store.
Once it is done, you can test to browse your website and you can see that your SSL valid to newest date.
How to Use 301 Redirection
We have discussed it on previous tutorial about how to redirect http to https. HTTP to HTTPS redirection can be achieved by modifying the Web.Config file of your ASP.NET website, to tell the IIS Url rewriter how to redirect. After a few attempts based on googling, our redirection rules look like:
<system.webServer>
  <rewrite>
    <rules>
      <clear />
      <rule name="Redirect to https" stopProcessing="true">
        <match url=".*" />
        <conditions>
          <add input="{HTTPS}" pattern="off" ignoreCase="true" />
          <add input="{URL}" pattern="(.*)XYZ" negate="true" ignoreCase="true"/>
          <add input="{HTTP_HOST}" matchType="Pattern" pattern="^localhost(:\d+)?$" negate="true" />
        </conditions>
        <action type="Redirect" url="https://{HTTP_HOST}{REQUEST_URI}" redirectType="Permanent" appendQueryString="false" />
      </rule>
      <rule name="redirect asphostportal.com to www.asphostportal.com">
        <match url=".*"/>
        <conditions logicalGrouping="MatchAll">
          <add input="{HTTP_HOST}" pattern="^www.*" negate="true"/>
          <add input="{HTTP_HOST}" pattern="localhost" negate="true"/>
        </conditions>
        <action type="Redirect" url="http://www.asphostportal.com/{R:0}"/>
      </rule>
    </rules>
  </rewrite>
</system.webServer>
If you believe this can be improved, please let us know.
- <add input=”{HTTPS}” pattern=”off” ignoreCase=”true” /> is the main redirection rule that redirects HTTP requests to HTTPS (this is called 301 redirection). You’ll find many sites on the web to test that your 301 redirection works fine.
- Make sure to double check that urls with GET params are redirected well. On our side, url=“https://{HTTP_HOST}{REQUEST_URI}” processes GET params seamlessly
- <add input=”{URL}” pattern=”(.*)XYZ” negate=”true” ignoreCase=”true”/> is important to avoid HTTP to HTTPS redirection for a page named XYZ. Typically, if you have special pages with POST requests, they might be broken with the HTTPS redirection, and thus the redirection needs to be discarded for those.
- <add input=”{HTTP_HOST}” matchType=”Pattern” pattern=”^localhost(:\d+)?$” negate=”true” /> avoid the HTTPS redirection when testing on localhost.
- <add input=”{HTTP_HOST}” pattern=”^www.*” negate=”true”/> just transforms asphostportal.com requests into www.asphostportal.com,
- and <add input=”{HTTP_HOST}” pattern=”localhost” negate=”true”/> avoids this WWW redirection on localhost.
How to Eliminate Mixed Content
At this point you are almost done. Yet depending on the topology of your web site(s) and resources, it is possible that some pages generate a mixed content warning. Mixed content means that some resources (like images or scripts) of an HTTPS web page are served through HTTP. When mixed content is detected, most browsers show a warning to users about a not fully secured page.
You’ll find tools to search for mixed content on your web site, but you can also crawl the site yourself and use the Chrome console to get details about mixed content found.
Final Verdict
One of the reason that you must moving to HTTPS is Google love secure website and Google Analytics don’t work if you keep up HTTP website. The other factor is with HTTPS website, it will help your site to rank higher on Google. We hope that above article help to to setup SSL on your site.
If you are looking for fast and secure website, you can visit our site at https://www.asphostportal.com. Instead of hosting, you can purchase domain and SSL with us with an affordable price. Our fully featured hosting already includes
- Easy setup
- 24/7/365 technical support
- Top level speed and security
- Super cache server performance to increase your website speed
- Top 9 data centers across the world that you can choose.


Andriy Kravets is writer and experience .NET developer and like .NET for regular development. He likes to build cross-platform libraries/software with .NET.