As engineers, we frequently become so engrossed in other facets of development that we fail to consider how users view and engage with our systems. Users may abandon the app nearly immediately after arriving as a result of this error, increasing bounce rates and decreasing engagement.
Providing value to its users is the foundation of any successful business. The success of the company is eventually impacted when users are unable to obtain this value because of subpar performance. Among other things, slow load times irritate users and make them leave before they get a chance to interact.
More than just a technical aspect, performance optimization is essential to developing a successful application. Without it, consumers may not notice even the nicest features if they don’t stay long enough to observe them.
We’ll look at important strategies in this post to help you speed up and improve the efficiency of your Next.js application.
Developing an Effective Application
Finding the ideal mix between responsiveness, speed, and resource efficiency is key to improving the performance of your apps. Making an application that provides value and maintains user satisfaction should be your goal.
When creating a performant application, it is important to ensure that there are no annoying lags when a user clicks buttons, scrolls, or navigates the interface. Additionally, you should ensure that there are no needless delays in data loading or updates.
How to Make Your Apps More Effective
Finding the issues with your application is the first step in optimizing it. You can effectively analyze the performance of your application with a variety of tools and packages. Here’s how to put them to use:
Using npm run build
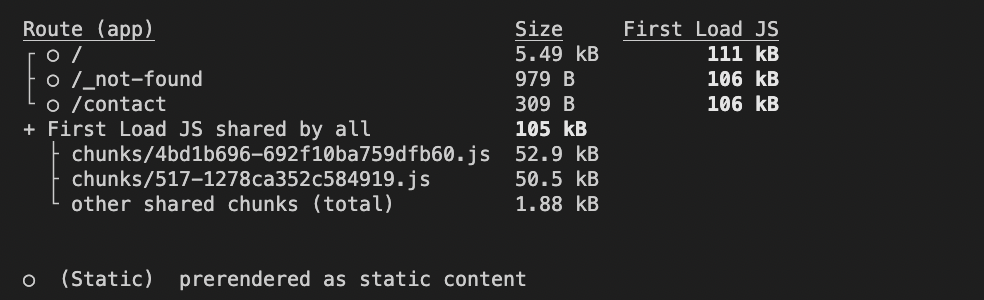
Next.js generates a production-ready version of your application and provides a thorough description of your pages when you execute npm run build. This comprises:
- Size: The JavaScript file sizes for every route. pointing out any paths that are too big and can cause delays. While large pages may take longer to download, particularly for people with poorer network connections, smaller pages typically load faster.
- First Load Js: The entire amount of JavaScript that must be downloaded and run by the browser in order to render the page completely the first time is indicated in this column. The Time-to-Interactive (TTI) is slower when the First Load JS values are large.
When this command is run, the analysis looks like this:
Using @next/bundle-analyzer
The bundle analyzer is a Next.js package that provides a visual depiction of the application’s modules and dependencies in order to examine the size of JavaScript bundles. The package can be used as follows:
First, use this command to install the package:
npm install @next/bundle-analyzer
Or you can use yarn:
yarn add @next/bundle-analyzer
Then add the @next/bundle-analyzer configuration to your next.config.js file:
const withBundleAnalyzer = require('@next/bundle-analyzer')({
  enabled: process.env.ANALYZE === 'true',
});

module.exports = withBundleAnalyzer({
  // other Next.js config options here
});
Use the following command to examine your application bundles as you create a production build:
ANALYZE=true npm run build
Browser tools
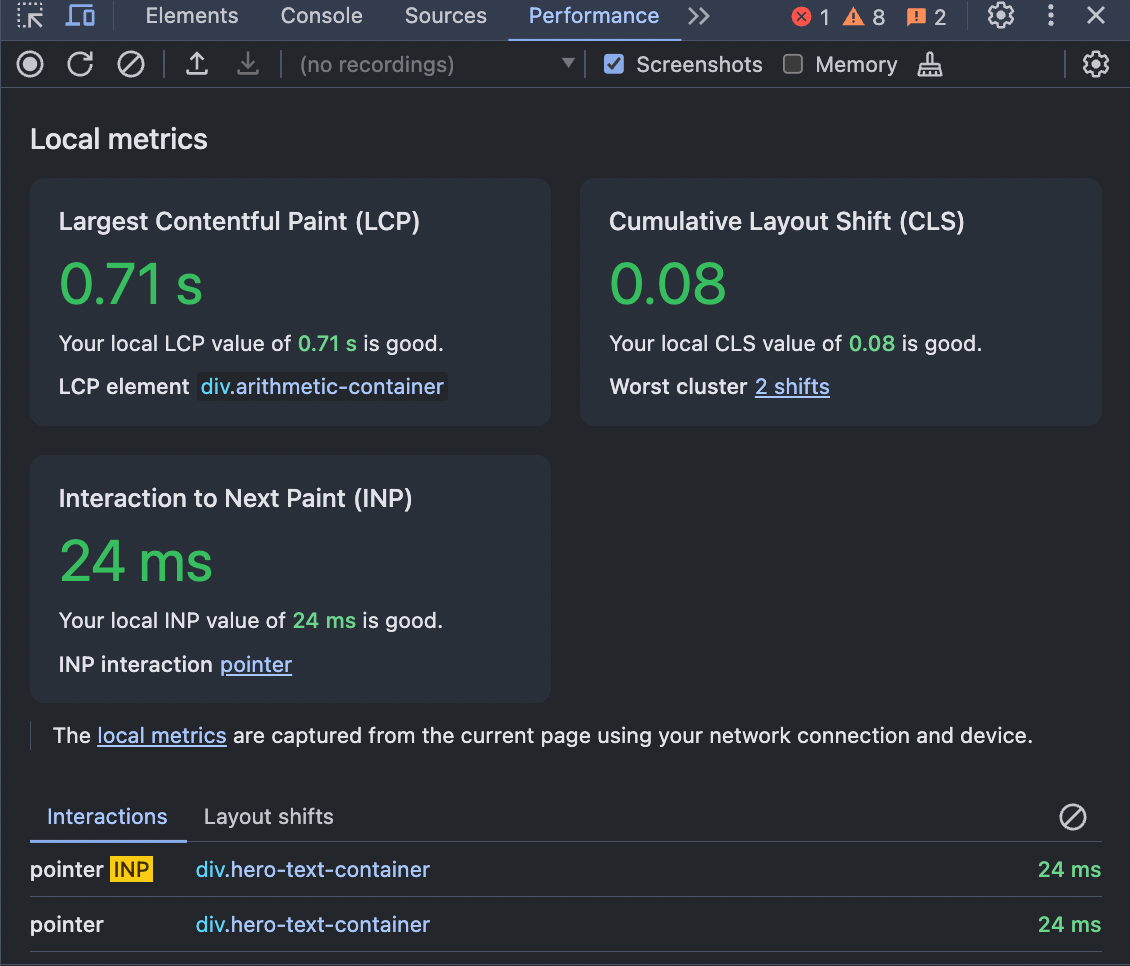
Last but not least, contemporary browsers like Google Chrome, Firefox, and Edge provide strong tools for evaluating and enhancing the functionality of your application. You may identify problems like poor rendering or lengthy processes by recording and visualizing how your application operates with features like the Performance Tab.
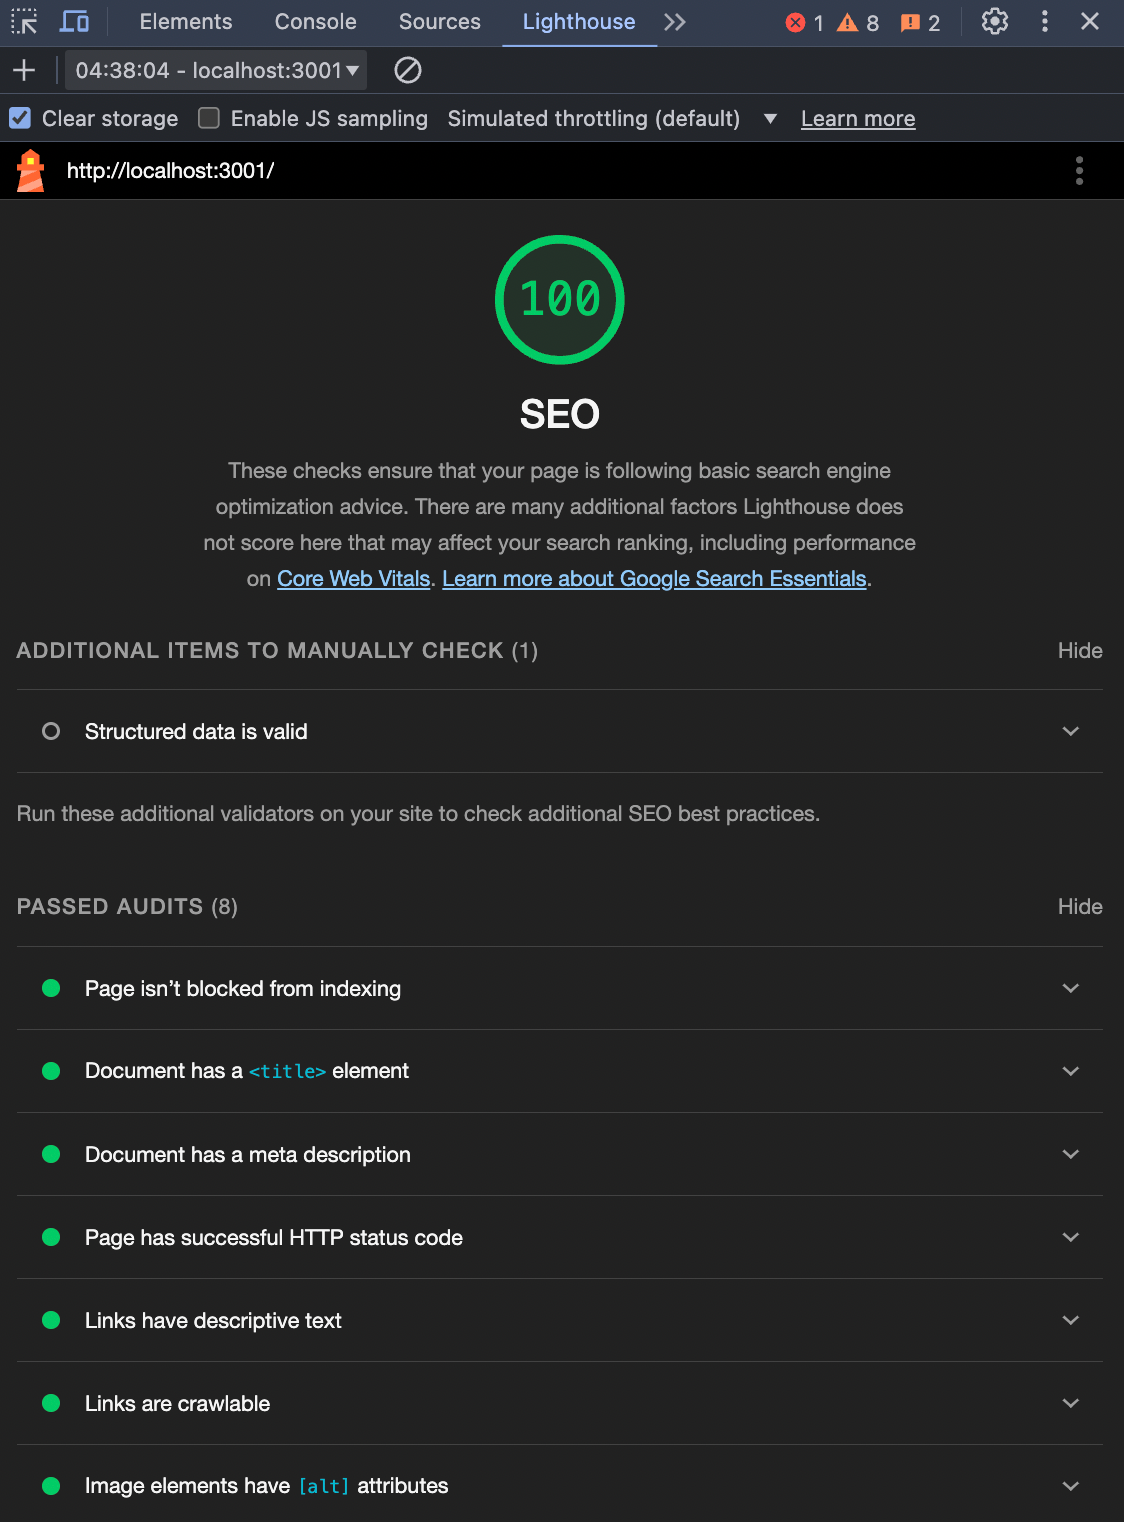
Additionally, you may use programs like Lighthouse (included in Chrome and Edge) to create automatic audits that point up issues like excessive assets and underutilized resources.
To access the Lighthouse and Performance tabs:
- Open your browser’s developer tools by right-clicking anywhere on the browser and selecting the Inspect option or pressing Command + Option + I (on Mac) or Ctrl + Shift + I (on Windows).
- Look at the top menu in the developer tools.
- If you don’t see the Lighthouse or Performance tabs right away, click the double right arrow (>>) to reveal hidden tabs.
- Select the desired tab to start analyzing performance or generating a Lighthouse report.
This is an illustration of a created audit found in Chrome’s Performance tab.
This additional image displays the audit that Lighthouse generated.
Essential Methods for Enhancing Performance
1.) Using The Next.js Image Component
The majority of a page’s weight is frequently made up of images, which has an immediate impact on user experience and load times. Large photos need more bandwidth because they slow down rendering.
The built-in Image component of Next.js is incredibly helpful for web performance because it automatically optimizes images. It handles format optimization, lazy loading, and resizing such that, when supported by the browser, photos are shown in the most efficient format (such as.WebP).
import Image from 'next/image';

    <Image
      src="/house.jpg"
      alt="House Image"
      width={700}
      height={500}
      priority={false} // Lazy loads the image by default
    />
In the snippet above,
src="/house.jpg": This indicates that the image file is located in thepublicfolder. There is no need for additional settings because the images in the /public directory are provided statically.alt="House Image": Similar to the native HTML image element, thealttext offers a description of theimage, which is excellent for SEO and accessibility (such as screen readers).width & height: Next.js may determine how much room the image will take up on the site before it loads by specifying defining the width and height. This enhances performance metrics like Cumulative Layout Shift (as seen in the image above) and improves user experience by preventing the page layout from changing as the image loads.priority={false}: This saves bandwidth and speeds up site load times for non-essential images by guaranteeing that the image will only load when it is close to the user’s viewport. To avoid lazy loading and guarantee that the picture loads as rapidly as feasible, you can usepriority={true}for crucial images that should load instantly, such as those that are displayed as soon as the page opens.
One of the key advantages of the Next.js Image component is its built-in lazy loading feature. This means that images won’t be loaded until they are actually needed (when they enter the viewport). By only loading images that are about to be viewed, performance is improved and pages can load faster, even with many high-quality images.
2.) Using the Next.js Script Component to Optimize Third-Party Scripts
If not properly controlled, third-party scripts—like advertising networks or analytics tools—can significantly impact the performance of your application. Next.You may easily load scripts efficiently with the help of js’s Script component, which gives you control over when and how they load.
You can provide a loading strategy for scripts using the Script component, which controls how and when they are fetched and run. You can enhance your application’s overall efficiency and user experience by ranking or postponing scripts according to their significance.
beforeInteractive: Use this technique for scripts, such as necessary analytics or monitoring tools, that need to load before the page can be interactive.afterInteractive: By default, when you use this method, the script loads after the page becomes interactive. Scripts that provide functionality but are not necessary for initial rendering are best suited for this.lazyOnload: Waits for the completion of loading all other page resources before loading the script. For scripts that aren’t absolutely necessary, such advertisements or social networking widgets, this is ideal.
<Script src="https://example.com/non-essential.js" strategy="lazyOnload" /> //Pass the strategy as a prop to the component
Time to Interactive (TTI) can be improved and load times decreased by using the Next.js Script component to stop scripts from obstructing essential rendering.
3.) Remove Unused Packages/Dependencies
Unused dependencies may accumulate in your codebase as you develop and manage your project over time. These superfluous packages make the code more difficult to manage, slow down installation times, and expand the size of your project. Maintaining a clean codebase and improving the speed of your application require clearing out these unnecessary dependencies.
One excellent method for finding and eliminating unnecessary dependencies from your project is to utilize the depcheck tool. It analyzes your package.json and the project files to find unused dependencies, unused devDependencies, and missing dependencies.
You can run a depcheck like this:
npx depcheck
Once the unnecessary dependencies have been found, you can eliminate them by running:
npm uninstall <package-name>
or with yarn:
yarn remove <package-name>
Maintaining the cleanliness and efficiency of your project can be achieved simply but effectively by running depcheck on a regular basis.
4.) Caching and Incremental Static Regeneration (ISR)
When you find yourself running the same calculations or database queries repeatedly, you should consider caching. It’s a simple yet powerful way to boost your web application’s performance, especially for content that doesn’t change often. By storing frequently accessed data in a cache, you can avoid unnecessary processing and speed up load times.
In Next.js, you can take this a step further with Incremental Static Regeneration (ISR), which lets you serve static content instantly while keeping it fresh behind the scenes.
Next.js’s Incremental Static Regeneration (ISR) allows you to update static pages without having to rebuild the entire website. This is how it operates:
- Build time generation: When the site is being constructed, ISR creates pages.
- Caching: When people visit, it saves the pages so they load quickly.
- Background updates: ISR updates the pages in the background when content changes, so users are not impacted.
- Dynamic updates: It combines the capability of frequently updating content with the quick loading of static pages.
export async function getStaticProps() {

  const data = await fetchData();

  return {
    props: { data },
    //regenerate the page every 20 seconds.
    revalidate: 20,
  };
}

//pre-render the page as static content
function MyPage({ data }) {
  return (
    <div>
      <h1>My Page</h1>
      <p>{data}</p>
    </div>
  );
}

export default MyPage;
Caching Frequently Used Content
It’s critical to have current and quick content for websites with high traffic pages, such as product listings or blog entries.
This is made possible by caching, which saves a copy of the page so that it doesn’t have to be made from scratch every time a user comes. With the use of caching headers, the browser or server will keep this cached page for a predetermined period of time. When necessary, the page can be updated in the background using ISR (Incremental Static Regeneration), which eliminates the need to rebuild the entire website.
By storing API answers, caching can help expedite the process in applications with large data sets. In this manner, users can swiftly retrieve the same material from the cache rather than having to wait for it to be fetched again when they make a subsequent request. In order to assist users get these cached pages more quickly, tools like Vercel and Content Delivery Networks (CDNs) store them in numerous places across the globe.
export async function getStaticProps() {
  const data = await fetchData();

  return {
    props: { data },
    // Regenerate page at most once every 30 seconds
    revalidate: 30,
    // Cache for 1 hour at the CDN level
    headers: {
      'Cache-Control': 'public, max-age=3600, must-revalidate',
    },
  };
}
In this case, the page is cached at the CDN level for an hour and is refreshed every 30 seconds. The Cache-Control header instructs the browser and CDN to cache the page for one hour and then revalidate it.
5.) Font Optimization With next/font
You don’t need to manually configure or use other libraries because Next.js’s next/font module takes care of font loading automatically for better performance. It speeds up page loads by loading only the font’s needed components.
By ensuring that fewer bytes are delivered and that pages load quickly, you can further minimize the font file size by providing the subsets array.
This is how it operates:
- Automatic font loading: By automatically optimizing font loading, the module ensures that fonts are supplied in the most effective manner possible, enhancing efficiency without requiring additional work.
- Subsetting fonts: The precise font characters required for your application can be specified.
- Font display strategy: The font-display strategy determines how text is shown to the user while fonts are loading. Next.js typically uses the
swapstrategy by default, but you can manually configure it if necessary. The most common strategies areswapfallbackoptionalandblock. -
  import { Inter } from 'next/font/google'

  const inter = Inter({
    subsets: ['latin', 'latin-ext'], // Load only the Latin and extended Latin subsets
    weight: '400', // Choose the specific weight you need
    style: 'normal', // Specify the style if needed
  })

  export default function Page() {
    return <div className={inter.className}>Hello World</div>
  }
The Next.js built-in tool for Google Fonts is used in the sample above. For convenience and efficiency, you can import the font directly like this rather than utilizing a third-party library or including the font URL in your HTML.
- subsets: instructs the program to load just the necessary characters. By avoiding the need to download extraneous data, such as Greek or Cyrillic (used in Russian), you can keep your program lighter and load faster.
- weight: You just bring in Regular (400) font weights rather than all of them (such as Bold and Light). As a result, the total size is decreased.
- style: Don’t use fancy italics; stick to the regular style. This also reduces the amount of downloaded content.
6.) Lazy Loading and Code Splitting
Making sure consumers don’t have to wait a long time for your pages to load is important when developing web apps. Reducing the amount of JavaScript loaded when the page first loads is a major component of this. Lazy loading and code splitting are two methods that aid in this, and Next.js makes these simple to employ.
Lazy Loading in Next.js
Lazy loading can be compared to waiting to download a film until you’re ready to see it. Consider having a sizable element, like as a map or chart, that people can only view after interacting with a site. You can use next/dynamic to instruct Next.js to load it just as necessary, rather than loading it all at once.
Code Splitting in Next.js
Code splitting allows users to load only the necessary portions of your JavaScript by breaking it up into smaller units called bundles. For instance, other pages like “About Us” and “Dashboard” don’t require JavaScript to load when a person views your site. Usually, it occurs dynamically during runtime or during the build process.
import dynamic from 'next/dynamic'

// Load HeavyComponent only when it’s rendered
const HeavyComponent = dynamic(() => import('./HeavyComponent'), { ssr: false })

export default function Home() {
  return (
    <div>
      <h1>Welcome Home!</h1>
      <HeavyComponent /> {/* This loads only when rendered */}
    </div>
  )
}
Only when necessary does the aforementioned code dynamically import the component. If the component doesn’t need to be pre-rendered, setting ssr: false can save resources by turning off server-side rendering.
By automatically dividing the code by page, Next.js speeds up load times by ensuring that only the required JavaScript loads on each page when it is requested. You can dynamically import particular components with next/dynamic for more precise control, making sure they load sluggishly only when required. Using next/dynamic allows you to apply component-level splitting, which optimizes resource loading and improves performance, whereas Next.js handles page-level code splitting by default.
Conclusion
A crucial component of any business is developing a high-performance application. An application that is quicker and more effective increases user engagement, decreases bounce rates, and improves SEO rankings—all of which support customer happiness and business expansion.
You can retain maximum efficiency behind the scenes while offering a seamless user experience by employing the strategies we covered in this tutorial.
Keep in mind that every second of load time saved results in happy users and, eventually, greater business consequences.


Andriy Kravets is writer and experience .NET developer and like .NET for regular development. He likes to build cross-platform libraries/software with .NET.