
We’ll go over the RFC 6455 WebSockets specification in this article and configure a basic ASP.NET (Core) 7 application to connect via WebSockets to SignalR. To comprehend what goes on behind the scenes, we will delve into the underlying concepts.
About WebSocket
To allow for two-way communication between a client and a server, WebSockets were developed. One of the problems with HTTP 1.0 was that every time we sent a request to the server, we had to open and close a connection. However, HTTP 1.1 introduced persistent connections (RFC 2616) by utilizing a keep-alive mechanism. As a result, connections may be reused for multiple requests, reducing latency because each request would no longer require the server and client to establish a handshake.
When you are learning about protocols, a good place to start is to read its corresponding RFC specification.
Because HTTP 1.1 supports persistent connections, WebSockets is built on top of that specification. Therefore, when you establish your first WebSocket connection, you are actually making an HTTP 1.1 request (more on this later). This makes it possible for clients and servers to communicate in real time. The following diagram summarizes what takes place during the establishment (handshake), data transfer, and termination of a WS connection. Later, we will delve further into these ideas.
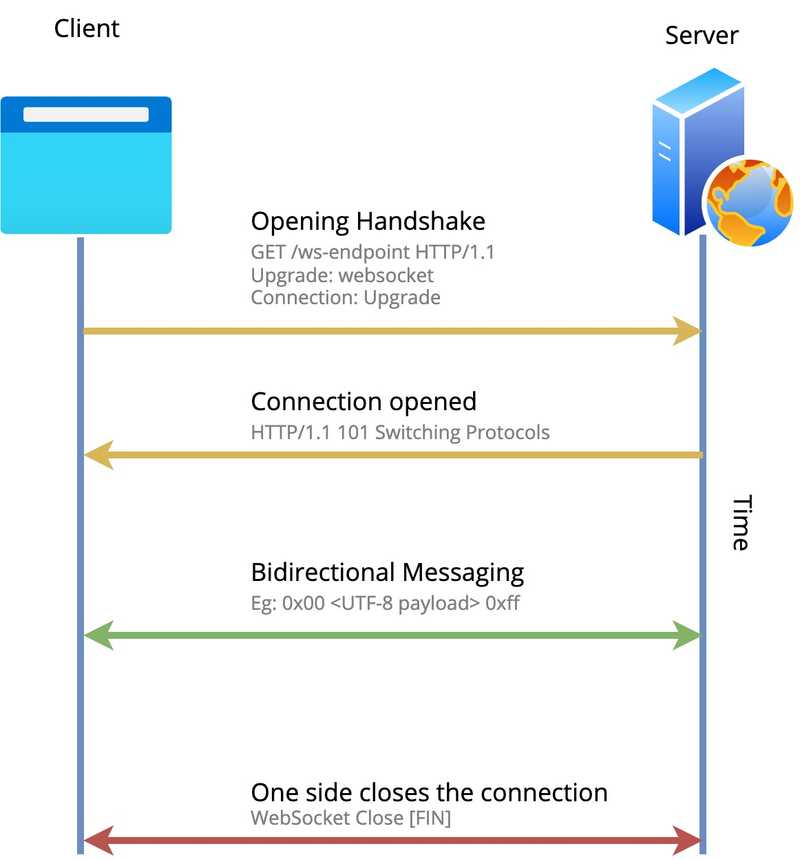
The protocol has two parts to it; Handshake and Data Transfer.
Handshake
First, let’s discuss the formal handshake. the specification
The opening handshake is intended to be compatible with HTTP-based
A single port can be used by HTTP clients talking to that server and WebSocket clients talking to that server thanks to server-side software and intermediaries.
A WebSocket connection, to put it simply, relies on HTTP (and TCP as the transport) over a single port. Here is a list of all the steps.
- Incoming TCP socket connections must be heard by a server. This could be any of the assigned ports, which typically would be
80or443. - With an HTTP GET request—the “Web” in “WebSockets”—the client initiates the handshake (otherwise, the server wouldn’t know who to talk to). The client will request that the server upgrade the connection to a WebSocket in the headers.
- The server notifies the client in a handshake response that it will switch from HTTP to WebSocket as the protocol.
- The connection specifics are negotiated by the client and server. If the conditions are unfavorable, either party may withdraw.
Here’s what a typical opening (client) handshake request looks like.
GET /ws-endpoint HTTP/1.1
Host: example.com:80
Upgrade: websocket
Connection: Upgrade
Sec-WebSocket-Key: L4kHN+1Bx7zKbxsDbqgzHw==
Sec-WebSocket-Version: 13
Note how the client sends out Connection: Upgrade and Upgrade: websocket headers in the request.
the response from the server handshake,
HTTP/1.1 101 Switching Protocols
Upgrade: websocket
Connection: Upgrade
Sec-WebSocket-Accept: CTPN8jCb3BUjBjBtdjwSQCytuBo=
Take note of the HTTP/1.1 101 Switching Protocols that the server sends in the response headers. Anything less than a 101 means the initial handshake wasn’t exchanged.
The final handshake is fairly straightforward. A closing handshake request may be sent by either the client or the server. the specification
It is safe for both peers to initiate this handshake simultaneously.
Since the TCP closing handshake (FIN/ACK) is not always reliable end-to-end, especially in the presence of intercepting proxies and other intermediaries, the closing handshake is meant to supplement the TCP closing handshake.
When we move over to the demo section, we will talk about these in detail.
Data Transfer
The next crucial idea we must comprehend is data transfer. Since it is a Full Duplex communication protocol, either party may send messages at any time.
One or more frames make up the messages. Text (UTF-8), binary, and control frames (like 0x8 (Close), 0x9 (Ping), and 0xA (Pong)) are all examples of frame types.
If you are interested, you can read the full RFC spec from here.
How to Setup
First, please create ASP.NET WebApi app.
dotnet new webapi -n WebSocketsTutorial
dotnet new sln
dotnet sln add WebSocketsTutorial
Now we will add SignalR to our app.
dotnet add WebSocketsTutorial/ package Microsoft.AspNet.SignalR
Sample code explanation
We’ll begin by integrating WebSockets middleware into our WebAPI application. The following line should be added to the Configure method of the Startup.cs file.
For this tutorial, I like to keep things straightforward. I won’t discuss SignalR (Hubs and stuff) as a result. It’d only use WebSockets for communication. If you want to make things even simpler, you can accomplish the same thing without using SignalR by using raw WebSockets.
...

app.UseWebSockets();

...
The default WeatherForecastController will then be removed, and WebSocketsController added in its place. Keep in mind that we won’t be intercepting the request pipeline; instead, we’ll just be using a controller action.
The full code for this controller will look like this. This code is based on Microsoft’s official docs’ example.
WebSocketsController.cs
using System;
using System.Net.WebSockets;
using System.Text;
using System.Threading;
using System.Threading.Tasks;
using Microsoft.AspNetCore.Mvc;
using Microsoft.Extensions.Logging;

namespace WebSocketsTutorial.Controllers
{
    [ApiController]
    [Route("[controller]")]
    public class WebSocketsController : ControllerBase
    {
        private readonly ILogger<WebSocketsController> _logger;

        public WebSocketsController(ILogger<WebSocketsController> logger)
        {
            _logger = logger;
        }

        [HttpGet("/ws")]
        public async Task Get()
        {
          if (HttpContext.WebSockets.IsWebSocketRequest)
          {
              using var webSocket = await HttpContext.WebSockets.AcceptWebSocketAsync();
              _logger.Log(LogLevel.Information, "WebSocket connection established");
              await Echo(webSocket);
          }
          else
          {
              HttpContext.Response.StatusCode = 400;
          }
        }

        private async Task Echo(WebSocket webSocket)
        {
            var buffer = new byte[1024 * 4];
            var result = await webSocket.ReceiveAsync(new ArraySegment<byte>(buffer), CancellationToken.None);
            _logger.Log(LogLevel.Information, "Message received from Client");

            while (!result.CloseStatus.HasValue)
            {
                var serverMsg = Encoding.UTF8.GetBytes($"Server: Hello. You said: {Encoding.UTF8.GetString(buffer)}");
                await webSocket.SendAsync(new ArraySegment<byte>(serverMsg, 0, serverMsg.Length), result.MessageType, result.EndOfMessage, CancellationToken.None);
                _logger.Log(LogLevel.Information, "Message sent to Client");

                buffer = new byte[1024 * 4];
                result = await webSocket.ReceiveAsync(new ArraySegment<byte>(buffer), CancellationToken.None);
                _logger.Log(LogLevel.Information, "Message received from Client");

            }
            await webSocket.CloseAsync(result.CloseStatus.Value, result.CloseStatusDescription, CancellationToken.None);
            _logger.Log(LogLevel.Information, "WebSocket connection closed");
        }
    }
}
Here’s what we did,
- Add a new route called
ws/ - Check if the current request is via WebSockets otherwise throw a 400.
- Wait until client initiates a request.
- Going into a loop until the client closes the connection.
- Within the loop, we will prepend “Server: Hello. You said: <client’s message>” to the message and send it back to the client.
- Wait until the client send another request.
After the initial handshake, the server can start pushing messages to the client without having to wait for a request from the client. Let’s test the application’s functionality by running it.
dotnet run --project WebSocketsTutorial
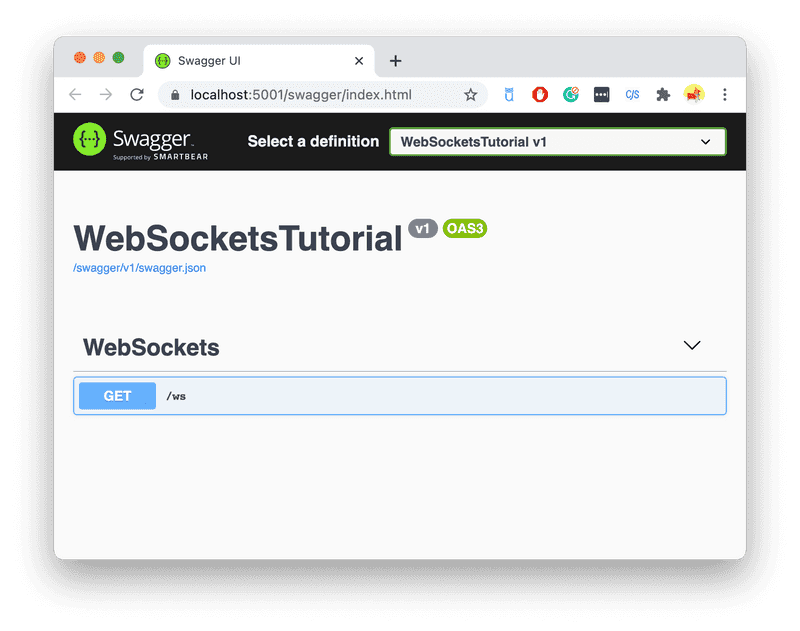
Once you run the application, head over to https://localhost:5001/swagger/index.html. You should see the Swagger UI.
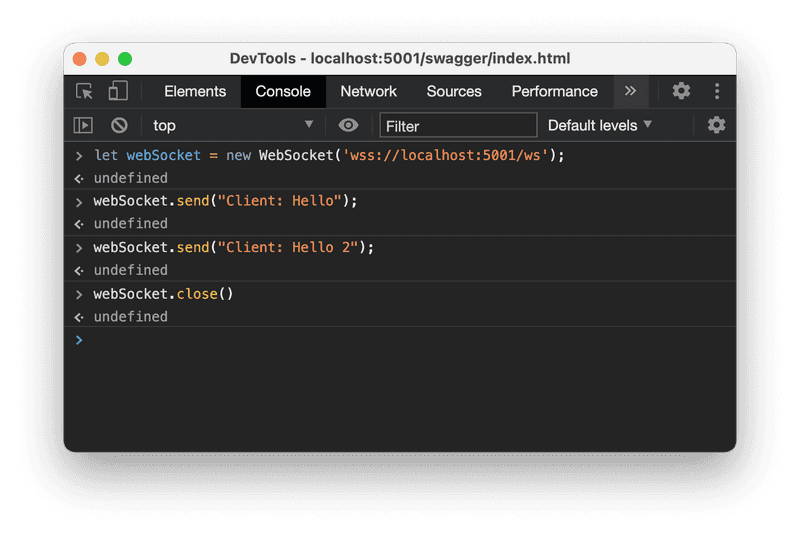
We’ll now look at how to make the client and server communicate with one another. I’ll be using Chrome’s DevTools for this demonstration (Open new tab Inspect or press F12 Console tab). However, you are free to use any client you like.
We’ll establish a WebSocket connection to our server endpoint first.
let webSocket = new WebSocket('wss://localhost:5001/ws');
Initiating a connection between the client and the server is what this accomplishes. Since our WebAPI app is served using TLS, the wss:// protocol stands for WebSockets Secure.
Then, you can use the webSocket.send() method to send messages. Your console ought to resemble the one shown below.
Examining the WebSocket connection in more detail
If you go to the Network tab, select the WS tab to filter out the requests, and then click on the most recent request labeled ws.
Examine the messages exchanged by selecting the Messages tab. You will see “This was sent from the Client!” displayed in this box if you issue the following command during this time. Test it out!
webSocket.send("Client: Hello");
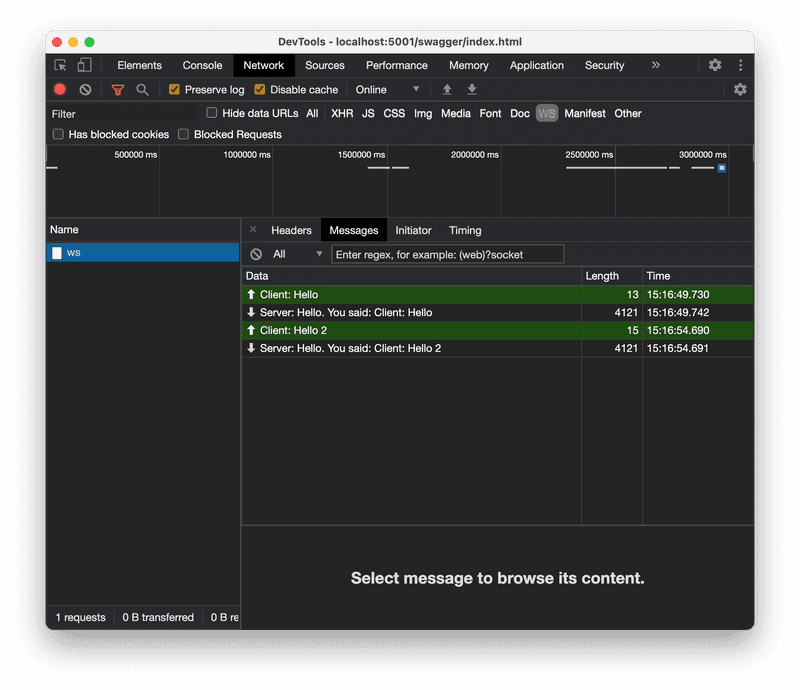
As you can see, after the initial handshake, the server does need to wait for the client to send a response, but the client is still free to send the messages. Full Duplex communication is taking place. The WebSocket communication’s Data Transfer feature has been covered. Run a loop to send messages to the client as an exercise to see it in action.
Additionally, ping-ponging will be used between the server and client to determine whether the client is still alive. WebSockets actually has a feature like this! Use a program like WireShark to look at these packets if you’re really interested in learning more.
How is the handshake performed? The request-response headers we discussed in the first section of this post can be seen if you switch to the Headers tab.

Have a play around with webSocket.close() too so that we can fully cover the open-data-close loop.
Conclusion
Visit RFC 6455 and take a look at it if you’re interested in reading the RFC for WebSockets. There are a lot more topics we could cover with WebSockets than what is covered in this post, including security, load balancing, proxies, and other topics.


Javier is Content Specialist and also .NET developer. He writes helpful guides and articles, assist with other marketing and .NET community work