What do we, developers, do when we want to use a framework we haven’t heard of before? This is what happened to me when I started implementing database logging with Serilog in ASP.NET Core, for one of our projects.
In order to help other fellow developers in need, I decided to put the most important details about database logging using Serilog all together in this article.
What Is Logging and Why Is It Important?
Having an effective logging strategy can be vital for our applications. Logging usually provides useful data that can be often helpful in diagnosing failures, problem root causes analysis, and even do a performance review of the application.
What Should Be Logged?
Well, everything! We should log everything that provides useful data about the app and its behavior. For example:
- Exceptions – could be helpful when analyzing system failures, errors, bugs, etc.
- Data Changes – any change made on app’s data: add, edit or remove actions on data. Could be helpful in maintaining app’s security.
- Threats – suspicious activities in the app, such as: failed authentication, attempts to access restricted data, invalid parameters, etc.
- Requests – each request should be recorded. Some other details should be included, such as: date & time, the identity of the user who made the request, the request data, a brief description of the action taken
A good practice is to customize error messages. Logs should contain some details to ease the investigations into the app’s failures:
- Who was using the system?
- Where did the failure take place in the code?
- When did the failure happen?
- Why did the application fail?
- What action was the system doing when it failed?

Where Should We Keep the Logs?
One way to log data is using the Console.
However, this isn’t the best approach in case of logs from the past need to be analyzed. In order to make this happen, logs should be stored in external files or databases.
To make this happen, there are some third-party frameworks that could be used.
One of them is Serilog.
What is Serilog?
Serilog is a framework used to gather structured logs for an application and it is well suited to collecting and recording them in both files and databases.
The main focus of this article will be configuring and implementing SQL server database logging with Serilog in ASP.NET Core.
Configuring Serilog
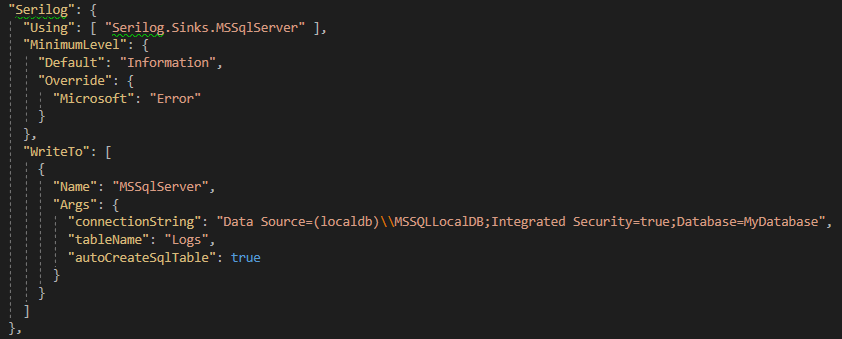
Serilog can be configured through the appsettings.json file. In this file, a new section named Serilog should be added.
Logging Levels Configuration
The “MinimumLevel” subsection determines the level at which log events are generated. This setting can be seen as a performance feature because it gives the ability to control which events actually generate logs.
Any level lower than the minimum set won’t generate any logs.
Here are the existing levels:
- Verbose – for logging details about a running block of code, rarely enabled in a production environment
- Debug – for internal system events that may not be observed from the outside
- Information – for informative events that describe the actions made
- Warning – for events that may not crash the application, but could lead to more serious problems
- Error – for events that cause issues or crash the application
- Fatal – for critical events that need immediate fixes
If no minimum level is specified, then only “Information” level and higher will be processed.
The “MinimumLevel” configuration can only be set to a single value, using the “Default” option.
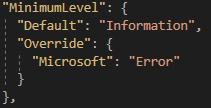
In our example, the minimum level is set to “Information”. If we want to capture “Error” level events too, we have to add the “Override” option and specify the “Error” level and, also, the logging source.
Database Configuration
To write logs to the database, the first step required is to install Serilog.Sinks. MSSqlServer package from NuGet.
In order to proceed with database logging with Serilog in ASP.NET Core, the first step required is to install Serilog.Sinks. MSSqlServer package from NuGet.
In the “Write To” subsection, we can set up the database connection string, along with the name of the table we want to create for logs.
When creating the Logs table in the database, here are the options available:
- Use the “autoCreateSqlTable” option. This option could be set to true if we want Serilog to auto generate Logs table in our database if it isn’t already existing.
- Create Logs table using a database script
- Create Logs table using an EF Core migration
By default, Logs table has the following structure:
[Id]               INT
[Message]          NVARCHAR (MAX)
[MessageTemplate]  NVARCHAR (MAX)
[Level]            NVARCHAR (MAX)
[TimeStamp]        DATETIME
[Exception]        NVARCHAR (MAX)
[Properties]       NVARCHAR (MAX)
Whether the Logs table is created using any of the options detailed above, all of these columns should exist in the table.
However, the Logs table can be customized by removing some of the default columns and adding custom ones. To do this, we have to add some extra details in the appsettings.json file.
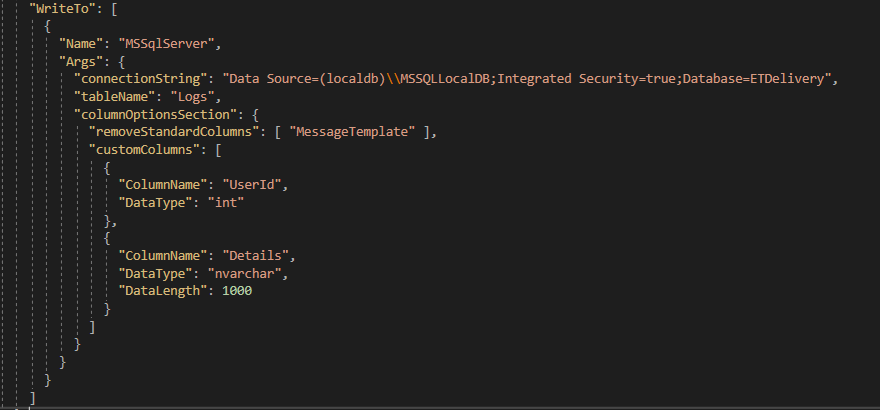
To remove some of the default columns of the Logs table, the option “removeStandardColumns” is used.
In the example above, the default column “MessageTemplate” is no longer needed, so it has been removed.
To add custom columns, the option “customColumns” is used. Any column that suits the user’s needs can be added, with the mention that details like Column Name, Data Type and /or Data Length should be set.
Startup.cs Configuration
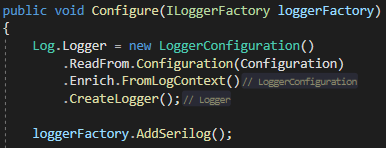
In order to create a Logger, we use Serilog’s sinks, which are configured once, when the application first starts. The configuration must be done in the Configure function from Startup.cs file.
Log.Logger accesses the global Serilog logger which can be later invoked using Log class and its static methods.
ReadFrom.Configuration(Configuration) helps us get the Serilog configuration we’ve done earlier in the appsettings.json file.
How to Write Log Events
We can write Log events using Log class from Serilog in our app’s controllers. We can also dynamically add or remove some other properties to Log context, using enrichers.
For example, we can log the action “Order created” when a user successfully creates an order in our app, using: Serilog.Log.Information(“Order created”). We might also want to log the id of the user that created that order. We can do this by pushing a property into the Log context: LogContext.PushProperty(“UserId”, user.Id).

In order to log errors, we could use an exceptions middleware. In this middleware, in catch() block, we can log error events using: Serilog.Log.Error(“Error”).Adding more details could be helpful.
Conclusion
Writing logs is an important step of application development that requires attention. In some cases, keeping the logs in the database is a good idea.
A good logging strategy can be created just by following some basic rules.
Serilog may be suitable for one’s needs when logging events from the application. I found it very helpful in my case and relatively easy to implement after understanding all the steps that have to be followed.

Yury Sobolev is Full Stack Software Developer by passion and profession working on Microsoft ASP.NET Core. Also he has hands-on experience on working with Angular, Backbone, React, ASP.NET Core Web API, Restful Web Services, WCF, SQL Server.