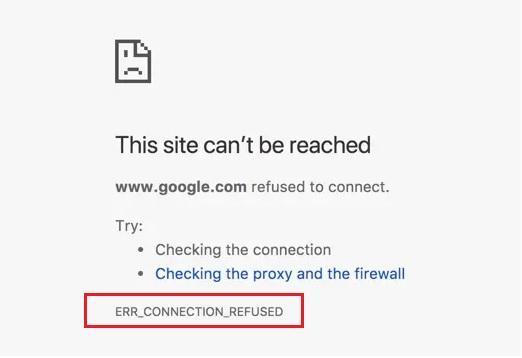
Localhost refused to connect or the ERR Connection Refused error are a few of the several network connection faults you could run into.
Normally, you attempt to connect to a separate computer when you attempt to connect to an IP address. Yet, connecting to localhost entails connecting to your own computer because it makes use of the loopback address network.
Because it lowers the possibility of disrupting a live site, many users, including developers and network administrators, utilize localhost to test programs or websites that are still under construction.
As a result, if localhost is unavailable, you won’t be able to access your project in a local setting.
And keep in mind that you may only access your localhost from your local machine; you cannot access it from any other devices.
This post will define the localhost refused to connect problem and outline three possible solutions. In previous post, we have also written tutorial about how to fix DNS issue and also connection timeout error.
How to Fix Localhost Refused to Connect
The following five approaches are listed in no particular order as ways to fix the localhost refused to connect problem.
1. Disable Your Windows Firewall
A firewall is a type of security system that keeps an eye on your traffic and filters it to block any potential dangers. Despite being a crucial tool, the detection techniques might occasionally operate incorrectly.
A firewall may inadvertently deny access to secure websites or inbound connections. Consequently, it is recommended to temporarily disable the firewall while working on a website if you are currently constructing it and need to access a locally hosted version of it. Your test site won’t be blocked in this manner.
Remember to immediately reactivate your firewall after the website goes online and you are no longer seeing the ERR CONNECTION REFUSED localhost error message.
Here are steps to disable Windows Firewall on Windows Server
1. Navigate to System and Security via your Start button
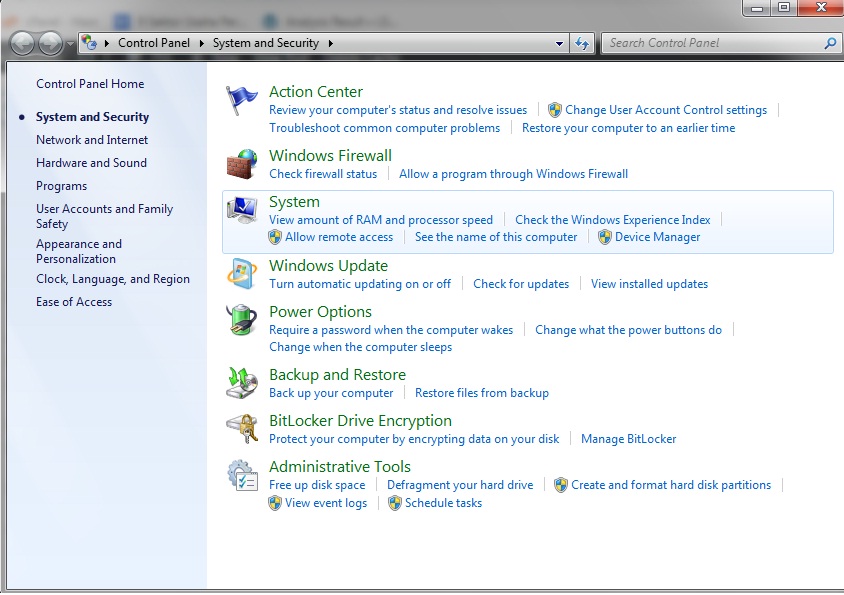
2. Click Windows Firewall
3. Then, please turn off Windows Firewall button
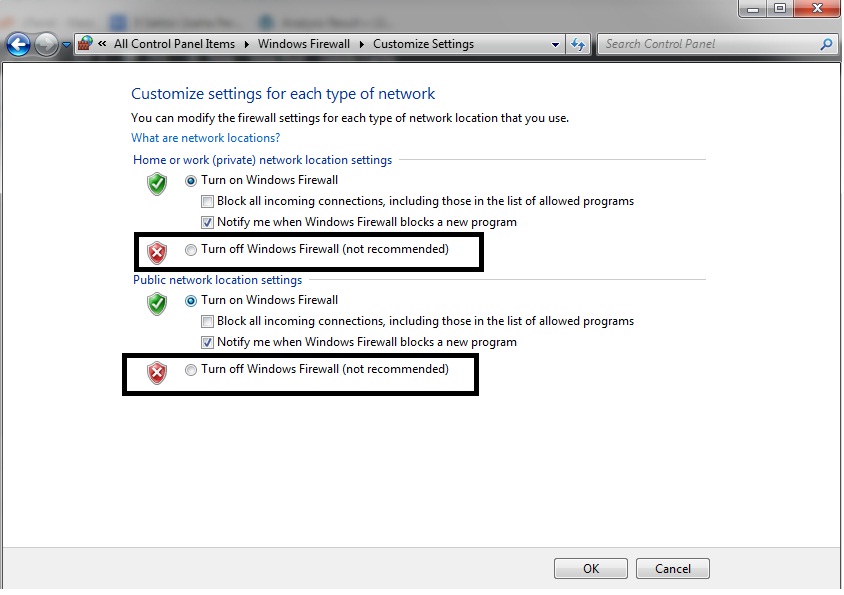
4. Click OK to apply the change.
2. Flush Your DNS
The DNS cache saves information from websites you visit, making it easier for you to access these websites later.
But if the DNS has too many records, it can stop working.
Flush the DNS to remove the records to resolve this:
1. Open cmd (command prompr) via Start Menu
2. Enter this command
ipconfig /flushdns
3. Check whether the 127.0 0.1 refused to connect issue has disappeared or not.
3. Go to Your Browser Settings
The 127.0 0.1 refuses to connect error could also be brought on by your browser settings because each web browser has a unique configuration and set of features.
For instance, certain browsers may automatically reroute you to the HTTPS version of an HTTP web address when you input it. However, you will receive the localhost refused to connect error message if that website has an incorrect SSL certificate or none at all.
Do the following actions if you’re using the Chrome browser:
1. Enter chrome://net-internals/#hsts on your browser’s address bar.
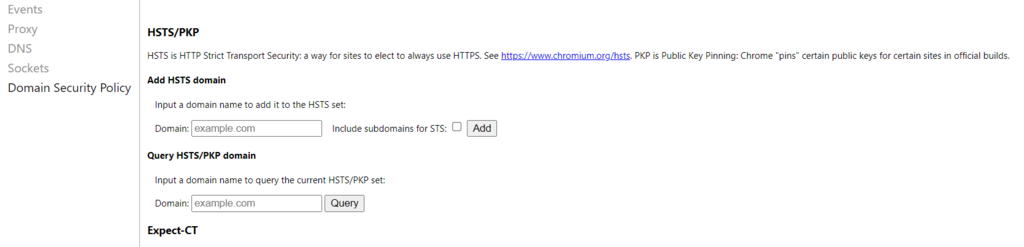
2. Locate Delete domain security policies, then type localhost.

3. Restart your browser.
Conclusion
When working on a project on your local web server, you could experience a particular kind of network connection issue called “Localhost Refused to Connect.”
If the firewall incorrectly blocks your server or you are utilizing the wrong port, it will be activated. If your Chrome browser or Apache web server are not set properly, the localhost error may also appear.
The localhost refused to connect problem can be fixed using one of three techniques:
- Disable your windows firewall – By turning off your firewall, you can prevent it from blocking access to the localhost project and flagging it as dangerous.
- Flush your DNS
- Browser settings – Navigate to the browser’s settings and enable connections to sites like your test site that don’t have SSL certificates.
We hope this article helps you solve the localhost refused to connect error.
Get your ASP.NET hosting as low as $1.00/month with ASPHostPortal. Our fully featured hosting already includes
- Easy setup
- 24/7/365 technical support
- Top level speed and security
- Super cache server performance to increase your website speed
- Top 9 data centers across the world that you can choose.


Javier is Content Specialist and also .NET developer. He writes helpful guides and articles, assist with other marketing and .NET community work