This article will cover JavaScript Interop in Blazor. We’ll learn about JavaScript Interop and how to implement it in Blazor with the help of a sample application.
For our demo, we’ll be using Visual Studio Code.
What is JavaScript Interop?
Blazor uses JavaScript to start the.NET runtime. It can use any JavaScript library. C# code can call a JS function/API, while JS code can call any C# method. This feature of calling a JavaScript method from C# code and vice versa is known as JavaScript Interop. Blazor employs JavaScript Interop to manage DOM manipulation and browser API calls.
WebAssembly supports JavaScript Interop because Blazor runs on Mono, which is compiled to WebAssembly. As a result, Blazor can also support this feature.
Prerequisites
Creating the Blazor application
We’ll use Windows PowerShell to create a Blazor application.
Step 1
First, we’ll install the Blazor framework templates on our machine.
Open the folder where you intend to create your project. Open Windows PowerShell with shift + right-click >> Open a PowerShell window here.
Type the following command:
dotnet new -i Microsoft.AspNetCore.Blazor.TemplatesStep 2
Type in the following command to create our Blazor application:
dotnet new blazor -o BlazorJSDemoThis will create a Blazor application named BlazorJSDemo.
Adding the Razor Page to our application
Open the BlazorJSDemo app in Visual Studio Code. Solution Explorer displays the folder structure, as shown in the image below.
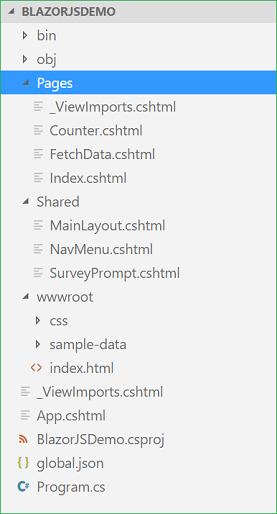
We’ll place our Razor page in the Pages folder.
Create a new file by right-clicking the Pages folder and selecting New File. Name the file JSDemo.cshtml. This file will contain HTML code to handle our application’s user interface (UI).
Similarly, add one more file, JSDemo.cshtml.cs. This file will contain the C# code for handling our business logic.
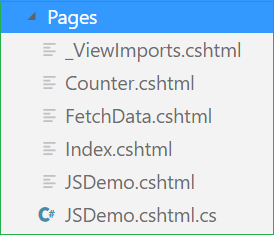
Now, our Pages folder will have the following structure:
Calling a JavaScript function from C#
First, we’ll define our JavaScript functions in the index.html file. Open the wwwroot/index.html file and enter the following code.
<!DOCTYPE html>
<html>

<head>
    <meta charset="utf-8" />
    <meta name="viewport" content="width=device-width">
    <title>BlazorJSDemo</title>
    <base href="/" />
    <link href="css/bootstrap/bootstrap.min.css" rel="stylesheet" />
    <link href="css/site.css" rel="stylesheet" />

    <script src="https://ajax.googleapis.com/ajax/libs/jquery/3.3.1/jquery.min.js"></script>

</head>

<body>
    <app>Loading...</app>

    <script src="_framework/blazor.webassembly.js"></script>

    <script>
        function JSMethod() {
            $("#demop").text("JavaScript Method invoked");
        }
    </script>

</body>

</html>
We have included a CDN reference to the JQuery library inside the section to handle DOM manipulation.
In the section, we defined our JS function. The function’s name is JSMethod, and it does not accept any arguments. When triggered, it will change the text of a
tag with id “demop” to “JavaScript Method Invoked”.
Important Note
- Do not include your JS code in the .cshtml file. This is not allowed in Blazor, and the compiler will generate an error. Place your JavaScript code in the wwwroot/index.html file.
- Always add your custom <script> tag after “ <script src=”_framework/blazor.webassembly.js”></script>” in the <body> section of index.html file. This ensures that your custom script is executed after loading the “blazor.webassembly.js” script.
Open JSDemo.cshtml.cs and put in the following code:
using Microsoft.AspNetCore.Blazor.Components;
using Microsoft.JSInterop;
using System;
using System.Collections.Generic;
using System.Linq;
using System.Threading.Tasks;

namespace BlazorJSDemo.Pages
{
    public class JSDemoModel : BlazorComponent
    {
        protected static string message { get; set; }

        protected void CallJSMethod()
        {
            JSRuntime.Current.InvokeAsync<bool>("JSMethod");
        }
    }
}
The method CallJSMethod will call our JavaScript function “JSMethod” via the “JSRuntime.Current.InvokeAsync” method. This method accepts two parameters: the JS function name and any additional parameters required by the JS function. In this case, we do not pass any parameters to the JS function.
Open JSDemo.cshtml and add the following code:
@page "/demo"
@using BlazorJSDemo.Pages

@inherits JSDemoModel

<h1>JavaScript Interop Demo</h1>

<hr />

<button class="btn btn-primary" onclick="@CallJSMethod">Call JS Method</button>

<br />
<p id="demop"></p>
We have defined the page’s route at the top. So, in this application, appending “/demo” to the base URL will redirect us to this page. We also inherit the JSDemoModel class, which is defined in the JSDemo.cshtml.cs file. This enables us to use the methods defined in the JSDemoModel class.
After this, we have defined a button. This button will invoke the “CallJSMethod” method when clicked. The <p> element with id “demop” is also defined, and its value will be set by the JS function “JSMethod”.
Calling a C#/.NET method from JavaScript
We will now define our JS method in the wwwroot/index.html file, which will call the C# method in the JSDemo.cshtml.cs file.
The syntax for calling a C# method from JavaScript is as follows.
DotNet.invokeMethodAsync('C# method assembly name', 'C# Method Name');Therefore, we will follow the same method calling syntax. Open the wwwroot/index.html file and add the following script section to it:
<script>
  function CSMethod() {
    DotNet.invokeMethodAsync('BlazorJSDemo', 'CSCallBackMethod');
  }
</script>
Here, we define the JS function “CSMethod”. This function will call our C# method “CSCallBackMethod” as defined in the JSDemoModel class.
To call a C#/.NET method from JavaScript, the target.NET method must satisfy the following requirements:
- The method needs to be Static.
- It must be Non-generic.
- The method should have no overloads.
- It has concrete JSON serializable parameter types.
- It must be decorated with [JSInvokable] attribute.
Open JSDemo.cshtml.cs file and add the following code inside the JSDemoModel class.
protected static string message { get; set; }

[JSInvokable]
public static void CSCallBackMethod()
{
  message = "C# Method invoked";
}

protected void CallCSMethod()
{
  JSRuntime.Current.InvokeAsync<bool>("CSMethod");
}
Here we have defined two methods:
- CallCSMethod: This will call our JS function “CSMethod”
- CSCallBackMethod: This is a static method that will be called from the JavaScript function “CSMethod”. As a result, it is marked with the [JSInvokable] attribute. This method sets the value of a string variable message that is displayed on the user interface.
Open the JSDemo.cshtml file and add the following code to it:
<button class="btn btn-primary" onclick="@CallCSMethod">Call C# Method</button>
<br />
<p>@message</p>
We’ve created a button that will invoke the “CallCSMethod” method on the “onclick” event. The value of the variable message is determined by the button click.
Adding Link to Navigation menu
Open \BlazorJSDemo\Shared\NavMenu.cshtml page and put the following code into it. This will include a link to our JSDemo.cshtml page in the navigation menu.
<div class="top-row pl-4 navbar navbar-dark">
    <a class="navbar-brand" href="">BlazorJSDemo</a>
    <button class="navbar-toggler" onclick=@ToggleNavMenu>
        <span class="navbar-toggler-icon"></span>
    </button>
</div>

<div class=@(collapseNavMenu ? "collapse" : null) onclick=@ToggleNavMenu>
    <ul class="nav flex-column">
        <li class="nav-item px-3">
            <NavLink class="nav-link" href="" Match=NavLinkMatch.All>
                <span class="oi oi-home" aria-hidden="true"></span> Home
            </NavLink>
        </li>
        <li class="nav-item px-3">
            <NavLink class="nav-link" href="counter">
                <span class="oi oi-plus" aria-hidden="true"></span> Counter
            </NavLink>
        </li>
        <li class="nav-item px-3">
            <NavLink class="nav-link" href="fetchdata">
                <span class="oi oi-list-rich" aria-hidden="true"></span> Fetch data
            </NavLink>
        </li>
         <li class="nav-item px-3">
            <NavLink class="nav-link" href="demo">
                <span class="oi oi-list-rich" aria-hidden="true"></span> JS Demo
            </NavLink>
        </li>
    </ul>
</div>

@functions {
    bool collapseNavMenu = true;

    void ToggleNavMenu()
    {
        collapseNavMenu = !collapseNavMenu;
    }
}
Execution demo
Navigate to View >> Integrated Terminal to open the terminal window.
To start the application, type the command dotnet run. Please refer to the image below.
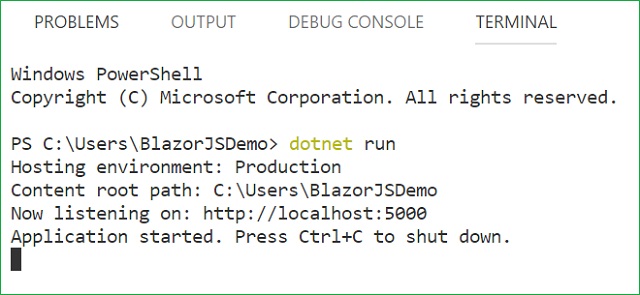
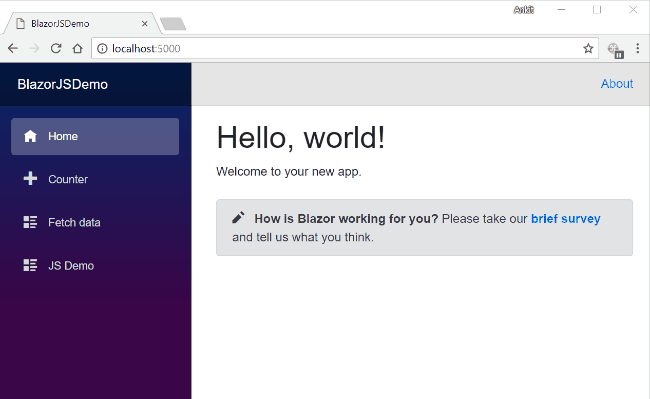
You can see that the application is listening at http://localhost:5000. Open any browser on your computer and go to this URL. You can view the application’s home page. To access the JSdemo view, select the “JS Demo” link from the navigation menu. The URL has “/demo” appended to it.
To invoke the JS functions and C# method, click the buttons.
Refer to the GIF below.
Conclusion
In this article, we learned about JavaScript Interop. We’ve also created a sample application that shows how JavaScript Interop works with the Blazor framework.
For your information, ASPHostPortal hosting support latest Asp.net core and blazor. Customers can use the latest Asp.net core when you signed up with us. Our fully featured hosting already includes
- Easy setup
- 24/7/365 technical support
- Top level speed and security
- Super cache server performance to increase your website speed
- Top 9 data centers across the world that you can choose.


Andriy Kravets is writer and experience .NET developer and like .NET for regular development. He likes to build cross-platform libraries/software with .NET.