This blog post demonstrates how to embed the Telerik HTML5 Report Viewer (or viewer for short) and host the Telerik Reporting REST Service (or service for short) in your ASP.NET Core 3+ web application.
What is the HTML5 Report Viewer?
The viewer’s purpose is to display report documents on a web page. Under the hood, the viewer is a custom jQuery-based widget. Widgets are feature-rich, stateful plugins that have a full life cycle, along with methods and events. The layout of the viewer is stored in an HTML template that supports mobile and desktop browsers and is fully customizable.
What is the Reporting REST Service?
The viewer cannot do the processing and rendering work by itself and this is where the Reporting REST Service comes in. The service wraps the Report Engine and exposes its functionality over HTTP, so the viewer can access it. A common scenario for the viewer-service interaction described in a high-level of abstraction would be:
- The viewer requests a report document by providing the report definition’s unique identifier (for example, the file name MyReport.trdx)
- The service searches for the requested report definition and instructs the Report Engine to process and render it to an HTML5 report document
- The service returns the produced result to the viewer
- The viewer displays the report document to the user
For convenience, the service can also provide all the required HTML5 Report Viewer widget resources – JavaScript, CSS, and HTML template files.
How to Host the Reporting REST Service in Your ASP.NET Core Web Application?
As the viewer cannot function without the service, let’s review the steps to host the service first. For this post, I’ll assume that the project displaying reports is also the service project. That way I don’t have to configure Cross-Origin Resource Sharing (CORS). However, if you need to use separate projects in your solution, here is a very good article that explains how to enable CORS in ASP.NET Core.
If you don’t have an existing ASP.NET Core web application, follow these steps to create one:
- Start Visual Studio 2019
- Open File > New > Project…
- Select ASP.NET Core Web Application and click Next
- Enter your Project name and click Create
- Select .NET Core and ASP.NET Core 3.1 for the framework version
- Select the Web Application template and click Create
To host the Reporting REST Service in this project or another existing project, add the NuGet package Telerik.Reporting.Services.AspNetCore from the Telerik NuGet feed at https://nuget.telerik.com/nuget.
The service package will add its own dependencies to the project, such as Microsoft.AspNet.Core.Mvc.NewtonsoftJson. To activate the NewtonsoftJson package dependency, open Startup.cs and change the services.AddRazorPages line in the ConfigureServices method to:
services.AddRazorPages().AddNewtonsoftJson();
Right below this line add the configuration code for a minimal Reporting REST Service implementation (add appropriate usings as well):
services.TryAddSingleton<IReportServiceConfiguration>(
    sp => new ReportServiceConfiguration
    {
        Storage = new FileStorage(),
        ReportSourceResolver = new UriReportSourceResolver(
            System.IO.Path.Combine(
                sp.GetService<IWebHostEnvironment>().ContentRootPath,
                "Reports"))
    });
The Storage configuration above specifies that the service will save its internal state objects and temp files on the file system. Other storage options are also available.
The ReportSourceResolver option instructs the service to search for report definition files inside the Reports application folder.
The Reports folder does not exist yet, but you’ll create it in a moment since you’ll need to add report definition files there. I grabbed my report definition (Report Catalog.trdp) from the Telerik Reporting installation folder – C:\Program Files (x86)\Progress\Telerik Reporting R2 2020\Report Designer\Examples, but you can create a new one using the Standalone Report Designer. Once you have a report definition, you need to add it to your project:
- Create a folder in the root of your project called Reports
- Copy your report definition file into it
Also inside the ConfigureServices method, make sure the application is configured for API controllers by adding:
services.AddControllers();
And map those controller endpoints by adding the following line (endpoints.MapControllers();) to the Configure method:
app.UseEndpoints(endpoints =>
{
    endpoints.MapRazorPages();
    endpoints.MapControllers();
});
The next step is to create the actual ReportsController class which is the essence of the service:
- Add a new Controllers folder to the root of the project
- Right-click the Controllers folder and select Add > Controller…
- Select the API Controller – Empty template and click Add
- Name the new controller ReportsController.cs and click Add
Change the content of the new controller to:
using Microsoft.AspNetCore.Mvc;
using Telerik.Reporting.Services;
using Telerik.Reporting.Services.AspNetCore;

namespace AspNetCoreReportViewerSample.Controllers
{
    [Route("api/reports")]
    public class ReportsController : ReportsControllerBase
    {
        public ReportsController(IReportServiceConfiguration reportServiceConfiguration)
            : base(reportServiceConfiguration)
        {
        }
    }
}
The string api/reports inside the Route attribute maps the URL that will be used to access this controller. The service is now ready and waiting to serve your reports.
There is a variety of other configuration options, including how to use a configuration file with connection strings, and more.

How to Request a Report Document and Display it in the HTML5 Report Viewer?
With the Web Application project template that I chose earlier my application’s landing page is Pages/Index.cshtml. This page uses a common layout stored in Pages/Shared/_Layout.cshtml. The common layout has a reference to jQuery by default. If your application does not reference jQuery yet, you can link it from the jQuery CDN.
To have a neat organization of the common layout page, add a custom section to the head element of _Layout.cshtml which you’ll use later to add the viewer’s Kendo UI themes:
<head>
    ...

    @RenderSection("Head", required: false)
</head>
Inside Pages/Index.cshtml you need a div element to hold the viewer. This element should have a unique id attribute value, which will be later used in the viewer’s JavaScript. It is also required to set the div element’s dimensions via CSS file or inline style, or the viewer will not be visible on the page:
<div id="reportViewer1" style="width:940px; height:1300px">
</div>
Add links to the desired Kendo UI theme in the custom Head section prepared earlier:
@section Head {
    <link href="https://kendo.cdn.telerik.com/2020.1.114/styles/kendo.common.min.css" rel="stylesheet" />
    <link href="https://kendo.cdn.telerik.com/2020.1.114/styles/kendo.default.min.css" rel="stylesheet" />
}
Finally, add a link to the viewer widget’s JavaScript file inside a Scripts section and call the telerik_ReportViewer method.
The Scripts section will help insert the viewer script after the reference to jQuery inside the common layout file. The viewer will then be able to find its jQuery dependency and extend the global jQuery object instance with the telerik_ReportViewer method.
telerik_ReportViewer is a jQuery extension method that creates and configures the viewer object. In this example, the viewer object is created inside the #reportViewer1 div element. The serviceUrl matches the URL of the ReportsController route and the report option value is the file name of the report definition:
@section Scripts {
    <script src="/api/reports/resources/js/telerikReportViewer"></script>

    <script type="text/javascript">
        $(document).ready(function () {
            $("#reportViewer1")
                .telerik_ReportViewer({
                    serviceUrl: "api/reports",
                    reportSource: {
                        report: "Report Catalog.trdp"
                    },
                    scaleMode: telerikReportViewer.ScaleModes.SPECIFIC,
                    scale: 1.0
                });
        });
    </script>
}
Above is the minimum required configuration of the viewer object. For a full list of configuration options, methods, and events, head to the HTML5 Report Viewer documentation.
This is how the final Index.cshtml looks:
@page
@model IndexModel
@{
    ViewData["Title"] = "Home page";
}

@section Head {
    <link href="https://kendo.cdn.telerik.com/2020.1.114/styles/kendo.common.min.css" rel="stylesheet" />
    <link href="https://kendo.cdn.telerik.com/2020.1.114/styles/kendo.default.min.css" rel="stylesheet" />
}

<div class="text-center">
    <div id="reportViewer1" style="width:940px; height:1300px">
    </div>
</div>

@section Scripts {
    <script src="/api/reports/resources/js/telerikReportViewer"></script>

    <script type="text/javascript">
        $(document).ready(function () {
            $("#reportViewer1")
                .telerik_ReportViewer({
                    serviceUrl: "api/reports",
                    reportSource: {
                        report: "Report Catalog.trdp"
                    },
                    scaleMode: telerikReportViewer.ScaleModes.SPECIFIC,
                    scale: 1.0
                });
        });
    </script>
}
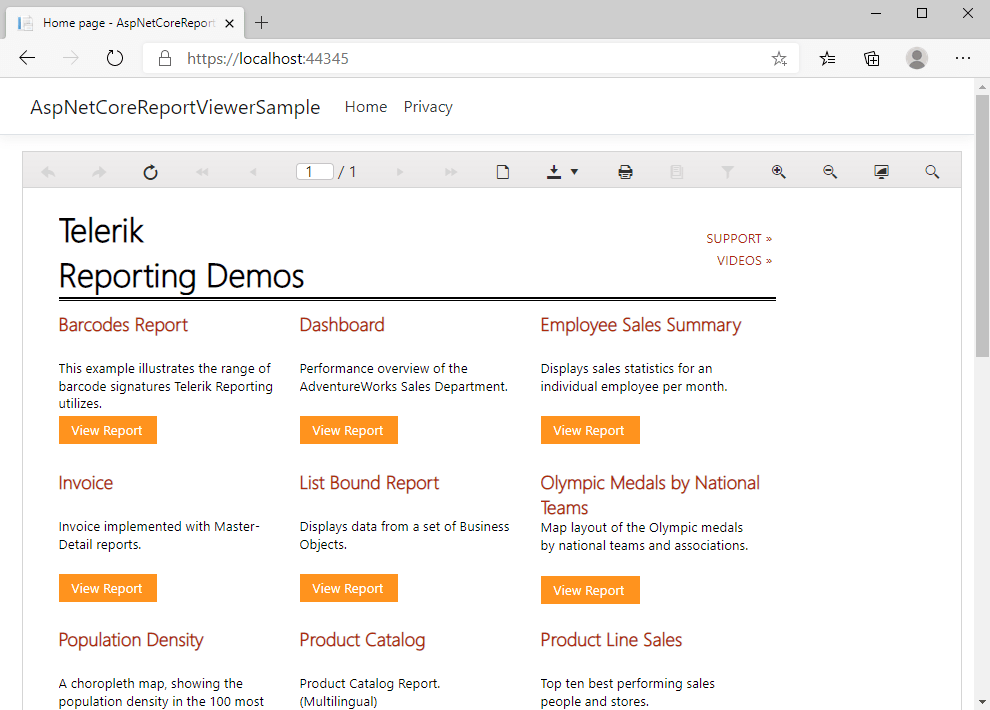
What’s left is to press F5 in Visual Studio and watch how the HTML5 Report Viewer will request the Report Catalog.trdp report from the service. The service will instruct the Report Engine to render the report definition in HTML5 format and return it to the viewer as a report document. If all goes as expected, you’ll find yourself looking at a similar screen:

Conclusion
I hope article above help you to get reports from a Telerik Reporting REST Service and have them display in ASP.NET Core applications.
Andriy Kravets is writer and experience .NET developer and like .NET for regular development. He likes to build cross-platform libraries/software with .NET.


