SQL Server Agent allows us to create jobs and assign any number of schedules to them. This allows for great flexibility when deciding when jobs should run. Over time, as the number of jobs and schedules increase on a given SQL Server, it can become challenging to fully understand when and how often jobs run during a given span of time.
A common need is to be able to quickly generate a list of jobs that will run during a given time frame. Knowing what jobs run when (and how often) can allow us to better plan maintenance events and ensure we do not miss anything important when SQL Server Agent is not running.
Our goal in this article will be steps to run schedule backup using SQL Agent in SQL Server Management Studio.
SQL Agent Components
SQL Agent consist of four core components:
- Jobs – A SQL Agent job is the specified action or series of actions that the SQL Server Agent will execute.
- Schedules – The SQL Agent schedule specifies when a job will run. Multiple jobs can have the same schedule.
- Alerts – A SQL Agent alert is an automatic response to a specific system event.
- Operators – A SQL Agent operator defines contact information for the person who is responsible for the maintenance of a SQL Server instance.
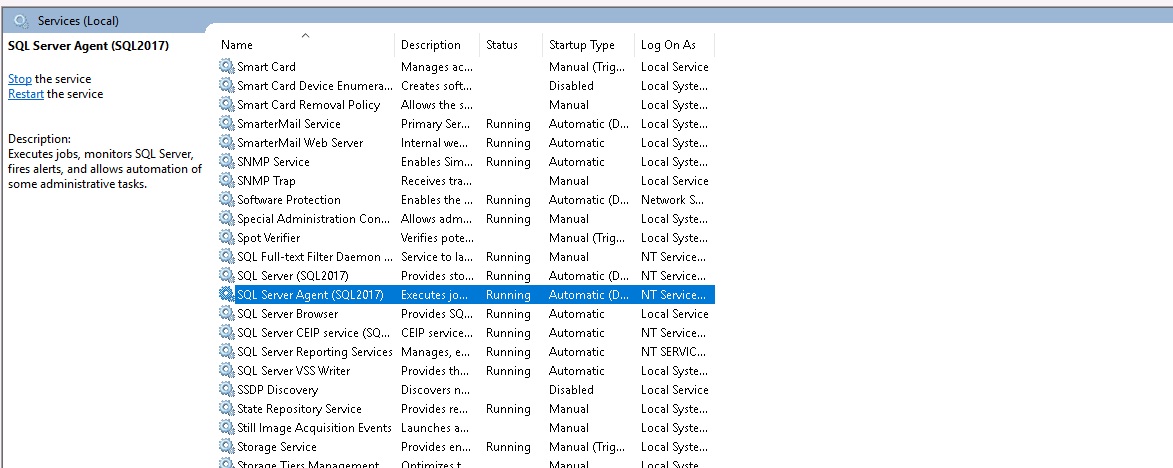
1. Make Sure Your Start Your SQL Agent Service
To start the SQL Server Agent simply go to services and then find SQL Server Agent. You can see on the figure below:
2. Login to Your SQL Server and Create SQL Agent Job
After the SQL Agent has been started you can create new SQL Agent jobs by opening SQL Server Management Studio (SSMS) and then right clicking on the SQL Agent node. Select New Job from the context menu to display the New Job dialog that you can see in figure below
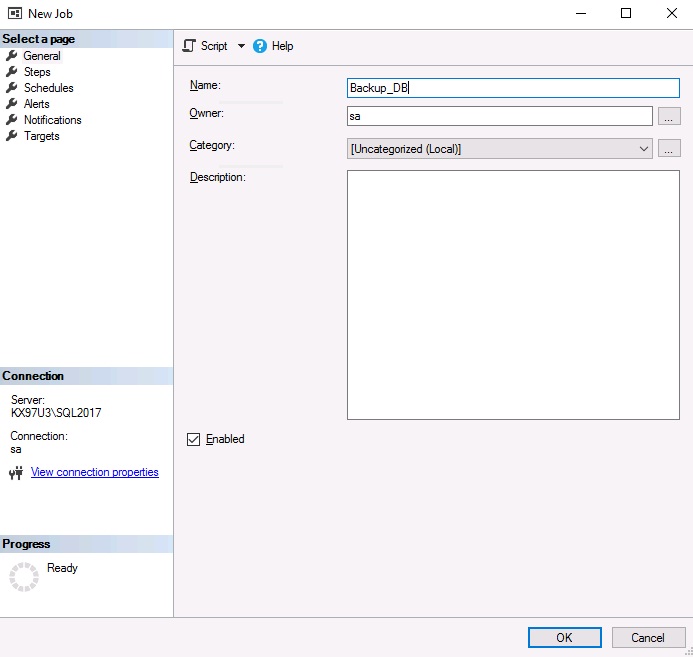
The General page essentially allows you to give your SQL Agent job a name and an optional description that describes what the job does.
Clicking on the Steps page enables you to define one of more job steps or actions that the SQL Agent job will perform. When the Steps page is initially displayed it will be empty. You need to click on the New button to add a job step which will display the New Job Step dialog that you can see in figure below.
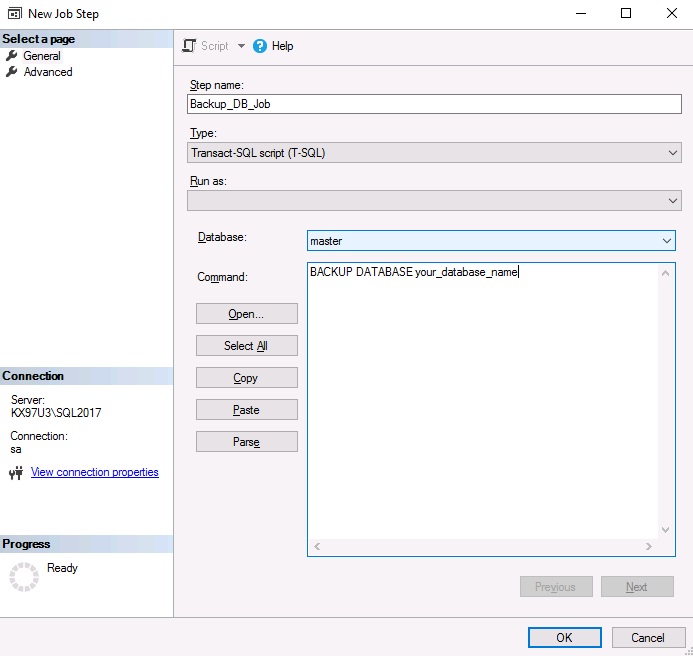
The New Job Step dialog is the core of the SQL Agent job as it contains the actual commands that will be run by the job. In Figure 3, you can see that a single job step consisting of the T-SQL BACKUP DATABASE command has been created. Job steps can execute any of the following:
- ActiveX Script
- PowerShell
- Replication Distributor
- Replication Merge
- Replication Queue Reader
- Replication Snapshot
- SQL Server Analysis Services Command
- SQL Server Analysis Services Query
- SQL Server Integration Services Package
- Transact SQL script (T-SQL)
You can change the security context that the job runs under using the Run as dropdown. The Open button enables you to open a T-SQL file. The Copy and Paste buttons enable you to edit portions of the command text box. The Parse button enables you to parse the command and validate the syntax of the command.
You also have the option to control what happens on the success or failure of the job step by clicking on the Advanced page. The default action for a successful job step is to continue with the next step. You also have the options to quit the job and report a success or quit the job and report a failure. Likewise, if the job step has an error and it fails, then the default action is to quit the job and report a failure. You also have the options to continue on to the next job step or to quit the job and report a success.
After you’ve entered the command you can click the OK button to save the job step and return to the Steps page of the New Job dialog. At this point, you can optionally enter more job steps. You can also edit or delete the existing job steps.
3. Schedule Your DB Job
After you’ve created the job and defined the job steps that will be executed the next step is typically to create a schedule for the job.
Clicking on the Schedules page enables you to setup a scheduled run time for the SQL Agent job. Like the Steps page, when the Schedules page is initially displayed it will be empty. Clicking on the New button will display the New Job Schedule dialog that you can see in figure below.
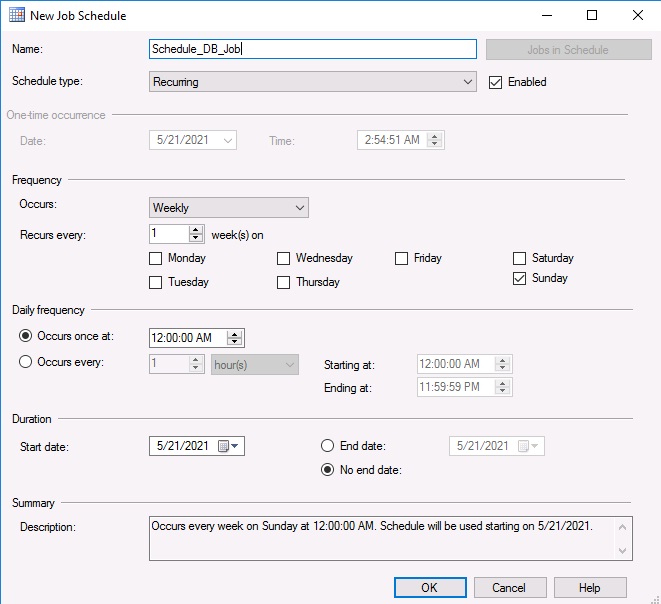
To setup a new schedule you first need to give the schedule a name. Then you select the type of schedule you want. Most of the time you will want the schedule to be recurring but you can also set it to run whenever the SQL Agent starts, whenever the CPU becomes idle or to run as a one time job. For recurring jobs you also need to set the frequency for the schedule to be run. After you’ve setup the schedule the job is ready to run.
Running and Managing SQL Agent Jobs
You can use SSMS to manage your SQL Agent jobs by expanding the SQL Agent node and then right clicking on the job that you want to manage. From the context menu you can start jobs at a specific job step, script out the job and view the job’s run history. You can also use the context menu to delete or rename any of the jobs. If you want to display the status of any of the scheduled jobs you can open up the Job Activity Monitor. The Activity Monitor shows the all the scheduled jobs as well as their status, the last run date and the next run date.
Conclusion
Being able to quickly map out all expected job runs for a given time period can be a huge time saver. We can predict future SQL Server Agent schedules, more confidently plan maintenance, and respond to outages with a better knowledge of what was missed.

Javier is Content Specialist and also .NET developer. He writes helpful guides and articles, assist with other marketing and .NET community work

