
I’ll demonstrate in this post how to use ASP.NET Core’s dynamic policies in conjunction with user permissions to secure your API endpoints.
TL;DR
I explained in this post how to easily authorize API endpoints using the following code: [PermissionAuthorize(Permissions.Read)]. Everything functions behind the scenes by using a custom IAuthorizationPolicyProvider to leverage dynamic policies.
Policies recap
Everything in ASP.NET Core authorization revolves around policies, as we discovered in the previous post. I demonstrated a few instances of policy-backed, role-based, and claims-based authorization.
While these options are a great place to start when adding basic authorization to your APIs, each has certain drawbacks.
The requirement to register them beforehand, during the call to AddAuthorization, seems to be the largest restriction in my opinion.
Assume that your system has CRUD permissions (as we saw in the first post). In the event that you adhere to the “classic” policies, you would have to:
// Startup.cs
services.AddAuthorization(options =>
{
    options.AddPolicy("Create", policy => policy.RequireAssertion(context =>
        context.User.HasClaim(c => c.Type == "permissions" && c.Value == "Create")));

    options.AddPolicy("Read", policy => policy.RequireAssertion(context =>
        context.User.HasClaim(c => c.Type == "permissions" && c.Value == "Read")));

    options.AddPolicy("Update", policy => policy.RequireAssertion(context =>
        context.User.HasClaim(c => c.Type == "permissions" && c.Value == "Update")));

    options.AddPolicy("Delete", policy => policy.RequireAssertion(context =>
        context.User.HasClaim(c => c.Type == "permissions" && c.Value == "Delete")));
})

// controller
[HttpPost]
[Authorize(Policy = "Create")] // use our policy here
public IActionResult Create()
{
    return Ok("Something was created");
}
That will definitely not scale well since you have to define them statically. What if you had a hundred policies? That much code there isn’t very good, is it?
The official documents provide some compelling arguments for why they might not be sufficient for you.
- Providing policy evaluation through the use of an outside service.
- Utilizing a wide variety of policies (for various room numbers or ages, for instance), so adding an AuthorizationOptions to every single authorization policy is pointless.Call AddPolicy.
- Establishing policies dynamically through another method or using data from an external data source (such as a database) to create policies at runtime. https://docs.microsoft.com/en-us/aspnet/core/security/authorization/iauthorizationpolicyprovider?view=aspnetcore-5.0
In a “real-world” app, point 1 above may very well occur. In order to assess permission, we frequently need to get in touch with a database or another service, which is impossible when using the traditional method.
Fortunately, ASP.NET Core’s authorization architecture is sufficiently adaptable to handle increasingly complicated situations. However, before we get started, allow me to briefly outline our ultimate goals for this whole process.
What are our goals?
Let’s first examine the ultimate goal before I discuss how to solve the problem. I think considering the requirements will make it clearer to you where we want to take this.
Now let’s move on to the CRUD example. What I (and I assume you) would like is:
- Devs are used to the
[Authorize]attribute. So I want to use that in my endpoints, telling it which permission is required. - Have the option to pass multiple permissions, and specify
ORorAND(requiring both, or any). - Not need to define them beforehand. They should be created automagically.
Like so:
[PermissionAuthorize(PermissionOperator.Or, Permissions.Create, Permissions.Update)]
[HttpPost]
public IActionResult Create()
{
    return Ok("I'm such a creator!");
}
Yes, it does look good. Next, let’s see if we can accomplish that. 😎
What do we require?
Policies must be made “on-the-fly” in order to accomplish our goals. Recall that we always require one in the end.
I explained requirements, policies, and authorization handlers in detail in my previous post. To accomplish this, we will now require all of those.
Let’s get started.
Requirements
Our example above had two things: Operator and Permission(s).
[PermissionAuthorize(PermissionOperator.Or, Permissions.Create, Permissions.Update)]
[PermissionAuthorize(PermissionOperator.Or, Permissions.Create, Permissions.Update)]
The kind of data that will include such information is required. Subsequently, it is injected into the handler, which makes decisions with it.
This is what we require:
using System;
using Microsoft.AspNetCore.Authorization;

namespace AuthUtils.PolicyProvider
{
    public class PermissionRequirement : IAuthorizationRequirement
    {
        public static string ClaimType => AppClaimTypes.Permissions;

        // 1 - The operator
        public PermissionOperator PermissionOperator { get; }

        // 2 - The list of permissions passed
        public string[] Permissions { get; }

        public PermissionRequirement(
            PermissionOperator permissionOperator, string[] permissions)
        {
            if (permissions.Length == 0)
                throw new ArgumentException("At least one permission is required.", nameof(permissions));

            PermissionOperator = permissionOperator;
            Permissions = permissions;
        }
    }
}
The IAuthorizationRequirement marker interface must be implemented by the requirements. It can receive data from you, just as I did previously. In this instance, we require 1 - the operator and 2 - the permissions list. The ClaimType, which is always permissions, is another option.
Authorization Handlers
Grant of permission It is the responsibility of handlers to assess requirements and, in the end, “mark” them as pass or fail. One or more requirements may be “handled” by handlers.
It suffices in our situation that our handler only handles our PermissionRequirement. As a result, we must inherit from the generic abstract class AuthorizationHandler<T>, where T represents the type of requirement.
These are a few details about them:
- If inheriting from the base
AuthorizationHandler<T>class, the handler needs to override theHandleRequirementAsyncmethod. This method receives two parameters: anAuthorizationHandlerContextand the instance of the requirement, in this case, ourPermissionRequirement. - Handlers don’t need to return anything. If the logic tells that the user has permission, we need to call
context.Succeed(requirement). That is the only thing necessary to authorize the request. - Optionally, you can also call
context.Fail()to ensure failure. Calling it will ensure that the request is not authorized, even if other handlers callcontext.Succeed. - You can inject DI services into handlers! That is super useful because, for example, you can inject your
DbContextand get data to help in your authorization logic.
Alright, enough talking. Our PermissionRequirement handler appears as follows:
using System.Threading.Tasks;
using Microsoft.AspNetCore.Authorization;

namespace AuthUtils.PolicyProvider
{
    public class PermissionHandler : AuthorizationHandler<PermissionRequirement>
    {
        protected override Task HandleRequirementAsync(
            AuthorizationHandlerContext context, PermissionRequirement requirement)
        {
            if (requirement.PermissionOperator == PermissionOperator.And)
            {
                foreach (var permission in requirement.Permissions)
                {
                    if (!context.User.
                        HasClaim(PermissionRequirement.ClaimType, permission))
                    {
                        // If the user lacks ANY of the required permissions
                        // we mark it as failed.
                        context.Fail();
                        return Task.CompletedTask;
                    }
                }

                // identity has all required permissions
                context.Succeed(requirement);
                return Task.CompletedTask;
            }

            foreach (var permission in requirement.Permissions)
            {
                if (context.User.HasClaim(PermissionRequirement.ClaimType, permission))
                {
                    // In the OR case, as soon as we found a matching permission
                    // we can already mark it as Succeed
                    context.Succeed(requirement);
                    return Task.CompletedTask;
                }
            }

            // identity does not have any of the required permissions
            context.Fail();
            return Task.CompletedTask;
        }
    }
}
We receive an instance of a PermissionRequirement and then it’s just looking if the logged-in user has the proper permissions. If we see the user has them, we call context.Succeed(requirement);. If not, we want to ensure it fails, so we call context.Fail();.
Here is where your primary authorization logic resides, I would like to stress.
I used
context.Fail()because I want to be absolutely sure that if the user does not have the required permissions, the request should not be authorized.
Let’s look at the Authorize attribute next.
Authorize attribute
We now have the handler and the requirement. The “business logic” aspect of authorization consists of those two.
The “plumbing code” now begins, with our custom authorize attribute coming first.
High level, there are two uses for the custom attribute. to annotate the endpoint and obtain the necessary permissions. (Metadata)
This is how it appears:
using System;
using Microsoft.AspNetCore.Authorization;

namespace AuthUtils.PolicyProvider
{
    public enum PermissionOperator
    {
        And = 1, Or = 2
    }

    public class PermissionAuthorizeAttribute : AuthorizeAttribute
    {
        internal const string PolicyPrefix = "PERMISSION_";
        private const string Separator = "_";

        public PermissionAuthorizeAttribute(
            PermissionOperator permissionOperator, params string[] permissions)
        {
            // E.g: PERMISSION_1_Create_Update..
            Policy = $"{PolicyPrefix}{(int)permissionOperator}{Separator}{string.Join(Separator, permissions)}";
        }

        public PermissionAuthorizeAttribute(string permission)
        {
            // E.g: PERMISSION_1_Create..
            Policy = $"{PolicyPrefix}{(int)PermissionOperator.And}{Separator}{permission}";
        }

        public static PermissionOperator GetOperatorFromPolicy(string policyName)
        {
            var @operator = int.Parse(policyName.AsSpan(PolicyPrefix.Length, 1));
            return (PermissionOperator)@operator;
        }

        public static string[] GetPermissionsFromPolicy(string policyName)
        {
            return policyName.Substring(PolicyPrefix.Length + 2)
                .Split(new[] {Separator}, StringSplitOptions.RemoveEmptyEntries);
        }
    }
}
That is a lot of code. Let’s make some sense of it:
1 – We have an enum which is a nice way to pass AND or OR as the operator.
2 – We inherit from the traditional AuthorizeAttribute.
3 – Next, you can see two internal strings PolicyPrefix and Separator. Hold them in your mind for a sec.
4 – Then we have our constructors. One receives the operator + permissions. The other just one permission.
With this custom attribute we can do this:
// multiple permissions
[PermissionAuthorize(PermissionOperator.Or, Permissions.Create, Permissions.Update)]

// single permission
[PermissionAuthorize("Create")]
You’ll see that we set a property named Policy in the ctor. It is imperative that we set this as it originates from the base class. Policies need to be given names. Recall the previous example:
// Startup.cs
services.AddAuthorization(options =>
{
    // Will set the Policy = 'Create'
    options.AddPolicy("Create", policy => policy.RequireAssertion(context =>
        context.User.HasClaim(c => c.Type == "permissions" && c.Value == "Create")));
})

// controller
[HttpPost]
[Authorize(Policy = "Create")] // we use the policy name here
public IActionResult Create()
{
    return Ok("Something was created");
}
The term “dynamic” must be used for our policy because we don’t want to define it statically.
You can choose your own path here, but this is what I did: <prefix><operator><separator><permissions>. The Policy property ultimately evaluates to something like this:
// Policy = PERMISSION_2_Create_Update
[PermissionAuthorize(PermissionOperator.Or, Permissions.Create, Permissions.Update)]

// Policy = PERMISSION_1_Create
[PermissionAuthorize("Create")]
This will be crucial in the last part of the puzzle, our policy provider. Speaking of which…
Policy Provider
Let’s review a bit:
- We have the
PermissionRequirementwhich is where we have the permission(s) and/or operator. - We have the
PermissionHandlerwhich is where we receive our requirement instance and do our authz logic - We have the
PermissionAuthorizeAttributewhich is what we use to annotate our endpoints with the proper permissions
You might be wondering now: Where is the PermissionRequirement created? I pass the permissions to our PermissionAuthorizeAttribute which, becomes a glorified string, and that’s it. I’m not getting it..? 🤔
The answer to that is this: IAuthorizationPolicyProvider.
ASP.NET Core ships with one implementation of the IAuthorizationPolicyProvider interface : DefaultAuthorizationPolicyProvider.
The job of the DefaultAuthorizationPolicyProvider is to provide policies to the authorization framework. If we take a look at the default implementation, it has a method called GetPolicyAsync with the following code:
public virtual Task<AuthorizationPolicy?> GetPolicyAsync(string policyName)
{
    // MVC caches policies specifically for this class, so this method MUST return the same policy per
    // policyName for every request or it could allow undesired access. It also must return synchronously.
    // A change to either of these behaviors would require shipping a patch of MVC as well.
    return Task.FromResult(_options.GetPolicy(policyName));
}
View the param policyName here. That is the use case for the Policy string that we previously constructed. The method looks for a policy with _options.GetPolicy, in the default implementation.The policies that are statically defined inside AddAuthorization will be examined by GetPolicy.
Our policies are not statically defined, so the default implementation will not find them. We must produce our own:
using System;
using System.Threading.Tasks;
using Microsoft.AspNetCore.Authorization;
using Microsoft.Extensions.Options;

using static AuthUtils.PolicyProvider.PermissionAuthorizeAttribute;

namespace AuthUtils.PolicyProvider
{
    public class PermissionAuthorizationPolicyProvider : DefaultAuthorizationPolicyProvider
    {
        public PermissionAuthorizationPolicyProvider(
            IOptions<AuthorizationOptions> options) : base(options) { }

        public override async Task<AuthorizationPolicy?> GetPolicyAsync(
            string policyName)
        {
            if (!policyName.StartsWith(PolicyPrefix, StringComparison.OrdinalIgnoreCase))
                return await base.GetPolicyAsync(policyName);

            // Will extract the Operator AND/OR enum from the string
            PermissionOperator @operator = GetOperatorFromPolicy(policyName);

            // Will extract the permissions from the string (Create, Update..)
            string[] permissions = GetPermissionsFromPolicy(policyName);

            // Here we create the instance of our requirement
            var requirement = new PermissionRequirement(@operator, permissions);

            // Now we use the builder to create a policy, adding our requirement
            return new AuthorizationPolicyBuilder()
                .AddRequirements(requirement).Build();
        }
    }
}
Now, imagine that we have a policyName of PERMISSION_2_Create_Update:
1 – We inherit from the default implementation so we don’t have to reinvent the wheel
2 – We override the method I mentioned above. The first thing we do is check if the policyName starts with our defined prefix PERMISSION. If it doesn’t, we just fall back to the original method, loading from the static policies
3 – Then we create an instance of our PermissionRequirement. For that, we need the operator + list of permissions. I have helper methods to extract that from our policyName string.
4 – Finally we use the builder to create and return a policy containing our requirement!
The key takeaway from this, which the default implementation hinted at, is that the provider must always return the same policy when given a policy name. As a result, it will always return the same policy with the same requirements when given the policy name PERMISSION_2_Create_Update.
We “stringyfied” our operator and permissions inside of our attribute for this reason. all in order for our custom policy provider to use it to create dynamic requirements and policies.
We just need to register everything at this point to be finished.
Registering our custom types:
We possess every component. We just need to register them at this point for the framework to recognize them. Within ConfigureServices, we must:
services.AddAuthorization(options =>
{
    // One static policy - All users must be authenticated
    options.DefaultPolicy = new AuthorizationPolicyBuilder(JwtBearerDefaults.AuthenticationScheme)
        .RequireAuthenticatedUser()
        .Build();

    // A static policy from our previous post. This still works!
    options.AddPolicy("Over18YearsOld", policy => policy.RequireAssertion(context =>
        context.User.HasClaim(c =>
            (c.Type == "DateOfBirth" && DateTime.Now.Year - DateTime.Parse(c.Value).Year >= 18)
        )));
});

// Register our custom Authorization handler
services.AddSingleton<IAuthorizationHandler, PermissionHandler>();

// Overrides the DefaultAuthorizationPolicyProvider with our own
services.AddSingleton<IAuthorizationPolicyProvider, PermissionAuthorizationPolicyProvider>();
That’s it. Now we can start adding permissions to our endpoints!
[PermissionAuthorize(Permissions.Read)]
[HttpGet]
public IActionResult Get()
{
    return Ok("We've got products!");
}

[PermissionAuthorize(PermissionOperator.And, Permissions.Update, Permissions.Read)]
[HttpPut]
public IActionResult Update()
{
    return Ok("It's good to change things sometimes!");
}
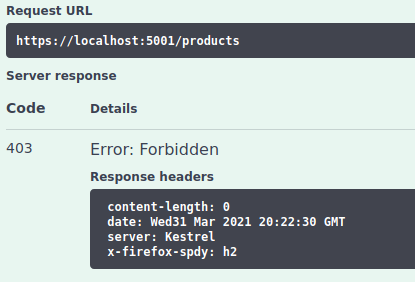
As anticipated, if we attempt to submit a request without the required authorization, we receive a 403 - Forbidden error.
Conclusion
Back in the first post of the series we saw how to create a custom ClaimsIdentity that contained all the user’s permissions as Claim. In the second post, I took you on a deep dive into the types and architecture of authorization in ASP.NET Core. These two established the foundation for us.
In this post, we came full circle. We created a powerful, yet simple structure (only 4 new files!) that can be used to authorize your APIs. You saw how to create your own Requirement, AuthorizatioHandler, AuthorizeAttribute and finally the PolicyProvider.
This method allows you to achieve very fine-grained authorization in your endpoints without compromising ease of use. Manual policy definitions are no longer necessary. All we have to do is apply permissions to the well-known [Authorize] attribute, and it functions flawlessly.
My favorite aspect of this solution is this. Although it may appear overwhelming at first, the essence of it is not that difficult to understand. After it’s finished, you can just concentrate on developing your API and working efficiently. In my opinion, the highlights are:
- Protecting endpoints is super easy
[PermissionAuthorize(Permissions.Read)]. - The team’s other developers don’t have to be aware of every internal detail—while it would be nice—
- The permissions needed to access an endpoint are easily visible.
- We are not going off course and creating something entirely unique. All we are doing is exploiting the flexibility and well-thought-out API design of the framework.
- It is simple to check if your endpoints have the required permissions and fully testable.
Thanks for reading and I hope this was useful to you.


Andriy Kravets is writer and experience .NET developer and like .NET for regular development. He likes to build cross-platform libraries/software with .NET.

