In this post, I will advise how to make your ASP.NET Core always running on IIS. This ASP.NET Core web application which hosts a background task via the IHosedService interface.
If you have an ASP.NET or an ASP.NET core which hosts a background job that needs to always run, want to preload the application for performance instead of waiting for the initial request to hit the app, or just get some tips on IIS, then read on.
Application does not auto start and goes into idle
The ASP.NET core module handles requests for an ASP.NET core application and manages the process under which the application runs. Per the documentation, the module does not start the process for the ASP.NET core app until it receives an initial HTTP request.
The module starts the process for the ASP.NET Core app when the first request arrives and restarts the app if it crashes. This is essentially the same behavior as seen with ASP.NET 4.x apps that run in-process in IIS that are managed by the Windows Process Activation Service (WAS)
As the behavior of an ASP.NET core module is similar to the WAS, the module also terminates the application it has not received a HTTP request for the application after a predefined period of time (Idle time-out). This lazy loading feature is by design to efficiently manage resources.
Keeping the app to run continuously on IIS
Do the following to keep an ASP.NET core application auto start and always run on IIS:
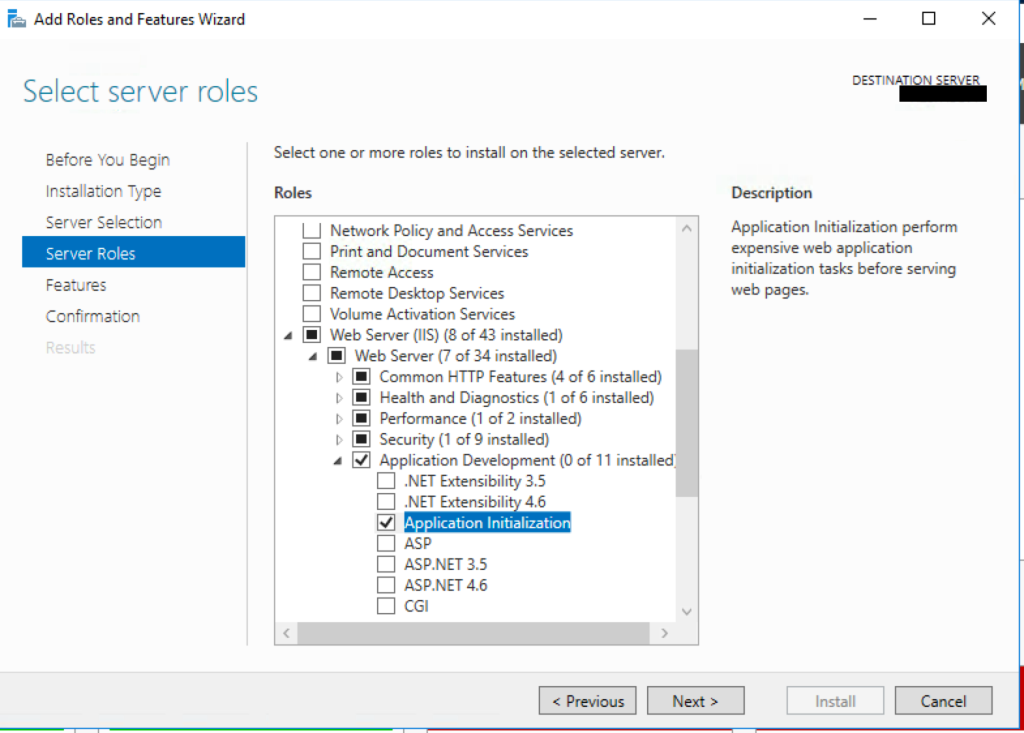
1. Install the Application Initialization Module
The application initialization module allows IIS to preemptively perform initialization tasks such as making the initial HTTP request to your application, or call your custom logic to perform whatever you desire to warm up your app.
I find it necessary to install the module even though the settings for making an application auto start and always running are there on IIS 10 which is the server I am using.
2. Configure the app pool
In IIS Manager, right click on the application pool under which the application runs and select “Advanced Settings”. Update the following values:
- Set the .NET CLR version to v4.0.
- Set start mode to “Always Running”.
- Set Idle Time-Out (minutes) to 0.
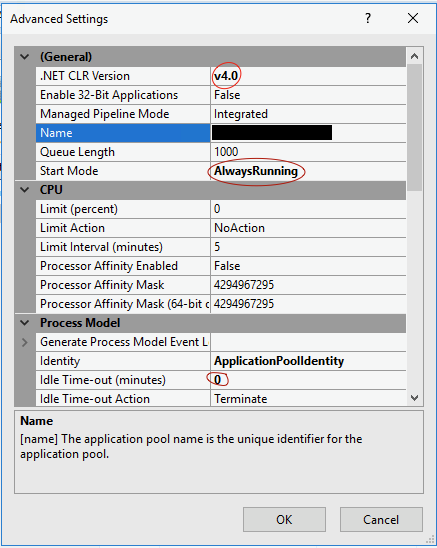
The Idle time-out value of 0 means your application never time out. IIS does not kill your application even if it has not received any HTTP request for an indefinite time.
Setting the start mode to “Always Running” tells IIS to start a worker process for your application right away, without waiting for the initial request.
The .NET CLR version is a little tricky. Normally, for an ASP.NET core application, we would set the .NET CLR version to “No Managed Code”, as suggested in the hosting ASP.NET core application on IIS documentation.
ASP.NET Core runs in a separate process and manages the runtime. ASP.NET Core doesn’t rely on loading the desktop CLR.
However, I’ve found it is necessary to set the .NET CLR version for the other settings to work ( application auto start and always run ).
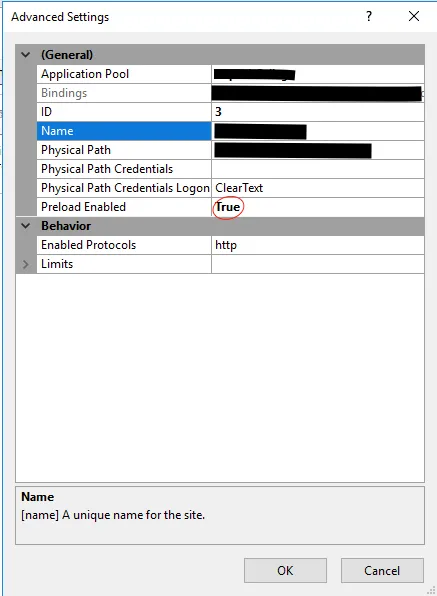
3. Configure the IIS site
In IIS Manager, right click on the site for the application, select “Manage Website” -> “Advanced Settings” and set the “Preload Enabled” value to true.
That’s it.
That’s all I have to do to keep the ASP.NET core app running on IIS. Let me know if you have questions. Your feedback is also welcome.


Javier is Content Specialist and also .NET developer. He writes helpful guides and articles, assist with other marketing and .NET community work