One of the most widely used online payment companies that can be included into web apps is Stripe.
We’ll look at how to incorporate Stripe into your.NET project so that you can take payments online.
After registering, you’ll need to complete extra steps and have your email address verified in order to enable payments on your account.
The extra actions consist of:
- Verifying your business
- Adding your bank details (so you get paid)
- Securing your account with two-step authentication
- Tax calculation
The front-end application
An ASP.NET Core Web API that can take online payments through Stripe will be put up.
We’re going to add these lines to Program.cs to make sure we can add static files in the wwwroot folder.
// Program.cs
...

var app = builder.Build();

...

app.UseDefaultFiles(); // <-- Add this line
app.UseStaticFiles(); // <-- Add this line

...

app.Run();
A static index.html file will be included, and it will be located in the wwwroot folder. This will make use of the stripe.js JavaScript file, which has a onclick event listener, to call our web application’s Web API.
The online payment with Stripe will be created by the API call. When a user creates an online payment, Stripe will provide a redirect URL so they can use their servers to complete the payment.
We will use document.location.href to reroute the user to Stripe using the redirect URL that will be returned as part of the API response.
The user will be taken back to a static confirmation.html page after placing a successful order.
The product page
Beats Flex Wireless Earphones are available on our product page for $49.99 USD. In order to purchase the product, Stripe requires you to enter your email address, so we’ve included a field and a button.
<!-- index.html -->
<!DOCTYPE html>
<html>
<head>
    <meta charset="utf-8" />
    <title>Buy our products</title>
    <link rel="stylesheet" href="https://cdn.jsdelivr.net/npm/[email protected]/dist/css/bootstrap.min.css" integrity="sha384-Gn5384xqQ1aoWXA+058RXPxPg6fy4IWvTNh0E263XmFcJlSAwiGgFAW/dAiS6JXm" crossorigin="anonymous">
</head>
<body>
    <div class="container">
        <div class="row">
            <div class="col-12">
                <h1>My shop</h1>
                <div class="container">
                    <div class="row">
                        <div class="row-12">
                            <h3>Beats Flex Wireless Earphones</h3>
                            <p>The Beats Flex Wireless Earphones offer a comfortable and versatile audio experience. With magnetic earbuds and up to 12 hours of battery life, they are ideal for everyday use.</p>
                            <p>USD 49.99</p>
                            Email: <input type="text" name="Email" />
                            <button class="btn btn-primary" type="submit" data-buy="1">Buy</button>
                        </div>
                    </div>
                </div>
            </div>
        </div>

    </div>
    <script src="/js/stripe.js"></script>
</body>
</html>

The attribute data-buy, which has a value of 1, is present in the Buy button on the page. This attribute will be used to create a onclick event listener and initiate the API call.
The product page has a JavaScript reference to /js/stripe.js in order to accomplish that.
The API call is made by the onclick event listener.
Initially, we will verify that the [data-buy] is a valid number and has a value. This number will serve as the product ID.
We’ll call the parent node from the data-buy button, a div element, assuming it’s a number. The email address input for the body of the API call is contained in this.
We can now proceed with making the API call. We’ll send a POST request to /api/stripe using JSON and the JavaScript fetch API.
The email address entered in the text box and the product ID will be in the body.
Should the API call be successful, the JSON will be obtained from the response and document.location.href will be set to the redirectUrl object property in the JSON.
// /js/stripe.js
document.querySelector('[data-buy]').addEventListener('click', async (event) => {
    if (event?.target?.getAttribute('data-buy') != '') {
        var productId = Number(event.target.getAttribute('data-buy'));

        if (isNaN(productId)) {
            throw 'Not a valid product';
        }

        var parentNode = event.target.parentNode;
        var email = parentNode.querySelector(`input[name='Email']`).value;

        await fetch('/api/stripe', {
            method: 'POST',
            headers: {
                'Content-Type': 'application/json'
            },
            body: JSON.stringify({ productId: productId, email: email })
        })
        .then(async(response) => {
            if (response?.ok) {
                var json = await response.json();

                document.location.href = json['redirectUrl'];
            }
        });
    }
});
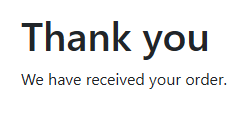
The confirmation page
Lastly, we will create a simple confirmation page, confirmation.html. A notification stating that the order has been received will be included in this.
<!-- confirmation.html -->
<!DOCTYPE html>
<html>
<head>
    <meta charset="utf-8" />
    <title>We have received your order</title>
    <link rel="stylesheet" href="https://cdn.jsdelivr.net/npm/[email protected]/dist/css/bootstrap.min.css" integrity="sha384-Gn5384xqQ1aoWXA+058RXPxPg6fy4IWvTNh0E263XmFcJlSAwiGgFAW/dAiS6JXm" crossorigin="anonymous">
</head>
<body>
    <div class="container">
        <div class="row">
            <div class="col-12">
                <h1>Thank you</h1>
                <div class="container">
                    <div class="row">
                        <div class="row-12">
                            <p>We have received your order.</p>
                        </div>
                    </div>
                </div>
            </div>
        </div>
    </div>
</body>
</html>
The Web API
A couple of models need to be created before we can configure the Web API endpoint.
Data from the request body that we are sending, including the product ID and email address, will be included in the BuyModel class. We’ll add data annotations to these fields to make sure they are validated. These annotations will confirm that the email address is valid and that the properties are required.
// BuyModel.cs
public class BuyModel
{
    [Required]
    public int ProductId { get; init; }

    [Required, EmailAddress]
    public string Email { get; init; }
}
We’ll also create a ProductModel class. This will include information about the product, including its name, ID, and cost.
// ProductModel.cs
public class ProductModel
{
    public int Id { get; }

    public string Name { get; }

    public decimal Price { get; }

    public ProductModel(int id, string name, decimal price)
    {
        Id = id;
        Name = name;
        Price = price;
    }
}
The Stripe API key
We still need to create one more class. The API key from our Stripe account will be in the StripeOptions class. This enables us to send the user to the Stripe payment page and start a Stripe checkout session.
// StripeOptions.cs
public class StripeOptions
{
    public string? ApiKey { get; init; }
}
}
How to get the Stripe API key
Make sure Test mode is enabled in the upper-right corner of your Stripe account after logging in. This guarantees that no actual money is exchanged and that only test payments are made.
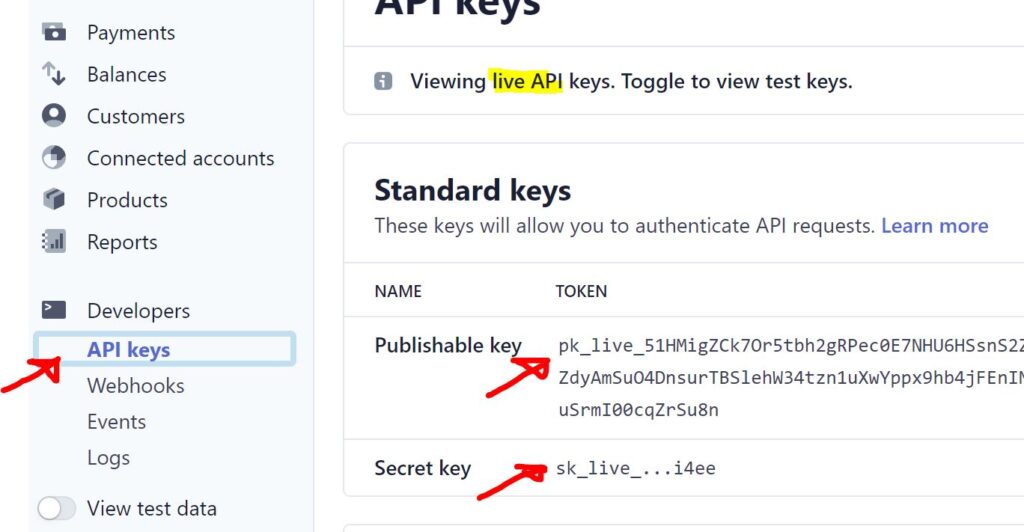
Next, select the Developers link located on the left side of the page.
You will need to disclose the Secret key after selecting the API keys tab. To copy it, click on it.
Paste the Stripe API key into your appsettings.Development.json file inside the Stripe:ApiKey key.
{
  "Logging": {
    "LogLevel": {
      "Default": "Information",
      "Microsoft.AspNetCore": "Warning"
    }
  },
  "Stripe": {
    "ApiKey": "API_KEY_HERE"
  }
}
We must add the API key to the StripeOptions class in order to make sure we can read it from the appsettings.Development.json file.
This is done in Program.cs before builder.Build() is called.
// Program.cs
var builder = WebApplication.CreateBuilder(args);

// Add services to the container.

...

builder.Services.AddOptions<StripeOptions>()
    .Bind(builder.Configuration.GetSection("Stripe")); // <-- Add this line

var app = builder.Build();

...

app.Run();
Nuget package
For usage of the API, Stripe provides a wealth of documentation.
We could use the endpoints listed in the Stripe documentation to create our own HTTP requests.
However, there is a far easier method.
To integrate Stripe payments into your.NET project, Stripe provides Stripe.net, a NuGet package. Feel free to include it in your project.
The Web API controller
Now is the time to develop the StripeController Web API controller.
We’ll create a ProductModel field named DefaultProduct inside of that. This will include information on the product.
Furthermore, we will utilize dependency injection to supply a reference for the StripeOptions.
// StripeController.cs
[Route("api/[controller]")]
[ApiController]
public class StripeController : ControllerBase
{
    private readonly ProductModel DefaultProduct
        = new(1, "Beats Flex Wireless Earphones", 49.99m);

    private readonly StripeOptions _stripeOptions;

    public StripeController(IOptionsSnapshot<StripeOptions> stripeOptionsValue)
    {
        _stripeOptions = stripeOptionsValue.Value;
    }
}
We will then construct the endpoint. We’ll pass in a BuyModel instance as the parameter so we know the product ID and email address, and the function will be called BuyAsync. We will also give it the HttpPost attribute in addition to that.
Next, we’ll verify that the request body’s ID matches the default product ID and that the ModelState is legitimate.
Obtaining the static StripeConfiguration class from the Stripe namespace and adding the API key to the ApiKey property is how we add the key.
Next, we establish a fresh StripeSession with the following information:
Mode= paymentClientReferenceId= A unique reference for the sessionSuccessUrl= The full URL (including the origin) to redirect the user if they make a successful paymentCancelUrl= The full URL (including the origin) to redirect the user back if they cancel the paymentCustomerEmail= The customer’s email addressLineItems= Information about product such as the price and quantity
Lastly, we’ll send the user back the URL in the response to take them to the Stripe payment page.
// StripeController.cs
[Route("api/[controller]")]
[ApiController]
public class StripeController : ControllerBase
{
    private readonly ProductModel DefaultProduct
        = new(1, "Beats Flex Wireless Earphones", 49.99m);

    private readonly StripeOptions _stripeOptions;

    public StripeController(IOptionsSnapshot<StripeOptions> stripeOptionsValue)
    {
        _stripeOptions = stripeOptionsValue.Value;
    }

    [HttpPost]
    public async Task<IActionResult> BuyAsync(BuyModel buyModel)
    {
        if (!ModelState.IsValid)
        {
            return BadRequest();
        }

        if (buyModel.ProductId != DefaultProduct.Id)
        {
            return BadRequest();
        }

        var product = DefaultProduct;
        var origin = $"{Request.Scheme}://{Request.Host}";

        StripeConfiguration.ApiKey = _stripeOptions.ApiKey;

        // Create Stripe checkout session
        var stripeSessionService = new SessionService();

        var stripeCheckoutSession = await stripeSessionService.CreateAsync(new SessionCreateOptions
        {
            Mode = "payment",
            ClientReferenceId = Guid.NewGuid().ToString(),
            SuccessUrl = $"{origin}/confirmation.html",
            CancelUrl = $"{origin}/index.html",
            CustomerEmail = buyModel.Email,
            LineItems = new List<SessionLineItemOptions>
            {
                new SessionLineItemOptions()
                {
                    PriceData = new SessionLineItemPriceDataOptions()
                    {
                        Currency = "USD",
                        ProductData = new SessionLineItemPriceDataProductDataOptions
                        {
                            Name = product.Name,
                        },
                        UnitAmountDecimal = product.Price * 100
                    },
                    Quantity = 1
                }
            }
        });

        return Ok(new { redirectUrl = stripeCheckoutSession.Url });
    }
}
When the user is redirected to Stripe
The user is taken to the Stripe payment screen after entering their email address and clicking the “Buy” button.
Since this is a test order, the user can fill out the form with information about the test card. You can use the test card numbers that Stripe provides you with. This contains the card numbers for various kinds of cards.

Following a successful payment, the user will be taken back to the page we initially created for confirmation.
Start accepting live payments
You will need to add an additional Stripe API key to your.NET project when you are prepared to begin taking live payments.
To obtain the Stripe API key in your Stripe account, follow the same steps again, but make sure that Test mode is turned off.
The API key you are given will differ from the one you were given during the test.


Yury Sobolev is Full Stack Software Developer by passion and profession working on Microsoft ASP.NET Core. Also he has hands-on experience on working with Angular, Backbone, React, ASP.NET Core Web API, Restful Web Services, WCF, SQL Server.