In previous article, we have written an article about how to boost ASP.NET Core application using Caching. In this article, we will advise how this caching mechanism works in ASP.NET Core.
Caching refers to the process of storing frequently used data so that those data can be served much faster for any future requests. So we take the most frequently used data and copy it into temporary storage so that it can be accessed much faster in future calls from the client. If we try to explain with a simple example, Let User-1 request some data and it takes 12-15 seconds for the server to fetch the data. While fetching, we will make a copy of our fetched data parallelly to any temporary storage. So now, when User-2 requests the same data, this time we will simply serve his from the cache and it will take only 1-2 seconds for the response as we already stored the response in our cache.
There are two important terms used with cache, cache hit and cache miss. A cache hit occurs when data can be found in a cache and a cache miss occurs when data can’t be found in the cache.
Caching significantly improves the performance of an application, reducing the complexity to generate content. It is important to design an application so that it never depends directly on the cached memory. The application should only cache data that don’t change frequently and use the cache data only if it is available.
ASP.NET Core has many caching features. But among them the two main types are,
- In-memory caching
- Distributed Caching
In-memory caching
An in-memory cache is stored in the memory of a single server hosting the application. Basically, the data is cached within the application. This is the easiest way to drastically improve application performance.
The main advantage of In-memory caching is it is much quicker than distributed caching because it avoids communicating over a network and it’s suitable for small-scale applications. And the main disadvantage is maintaining the consistency of caches while deployed in the cloud.
Implement Memory Caching in .NET Core
Suppose we have a very lightweight process which talks to another server whose data is not going to change frequently; “Our service” and “Users Service” (which returns an array of users) respectively.
Without any caching in place, we would be making multiple requests which will ultimately result in timeouts or making the remote server unnecessarily busy.
Let’s have a look at how we can improve the performance of these requests by using a simple caching implementation. .NET Core provides 2 cache implementations under Microsoft.Extensions.Caching.Memory library:
- IMemoryCache – Simplest form of cache which utilises the memory of the web server.
- IDistributedCache – Usually used if you have a server farm with multiple app servers.
In this example we will be using the IMemoryCache along with latest version of .NET Core as of yet, which is version 3.1.
These are the steps we are going to follow:
1. Create/Clone a sample .NET Core app
First, we need to inject the in-memory caching service into the constructor of the HomeController
public class HomeController : Controller
{
    private readonly IMemoryCache _cache;

    public HomeController(ILogger<HomeController> logger, IMemoryCache memoryCache)
    {
        _cache = memoryCache;
    }
Note: With .Net Core 3.1 you don’t need to specifically register the memory caching service. However, if you are using a prior version such as 2.1, then you will need to add the following line in the Startups.cs:
public class Startup
{
    public void ConfigureServices(IServiceCollection services)
    {
        services.AddMemoryCache(); // Add this line

        services.AddMvc().SetCompatibilityVersion(CompatibilityVersion.Version_2_1);
    }
}
2. Naive implementation
For the sake of this tutorial, we’ll use a free external API such as reqres.in/api/users. Let’s imagine we want to cache the response of the API. For simplicity, I have used the example code provided by Microsoft Docs.
// Code removed for brevity
...

// Look for cache key.
if (!_cache.TryGetValue(CacheKeys.Entry, out cacheEntry))
{
     // Key not in cache, so get data.
     cacheEntry = DateTime.Now;

     // Set cache options.
     var cacheEntryOptions = new MemoryCacheEntryOptions()
         // Keep in cache for this time, reset time if accessed.
         .SetSlidingExpiration(TimeSpan.FromSeconds(3));

     // Save data in cache.
     _cache.Set(CacheKeys.Entry, cacheEntry, cacheEntryOptions);
}
Explanation
The code is pretty straightforward. We first check whether we have the value for the given key present in our in-memory cache store. If not, we do the request to get the data and store in our cache. What SetSlidingExpiration does is that as long as no one accesses the cache value, it will eventually get deleted after 10 seconds. But if someone accesses it, the expiration will get renewed.
Here’s my implementation with a bit of code re-structuring:
var users = _cacheProvider.GetFromCache<IEnumerable<User>>(cacheKey);
if (users != null) return users;

// Key not in cache, so get data.
users = await func();

var cacheEntryOptions = new MemoryCacheEntryOptions()
    .SetSlidingExpiration(TimeSpan.FromSeconds(10));

_cacheProvider.SetCache(cacheKey, users, cacheEntryOptions);

return users;
await func() will wait and return the response from our external API endpoint (provided that it’s passed into our method) so that we can use that value to store in our cache.
3. Refactoring our code to use locking
Now, let’s assume that we have several users accessing our service which means there could be multiple accessing our in-memory cache. One way to make sure that no two different users get different results is by utilising .Net locks. Refer the following scenario:
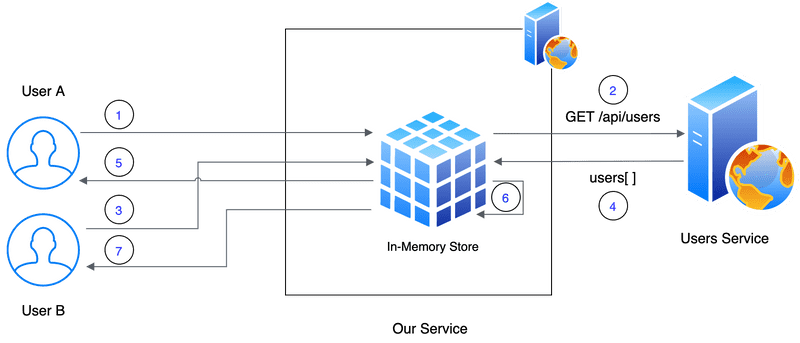
Let’s breakdown the sequence of requests and responses:
- User A makes a request to our web service
- In-memory cache doesn’t have a value in place, it enters in to lock state and makes a request to the Users Service
- User B makes a request to our web service and waits till the lock is released
- This way, we can reduce the number of calls being made to the external web service. returns the response to our web service and the value is cached
- Lock is released, User A gets the response
- User B enters the lock and the cache provides the value (as long it’s not expired)
- User B gets the response
The above depiction is a very high-level abstraction over all the awesome stuff that happens under the covers. Please use this as a guide only. Let’s implement this!
...
var users = _cacheProvider.GetFromCache<IEnumerable<User>>(cacheKey);

if (users != null) return users;
try
{
    await semaphore.WaitAsync();

    // Recheck to make sure it didn't populate before entering semaphore
    users = _cacheProvider.GetFromCache<IEnumerable<User>>(cacheKey);

    if (users != null) return users;
    users = await func();

    var cacheEntryOptions = new MemoryCacheEntryOptions()
        .SetSlidingExpiration(TimeSpan.FromSeconds(10));

    _cacheProvider.SetCache(cacheKey, users, cacheEntryOptions);
}
finally
{
    // It's important to do this, otherwise we'll be locked forever
    semaphore.Release();
}

return users;
Explanation
Same as in our previous example we first check our cache for the presence of the value for a key provided. if not, we then asynchronously wait to enter the Semaphore. Once our thread has been granted access to the Semaphore, we recheck if the value has been populated previously for safety. If we still don’t have a value, we then call our external service and store the value in the cache.
Demo
Hope you enjoyed this tutorial. Happy coding!

Javier is Content Specialist and also .NET developer. He writes helpful guides and articles, assist with other marketing and .NET community work