
Imagine you’re watching a live sports game online and the score updates instantly on your screen as a team scores, without having to refresh the application. That’s the power of real-time web applications: they enable you to send and receive data in real time.
In this tutorial, you’ll see how to use Next.js and SignalR to create a better real-time web application. This tutorial assumes that you have Node.js, npm, and the.NET 8.0 SDK installed, as well as some prior experience with Next.js and C#.
About SignalR
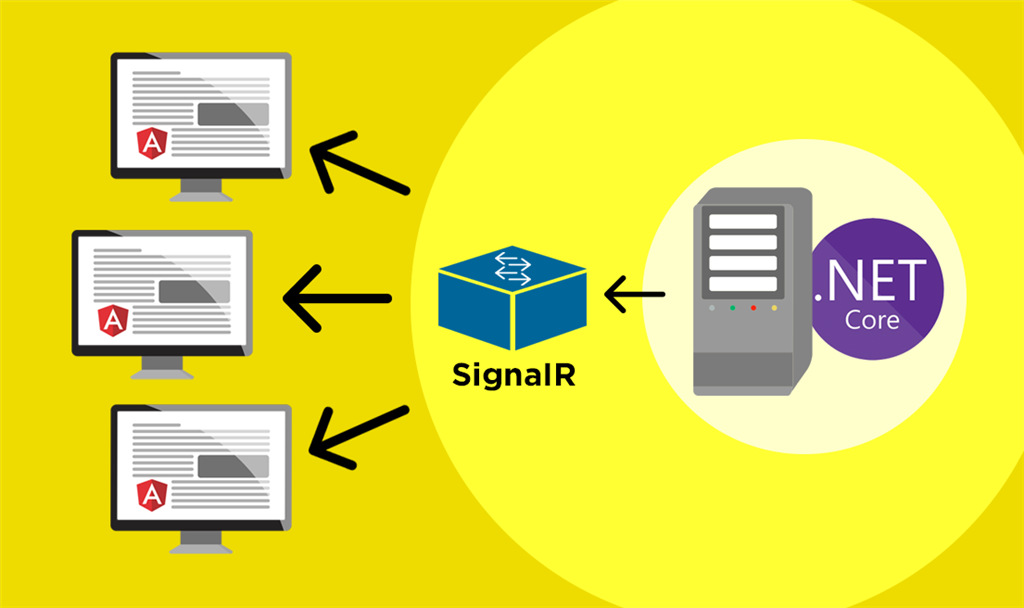
SignalR is an open source ASP.NET library that simplifies the process of developing real-time web applications. Instead of waiting for users to refresh the page, these real-time applications can send the most recent information to connected users as soon as it becomes available.
Here are some reasons that developers use SignalR:
- Easily creates real-time web applications, such as chat apps and live dashboards, with minimal overhead.
- Uses the WebSocket protocol by default for real-time communications while hybridizing it with other available protocols such as HDXP, Forever Frames, or long polling when WebSocket is not available
- Enables intercommunication by allowing the client to call the SignalR methods on the server side to trigger the push of data to the client
- Real-time functionality works well in large apps or enterprise applications with no scalability issues, even with growing numbers of users and connections.
- Abstracts the complexities involved in establishing real-time applications, such as communication management and data handling.
- A good choice for apps that require frequent server updates, such as online gaming apps and collaborative apps like live document editors.
SignalR has many other potential use cases in real-time apps.
Why should you use SignalR with Next.js?
SignalR and Next.js have unique features that are useful for developing real-time web applications. Let’s look into why this combination is a good choice for developers.
- Complementary strengths: SignalR, widely regarded as the fastest and most reliable real-time communication library, sends data to clients as quickly as possible. Next.js, which inherits features from React, provides a more efficient way to create responsive user interfaces. This integration facilitates the development of efficient and user-friendly real-time applications.
- Streamlined updates with Next.js: Next.js employs React’s state management features, making it equally capable of connecting to SignalR’s live data streams. This integration assists in updating the user interface to get it synchronized with the server in real-time, ensuring that the most recent data is always displayed in the user interface without any perceptible lag.
- Scalability and performance: Both SignalR and Next.js are designed to be scalable and performant. SignalR manages hundreds of WebSocket allotments, making it ideal for apps with high traffic. This is also where Next.js comes in, with its bundling and virtual DOM functionality. The virtual DOM keeps the user interface responsive and fast, even with frequent data updates.
- Modular approach of Next.js: The component-based approach The Next.js architecture is perfectly suited to SignalR’s real-time data streams. Next.js can update its user interface independently in response to new SignalR data updates. These features work together to create code that is well-managed and scalable.
- Flexible integration: SignalR is relatively flexible and thus integrates well with frontend frameworks such as Next.js. This adaptability is critical in modern web development, where decoupling frontend and backend functionalities is a common practice.
- Enhanced real-time features: SignalR bridges the gap between synchronous and real-time applications by enabling the integration of messaging and live update features into web apps. Next.js enhances SignalR features by ensuring that the UI changes in response to data or state changes.
- Community and documentation support: Developers have access to a wealth of resources, documentation, and community support through the Microsoft and React communities. This makes it easy to keep up with the version releases and troubleshoot any issues.
- Cross-platform reach: Combining SignalR and Next.js allows developers to create web applications that are accessible across multiple browsers and can handle requests from a large user base.
As you can see, combining the two frameworks is a successful strategy for developing performant, scalable, and SEO-rich real-time applications.
Integrate Next.js and SignalR
For the purposes of this tutorial, we’ll create an ASP.NET Core signal server to send and receive messages from the Next.js client application. Then, we’ll create a Next.js frontend that communicates with the server and allows users to chat in real time.
Creating the ASP.NET Server
To get started, create a new ASP.NET web API using the command below:
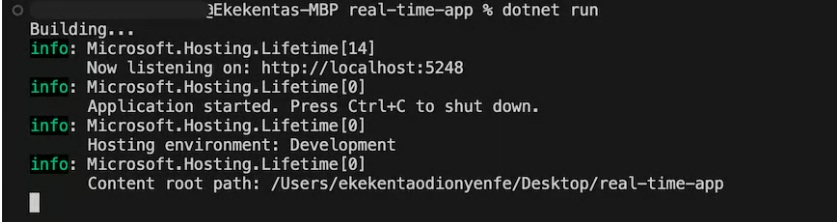
dotnet new webapi -n real-time-app
The command above will create a new ASP.NET API server that includes a demo API. Now, run the server with the following command:
dotnet run
The application will be built and run on http://localhost:5248/
You can preview the demo API on your browser by visiting the /weatherforecast endpoint:

Next, update the code in the Program.cs file to add AddSignalR for real-time communication:
using SignalRApp.Hubs;
var builder = WebApplication.CreateBuilder(args);
// Configure CORS
builder.Services.AddCors(options =>
{
    options.AddPolicy("CorsPolicy", policy =>
    {
        policy.WithOrigins("http://localhost:3000")
              .AllowAnyHeader()
              .AllowAnyMethod()
              .AllowCredentials();
    });
});
// Add SignalR services
builder.Services.AddSignalR();
var app = builder.Build();
// Use CORS with the specified policy
app.UseCors("CorsPolicy");
// Use default files and static files
app.UseDefaultFiles();
app.UseStaticFiles();
// Map the MessagingHub to the "/hub" endpoint
app.MapHub<MessagingHub>("/hub");
// Run the application
app.Run();
In the code snippet, we create a new builder instance and set up CORS policies, allowing our front end to interact with the ASP.NET server. We then register SignalR services to enable real-time communication, and requests to the /hub endpoint are routed to the MessagingHub class.
Creating a SignalR hub class
Let’s create a new folder called messageHub. Create a new file called MessageHub.cs in the messageHub directory and paste the following code snippet:
using Microsoft.AspNetCore.SignalR;
namespace SignalRApp.Hubs
{
    public class UserMessage
    {
        public required string Sender { get; set; }
        public required string Content { get; set; }
        public DateTime SentTime { get; set; }
    }
    public class MessagingHub : Hub
    {
        private static readonly List<UserMessage> MessageHistory = new List<UserMessage>();
        public async Task PostMessage(string content)
        {
            var senderId = Context.ConnectionId;
            var userMessage = new UserMessage
            {
                Sender = senderId,
                Content = content,
                SentTime = DateTime.UtcNow
            };
            MessageHistory.Add(userMessage);
            await Clients.Others.SendAsync("ReceiveMessage", senderId, content, userMessage.SentTime);
        }
        public async Task RetrieveMessageHistory() =>
            await Clients.Caller.SendAsync("MessageHistory", MessageHistory);
    }
}
The code snippet above defines two WebSocket methods:
- One to receive messages from the client side — in other words, our Next.js application
- Another way to send messages back to the client via SignalR WebSocket.
For PostMessage, we are using SignalR’s Others.SendAsync client method to send messages to all connected clients except the sender. Conversely, we used Caller.SendAsync to send the previous messages back to the sender.
Creating the Next.js frontend
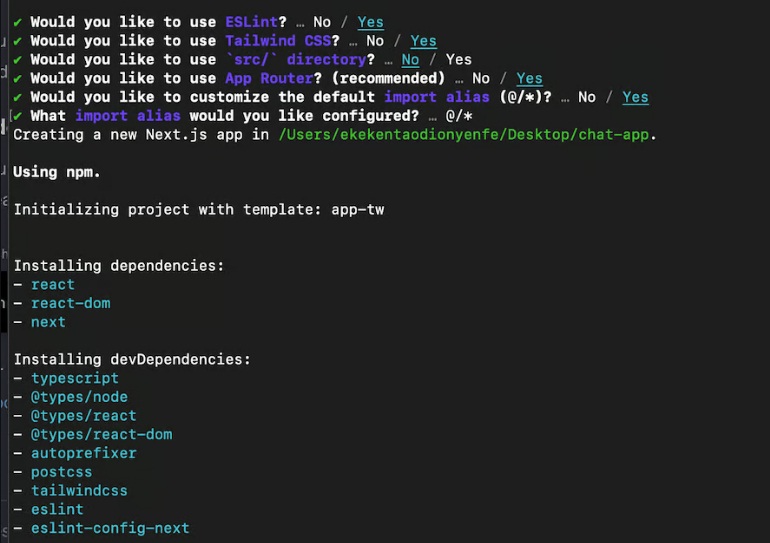
Now let’s move on to the frontend of our application. To scaffold a new Next.js application, execute the following command:
npx create-next-app@latest chat-app --typescript
The command above will prompt you to select the configurations for your project. For this tutorial, your choices should match the ones shown in the screenshot below.
Next, install the SignalR package with the command below:
npm install @microsoft/signalr
Then create a chat folder in the app directory and add a page.tsx file. Add the code snippet below to the file:
"use client";
import { useEffect, useState } from "react";
import {
  HubConnection,
  HubConnectionBuilder,
  LogLevel,
} from "@microsoft/signalr";

type Message = {
  sender: string;
  content: string;
  sentTime: Date;
};
In the code snippet above, we set up a HubConnection using HubConnectionBuilder from the @microsoft/signalr package and imported LogLevel to obtain logging information from the server. Additionally, we defined a Message type representing the structure of our message object, which includes sender, content, and sentTime fields.
Now, let’s create a Chat component in the file and define the state for our application. We’ll use a messages state to store messages, a newMessage state to capture new messages from the input field, and a connection state to keep track of the SignalR connection.
We will accomplish this with the following code snippets:
//...
const Chat = () => {
  const [messages, setMessages] = useState<Message[]>([]);
  const [newMessage, setNewMessage] = useState("");
  const [connection, setConnection] = useState<HubConnection | null>(null);
  useEffect(() => {
    const connect = new HubConnectionBuilder()
      .withUrl("http://localhost:5237/hub")
      .withAutomaticReconnect()
      .configureLogging(LogLevel.Information)
      .build();
    setConnection(connect);
    connect
      .start()
      .then(() => {
        connect.on("ReceiveMessage", (sender, content, sentTime) => {
          setMessages((prev) => [...prev, { sender, content, sentTime }]);
        });
        connect.invoke("RetrieveMessageHistory");
      })

      .catch((err) =>
        console.error("Error while connecting to SignalR Hub:", err)
      );

    return () => {
      if (connection) {
        connection.off("ReceiveMessage");
      }
    };
  }, []);
  const sendMessage = async () => {
    if (connection && newMessage.trim()) {
      await connection.send("PostMessage", newMessage);
      setNewMessage("");
    }
  };
  const isMyMessage = (username: string) => {
    return connection && username === connection.connectionId;
  };
  return (
    //...
  )
}
export default Chat;
In the preceding code snippet, we used the useEffect Hook to connect the server and our client side when the component mounted. This will notify our component whenever a new message is sent or received from other connected clients.
Then, we defined the sendMessage method to send new messages to the server using the send method from the SignalR connection. Additionally, we implemented isMyMessage to distinguish our messages from those sent by other connected clients.
Next, update the return method to display the messages with code snippets:
//...
 return (
    <div className="p-4">
      <div className="mb-4">
        {messages.map((msg, index) => (
          <div
            key={index}
            className={`p-2 my-2 rounded ${
              isMyMessage(msg.sender) ? "bg-blue-200" : "bg-gray-200"
            }`}
          >
            <p>{msg.content}</p>
            <p className="text-xs">
              {new Date(msg.sentTime).toLocaleString()}
            </p>
          </div>
        ))}
      </div>
      <div className="d-flex justify-row">
        <input
          type="text"
          className="border p-2 mr-2 rounded w-[300px]"
          value={newMessage}
          onChange={(e) => setNewMessage(e.target.value)}
        />
        <button
          onClick={sendMessage}
          className="bg-blue-500 text-white p-2 rounded"
        >
          Send
        </button>
      </div>
    </div>
  );
//...
Lastly, update the globals.css file to remove all the default styles:
@tailwind base;
@tailwind components;
@tailwind utilities;
Testing the application
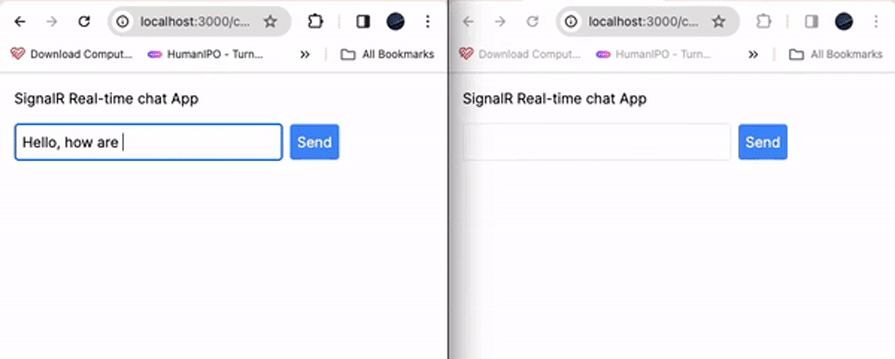
We successfully created a SignalR ASP.NET server and integrated it with our Next.js application. Now, run the Next.js application with the following command:
npm runn dev
Open your browser and visit http://localhost:3000/chat to see the frontend. Then, send messages to test the application:
The challenges of integrating.NET real-time capabilities in a JavaScript environment
As we previously demonstrated, combining a.NET-based real-time framework with a React-based framework has numerous benefits. It does, however, present its own set of challenges. Let’s look at some of these challenges and how SignalR addresses them.
Synchronizing state across different technologies
Maintaining a consistent state between the backend and frontend sides of an app can be difficult, especially in real-time apps where the state changes in response to data changes.
SignalR handles all workloads in real time, preserving both frontend and backend states by pushing updates directly from the server to the client.
Managing real-time data streams
Real-time data streams in chat apps or live dashboards can be one of the most challenging to manage. Conventional HTTP requests are very slow and can lead to server overload.
SignalR communication is based on WebSockets, a protocol that utilizes full-duplex communication channels. This allows for efficient data transfer over a single TCP connection.
SignalR also has fallbacks, such as long polling, in case WebSockets are not available. This behavior contributes to the best possible real-time experience across multiple environments.
Scalability of real-time applications
Scaling real-time applications to accommodate a large number of concurrent users and requests can be difficult, but SignalR is designed to be scalable. You can integrate it with Azure SignalR Service, a fully managed service that can handle an unlimited number of concurrent connections.
Learning curve and development complexity
Implementing real-time functionalities from scratch can be difficult, and the complexities of learning new technologies slow the app development process.
SignalR provides a simple API that enables developers to easily add real-time functionality without the need for custom code. This makes SignalR easier to use than alternatives such as the Fluid Framework or WebRTC, which have some complexities when attempting to get the code to work across multiple browsers.
Developers who use WebRTC must also write code for signaling functionality. This is an important component of the WebRTC infrastructure that is not standardized, resulting in significant differences between implementations.
Before you can work with WebRTC, you must first understand server-side technologies and be able to effectively manage peer connections, media streams, and data channels.
Conclusion
Congratulations! You have reached the end of this tutorial. In this tutorial, we learned how to combine Next.js and SignalR to improve real-time web app functionality.


Yury Sobolev is Full Stack Software Developer by passion and profession working on Microsoft ASP.NET Core. Also he has hands-on experience on working with Angular, Backbone, React, ASP.NET Core Web API, Restful Web Services, WCF, SQL Server.

