We are going to explore four potential reasons why your ASP.NET Core Application is not working in IIS. Previously we have written about common error that you can find when deployiong your ASP.NET Core application.
They were saying they still couldn’t get their ASP.NET Core application to work in IIS, despite following the recommendations in that article.
So, that’s explore the reasons why this might be the case and come up with some rememdies.
1. Permission Issue
So you’ve published your ASP.NET Core application. You’ve set up a website in IIS pointing to your published folder.
Tried to run the application. And then IIS throws an error that reads as follows:
HTTP Error 500.19 - Internal Server Error
The requested page cannot be accessed because the related configuration data for the page is invalid.

Config Error: Cannot read configuration file due to insufficient permissions
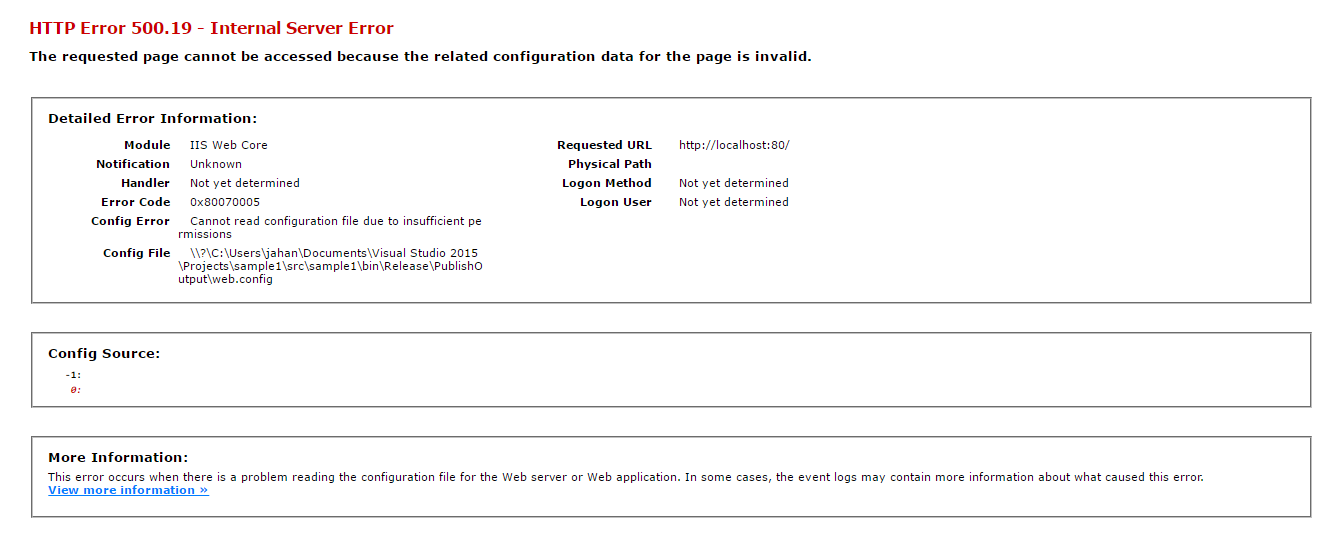
This error is because IIS does not have the correct permissions to render your ASP.NET Core application.
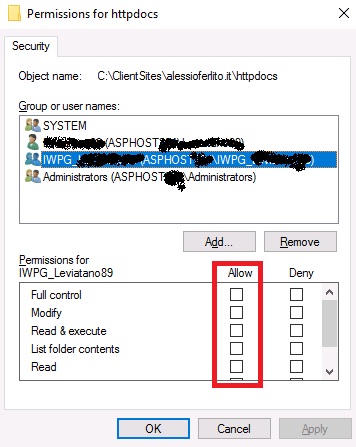
In Windows 2016, you need to give full access to the IIS_IUSRS group in the path where you are hosting your ASP.NET Core application in IIS.
This should resolve your issue.
However, what if that group is not there? Or it doesn’t resolve the issue?
If the group is not there, you can add the Users group to the folder that’s running your ASP.NET Core application in IIS. And give it full permission. That should at least get your application working.
But, it might be that you’ve changed the identity of the application pool in IIS. You might be running your IIS application from a different user.
In which case, in IIS, go to Application Pools and click on the pool running your application.
Go to Advanced Settings… and navigate to Process Model and Identity.
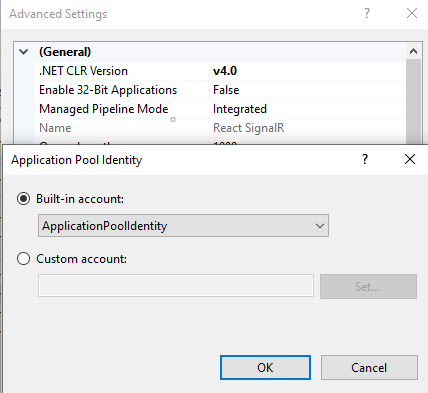
If you are using a Custom Account, you will probably need to give full permissions to that account as well.
2. Make Sure You Install ASP.NET Core Runtime
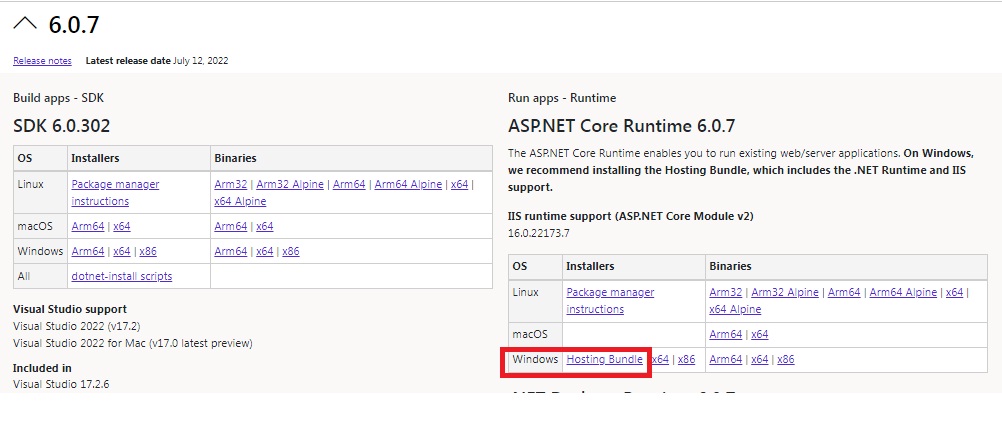
If you are running an ASP.NET Core application, you must install ASP.NET Core Runtime onto the machine that is running your application through IIS.
You can download ASP.NET Core Runtime from Microsoft’s ASP.NET Core website. It will give you different installers dependent on which operating system you are using.
For IIS, it’s recommended that you install the Hosting Bundle. Not only does this install ASP.NET Core Runtime, but also additional support for IIS runtime support.
3. Different .NET Core Version Cause Issue
It’s easily done. You’ve successfully deployed your ASP.NET Core application onto IIS and everything is fine.
That is until you upgrade your ASP.NET Core version. You try and deploy it to IIS and then you get a 500 error.
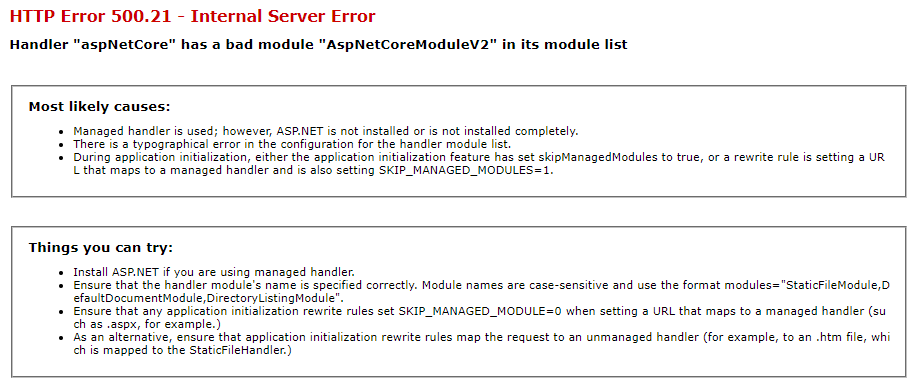
Here is an example of trying to run an ASP.NET Core 6 application with ASP.NET Core Runtime 3 installed.
The error reads:
HTTP Error 500.21 - Internal Server Error
Handler "aspNetCore" had a bad module "AspNetCoreModuleV2" in its moudle list
Now I must stress that you might not get any error when you upgrade your ASP.NET Core version for your application without upgrading your ASP.NET Core Runtime.
But, it’s worth keeping it up to date.
4. Runtime Error with Your Application
So you’ve tried all these solutions, but you are still getting a 500 error.
This one is more specific as it relates to a start up failure.
We have disccussed this error on our previous post, you may check it for further information about the error message.
This is a problem with your ASP.NET Core application rather than IIS. There is a runtime error.
First, check that it runs locally on your machine. Assuming you are using Visual Studio, open the application in Visual Studio and run the application.
If it throws an error, you will know the reason why you are getting a 500.30 error in IIS.
However, if it’s working fine, there is probably something wrong with the IIS environment. Maybe the server cannot see the database? Or maybe, there is something that hasn’t been installed on the server?
To help you identify the issue, you can turn on log files.
In the directory that is running your ASP.NET Core application in IIS, you should have a web.config file.
In there, you should have an aspNetCore tag with a stdoutLogEnabled and stdoutLogFile attribute.
<?xml version="1.0" encoding="utf-8"?>
<configuration>
  <location path="." inheritInChildApplications="false">
    <system.webServer>
      <handlers>
        <add name="aspNetCore" path="*" verb="*" modules="AspNetCoreModuleV2" resourceType="Unspecified" />
      </handlers>
      <aspNetCore processPath="dotnet" arguments=".\RoundTheCode.ReactSignalR.dll" stdoutLogEnabled="false" stdoutLogFile=".\logs\stdout" hostingModel="inprocess" />
    </system.webServer>
  </location>
</configuration>
Now the stdoutLogEnabled attribute should be set to false. By setting that to true, you should be able log the runtime error that you are getting in your application.
The log files are stored in the folder path that is contained in the stdoutLogFile attribute.
Final Verdict
We believe that above tutorial can help you to solve your issue. If you are looking for fast and secure ASP.NET hosting, you can visit our site at https://www.asphostportal.com. Our fully featured hosting already includes
- Easy setup
- 24/7/365 technical support
- Top level speed and security
- Super cache server performance to increase your website speed
- Top 9 data centers across the world that you can choose.


Javier is Content Specialist and also .NET developer. He writes helpful guides and articles, assist with other marketing and .NET community work