
There are many new things to explore in.NET 7, which has only been available for a few days. One of these is.NET’s build infrastructure’s actual capacity to publish your applications straight to a Docker container registry (or any other container registry, for that matter) without the need to specifically mention a Docker file.
All around us, containerization is prevalent. And, to be honest, a lot of us are still uneasy using Docker or tools of a similar nature (which is likely why there are so many container orchestration systems out there attempting to ease our burdens). Anyway, since.NET 7 is currently a hot topic, I figured it could be fun to check out one of the fresh features the newest SDK gives us.
So let’s examine how we can immediately deploy a.NET 7 application to Docker using only the framework’s built-in tooling. I’m using my Windows 11 computer for this, which has Docker set up.
Creating a simple application
First, let’s build a straightforward application that will subsequently allow us to verify that everything is operating as intended. I’m doing PowerShell commands on the.NET CLI while in my scratch directory to accomplish this. We’ll create a Blazor application with the command:
dotnet new blazorserver -o MvcToDocker --no-https
After that, change to the newly made directory and run
dotnet watch
The SDK will create your project, launch a browser, and display your program. While you are working on your site, the page will hot-reload as a result of the watch command’s monitoring of any changes to your file system. Really cool.
 MvcToDocker -> D:\repos\sandbox\MvcToDocker\bin\Debug\net6.0\MvcToDocker.dll
dotnet watch 🚀 Started
info: Microsoft.Hosting.Lifetime[14]
      Now listening on: http://localhost:5020
info: Microsoft.Hosting.Lifetime[0]
      Application started. Press Ctrl+C to shut down.
info: Microsoft.Hosting.Lifetime[0]
      Hosting environment: Development
info: Microsoft.Hosting.Lifetime[0]
      Content root path: D:\repos\sandbox\MvcToDocker\
dotnet watch ⌚ File changed: .\Pages\Index.razor.
dotnet watch 🔥 Hot reload of changes succeeded.
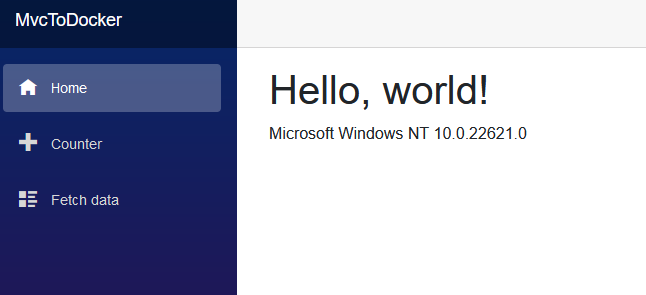
Let’s alter the contents of the index.razor to the following in order to observe a real change on the page after we migrate from hosting on Windows to hosting in a Docker container:
@page "/"

<PageTitle>Index</PageTitle>

<h1>Hello, world!</h1>

@operatingSystem

@code {
    private string operatingSystem;
    protected override void OnInitialized()
    {
        operatingSystem = Environment.OSVersion.ToString();
        base.OnInitialized();
    }
}
Ideally, your application now displays something like this:
Preparing the containerization support
Installing a NuGet package is the first step in adding containerization capabilities to our application:
dotnet add package Microsoft.NET.Build.Containers
This can be done using your preferred IDE as well. In either scenario, a line like this will be in your .csproj file:
<ItemGroup>
  <PackageReference Include="Microsoft.NET.Build.Containers" Version="0.2.7" />
</ItemGroup>
Almost everything is now set up for publication. But first, let’s ensure that our program and system are prepared for.NET 7. Run the following command to view the list of installed SDKs, and then check to see if the.NET 7 version is included.
dotnet --list-sdks
If not, you will first need to install it. Direct publication to container registries is not supported by .NET 6.
winget install Microsoft.DotNet.SDK.7
Also, make sure that the .csproj file references the correct framework:
<TargetFramework>net7.0</TargetFramework>
Publishing and running the app inside a container
Type the following command to publish the application as an image to the Docker container registry:
dotnet publish --os linux --arch x64 -p:PublishProfile=DefaultContainer /t:PublishContainer
We are instructing the SDK to use the profiles specified by the aforementioned NuGet package when compiling the program for a Linux-x64 file system. The final image will also be registered directly in Docker. Running the results through a
docker images
which gives me:
REPOSITORY    TAG     IMAGE ID       CREATED                SIZE
mvctodocker   1.0.0   f03fb089f375   About a minute ago     213MB
Now, to run the image as a container, we can use the following command:
docker run -d -p 80:80 mvctodocker:1.0.0
Here, we’re using the -p flag to map port 80 on the host to port 80 on the container and the -d flag to disconnect from the newly established container instance. You may wish to read one of the numerous available Docker tutorials if you find that to be perplexing.
In any case, visiting localhost:80 will now produce the following output:
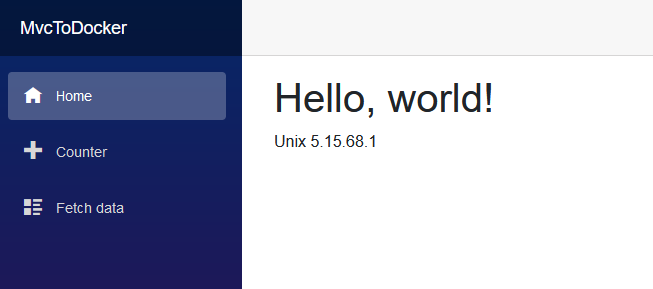
We can tell that the program is actually executing on a local Linux environment because we altered the index page’s content.
You could note that there isn’t a Docker file engaged in this procedure if you look at the bin/ directory that was generated on your computer. The appropriate image was directly registered in the Docker registry by the.NET SDK.
This is a really nice tool that makes the deployment of.NET programs very simple and uncomplicated. For many people, it may also be a good excuse to learn a little bit more about Docker. Any variety of apps can be hosted on local or distant computers, including Raspberry Pis. Try it out now, then let me know what you think.


Yury Sobolev is Full Stack Software Developer by passion and profession working on Microsoft ASP.NET Core. Also he has hands-on experience on working with Angular, Backbone, React, ASP.NET Core Web API, Restful Web Services, WCF, SQL Server.

