
Why Code-First Approach?
The following are some benefits of the Code-First approach that address database design and application development:
- Control over Entities: With complete control over the entity classes, developers can define custom configurations, data annotations, and relationships right in the code.
- Database Schema Generation: By using the entity classes as a basis, EF automatically creates the database schema, saving time on manual database setup.
- Flexibility: With migrations, Code-First enables developers to easily update the database schema in tandem with changes to the application.
OK, let’s get started!
Step 1: Create a .NET Web API Project
Let’s create a new .NET Web API project using Visual Studio or the .NET CLI:
dotnet new webapi -n DotnetWebApiWithEFCodeFirst
As an alternative, you can use Visual Studio to start a new project.
- Open Visual Studio and select “Create a Project”
- Select “ASP.NET Core Web API” or any other type of project you want to create
- Give your project a name, I am using “DotnetWebApiWithEFCodeFirst” and then click on create.
- This will create a new project.
Step 2: Install Entity Framework Core
Use the following command to install the Entity Framework Core package in the project directory:
dotnet add package Microsoft.EntityFrameworkCore
dotnet add package Microsoft.EntityFrameworkCore.SqlServer
dotnet add package Microsoft.EntityFrameworkCore.Tools
dotnet add package Microsoft.EntityFrameworkCore.Design
As an alternative, you can install these packages using Visual Studio’s “Mange Nuget Package” section.
Step 3: Define Entity Classes
We are not going to generate entity classes from the current database, in contrast to the Database-First approach. We will manually define them in code instead. Make a “Models” folder, then add the following class to represent the Customer entity:
// Models/Customer.cs

using System.ComponentModel.DataAnnotations;

namespace DotnetWebApiWithEFCodeFirst.Models
{
    public class Customer
    {
        [Key]
        public int CustomerId { get; set; }
        [Required]
        [MaxLength(50)]
        public string FirstName { get; set; }
        [Required]
        [MaxLength(50)]
        public string LastName { get; set; }
        [Required]
        [MaxLength(100)]
        public string Email { get; set; }
    }
}
Step 4: Create the Database Context
The database context class that derives from DbContext should then be created. The database will be modeled after this class, which will enable communication with it.
// Models/SampleDBContext.cs

using Microsoft.EntityFrameworkCore;

namespace DotnetWebApiWithEFCodeFirst.Models
{
     public partial class SampleDBContext : DbContext
     {
       public SampleDBContext(DbContextOptions
       <SampleDBContext> options)
           : base(options)
       {
       }
       public virtual DbSet<Customer> Customer { get; set; }
       protected override void OnModelCreating(ModelBuilder modelBuilder)
       {
           modelBuilder.Entity<Customer>(entity => {
               entity.HasKey(k => k.CustomerId);
           });
           OnModelCreatingPartial(modelBuilder);
       }
       partial void OnModelCreatingPartial(ModelBuilder modelBuilder);
     }
}
Step 5: Configure Database Connection
Set up the database connection and add the database context to the DI container in the Program.cs file:
// Startup.cs


using DotnetWebApiWithEFCodeFirst.Models;
using Microsoft.EntityFrameworkCore;

namespace DotnetWebApiWithEFCodeFirst
{
    public class Program
    {
        public static void Main(string[] args)
        {
            var builder = WebApplication.CreateBuilder(args);

            builder.Services.AddControllers();
            builder.Services.AddEndpointsApiExplorer();
            //This section below is for connection string
            var connectionString = builder.Configuration.GetConnectionString("DefaultConnection");
            builder.Services.AddDbContext<SampleDBContext>(options => options.UseSqlServer(connectionString));

            builder.Services.AddSwaggerGen();

            var app = builder.Build();

            if (app.Environment.IsDevelopment())
            {
                app.UseSwagger();
                app.UseSwaggerUI();
            }

            app.UseHttpsRedirection();

            app.UseAuthorization();


            app.MapControllers();

            app.Run();
        }
    }
}
Step 6: Configure Connection String
In the appsettings.json file, add the connection string for your SQL Server database:
{
  "Logging": {
    "LogLevel": {
      "Default": "Information",
      "Microsoft.AspNetCore": "Warning"
    }
  },
  "ConnectionStrings": {
    "DefaultConnection": "Server=tcp:YOUR_SERVER,1433;Initial Catalog=YOUR_DATABSE;Persist Security Info=False;User ID=YOUR_USER_ID;Password=YOUR_PASSWORD;MultipleActiveResultSets=False;Encrypt=True;TrustServerCertificate=False;Connection Timeout=30;"
  }
}
Change the connection string to match the connection string you actually have.
Step 7: Run Database migration
We will create a new migration for our customer model in this step, which is the import.
Launch Visual Studio and navigate to the Package Manager Console. This option is located in the Package Manager Console under Views => Other Windows.
Run the command below once the Package Manage Console has opened.
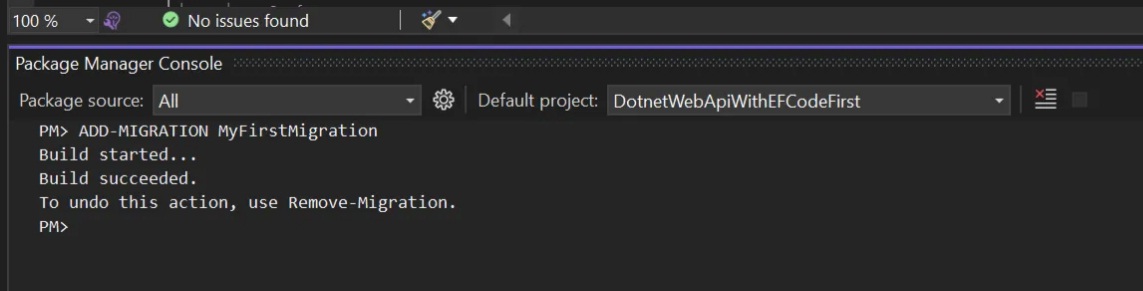
ADD-MIGRATION MyFirstMigration
This will result in a new migration, and the output would resemble this.
Your migration files will now be located in a new folder called “Migrations,” which will be created by this.
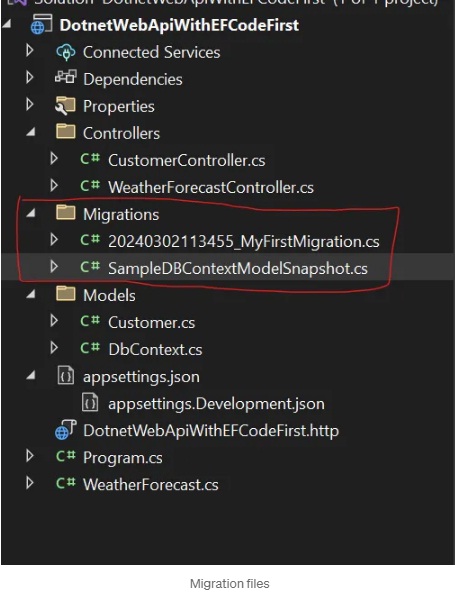
These are the modifications that your migration will execute and commit into the database. You can now review these, and if everything checks out, you can commit your migration.
Step 8: Apply the migration
Once you’re satisfied with the modifications, use the command below to apply the migration.
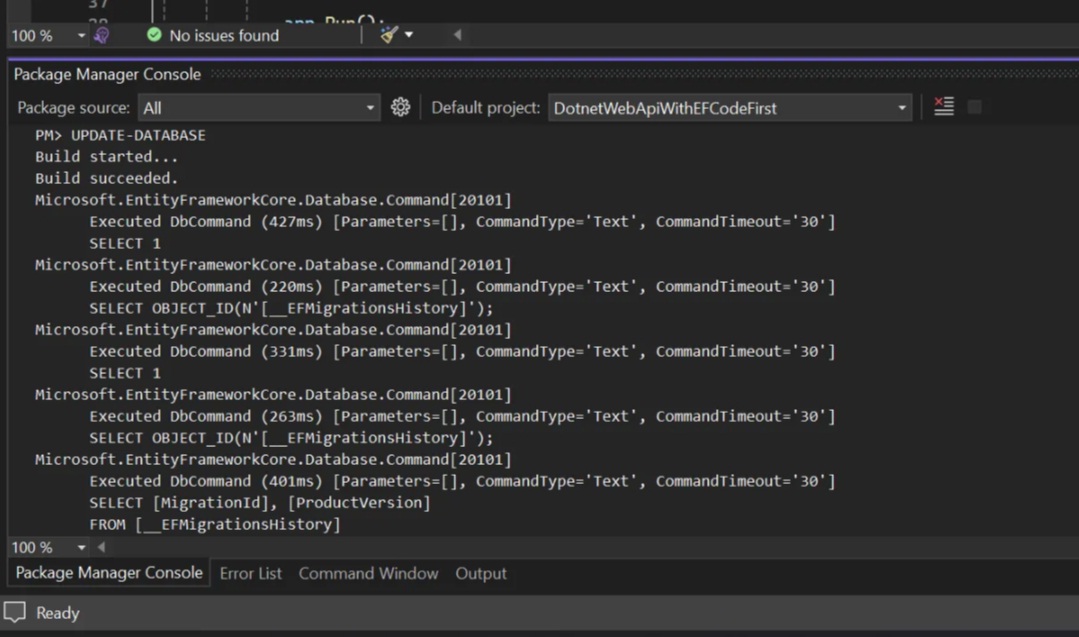
UPDATE-DATABASE
This will apply the migration into the database
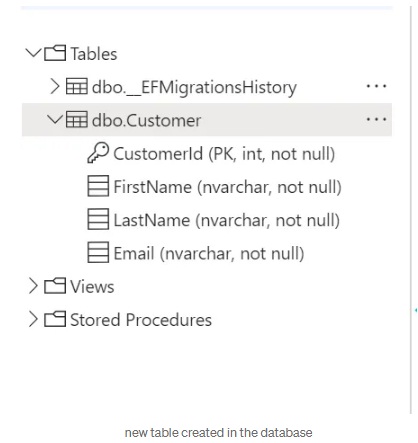
You can validate your database to check if changes have been made once the migration has been implemented.
Step 9: Remove or Revert a Migration
You can use the “Remove-Migration” command in the Package Manager Console or the command “dotnet ef migrations remove” in the terminal to remove the most recent migration that was applied in Entity Framework Core. As an illustration:
Remove-Migration
By deleting the most recent migration, this command updates the database schema to reflect the situation prior to the last migration.
You can use the “update-database” command along with the migration name to restore the database to a particular migration. For example:
Update-database MyFirstMigration
With this command, database modifications are undone and the specified migration’s state is restored. Entity Framework Core migrations offer an organized method for effectively applying and managing modifications to database schema.
Step 10: Create the Web API Controller
Create a controller for the Customer entity to handle CRUD operations:
// Controllers/CustomerController.cs

using DotnetWebApiWithEFCodeFirst.Models;
using Microsoft.AspNetCore.Http;
using Microsoft.AspNetCore.Mvc;

namespace DotnetWebApiWithEFCodeFirst.Controllers
{
    [Route("api/[controller]")]
    [ApiController]
    public class CustomerController : ControllerBase
    {
        private readonly SampleDBContext _context;
        public CustomerController(SampleDBContext context)
        {
            _context = context;
        }

        // GET: api/Customer
        [HttpGet]
        public ActionResult<IEnumerable<Customer>> GetCustomers()
        {
            return _context.Customer.ToList();
        }

        // GET: api/Customer/1
        [HttpGet("{id}")]
        public ActionResult<Customer> GetCustomer(int id)
        {
            var customer = _context.Customer.Find(id);
            if (customer == null)
            {
                return NotFound();
            }
            return customer;
        }

        // POST: api/Customer
        [HttpPost]
        public ActionResult<Customer> CreateCustomer(Customer customer)
        {
            if (customer == null)
            {
                return BadRequest();
            }
            _context.Customer.Add(customer);
            _context.SaveChanges();
            return CreatedAtAction(nameof(GetCustomer), new { id = customer.CustomerId }, customer);
        }
    }
}
Step 11: Run the Web API Application
Use the following command to launch the Web API application at this point:
dotnet run
What to Expect After Running dotnet run:
- The command prompt or terminal will show messages indicating the application’s successful execution if everything is configured correctly. This will contain details about the hosting environment and log messages.
- When the application is launched, you can use a web browser to access the Web API or you can use programs like Postman. The base URL listed in the
[Route]attribute of theCustomerControllercan be used to access the API endpoints. - For example:
- To retrieve all customers:
https://localhost:5001/api/Customer - To retrieve a specific customer:
https://localhost:5001/api/Customer/1 - Using a program like Postman or cURL, send an HTTP POST request with the JSON payload containing the new customer’s details to
https://localhost:5001/api/Customerin order to create a new customer.
You now know how to use Entity Framework in the Code-First method to connect a.NET Web API to SQL Server by reading this continuation article. The Code-First approach is a great option for database design and application development because it gives developers more control over entities and generates the database schema automatically.
Happy coding!


Javier is Content Specialist and also .NET developer. He writes helpful guides and articles, assist with other marketing and .NET community work

