
Analyzing the request itself is the first step towards troubleshooting AJAX requests. While there are many tools available for this, the developer tools offered by the major browsers are the most easily accessible. By pressing F12 while viewing your webpage in Chrome, IE, Edge, or Firefox, or Ctrl+Shift+I in Opera, you can access them. The latter key combination is compatible with FireFox as well. Under all circumstances, the browser should display a panel that resembles this one:
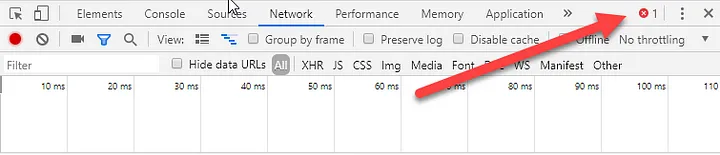

Verify that the event handler that starts the request is correctly wired to the trigger element if there are no errors reported but the request is still not made in response to the trigger action. If the request is approved, information will show up, ideally with a nice 200 HTTP status code to indicate that everything went according to plan. That being said, as this article’s title suggests, the most confusing status code is 400:

It appears that there is a mistake in the way the post request was put together, but what is it? A missing Request Verification token is the most frequent reason Razor Pages return a 400 Bad Request status code.
Request Verification Tokens
The procedure known as “request verification” makes sure that post requests that your application receives come from it and not from another source. Razor Pages by default enable request verification, which is a valuable tool in the defense against cross-site request forgery (CSRF) attacks. The form tag helper renders a hidden form field called __RequestVerificationToken inside each form. There is an encrypted token in it. A cookie that is sent along with the form request contains the same value. ASP.NET Core verifies the existence of these two tokens and their values when it handles a POST request. The framework returns a 400 status code if verification is unsuccessful.
The hidden field containing the CSRF token is automatically appended to the payload during standard form submission. When an AJAX post fails and returns a 400 status code, the following are the most frequent causes:
- Although the CSRF token was generated, it was absent from the payload that was posted.
- The CSRF token was present in the post, but it was hidden from the server’s view.
- Since the form tag helper was not used, no CSRF token was generated.
No hidden field was generated
A CSRF token value must be generated. There are other ways to generate the token value as a hidden field besides using the form tag helper, which is the most popular method. In fact, generating form tags or hidden fields might not even be necessary in your situation, particularly if you aren’t posting form field values. If adding a form to your page makes sense, go ahead and do so, just make sure that the method attribute is set to post. Forms that use the get method do not generate CSRF tokens.
In order to generate a token value without the need for a form, you can insert the IAntiforgery interface into your page:
@page
@model MyApp.Pages.IndexModel
@inject IAntiforgery antiforgery
@{
    var token = antiforgery.GetAndStoreTokens(HttpContext).RequestToken;
}
You must either add a using statement to the _ViewImports file or reference IAntiforgery using the fully qualified namespace (Microsoft.AspNetCore.Antiforgery). After that, the token can be utilized in the AJAJX post.
Including the CSRF token in the post
There are numerous ways to build the data for your AJAX post. If you choose to use jQuery, all of the specified form values will be correctly encoded for submission thanks to its serialize() function. You can create a FormData object from the appropriate form element when utilizing the Fetch API, which will guarantee that all fields—including hidden fields—are included in the payload. Even though you’re doing this, 400 codes are still generated by your posts. If this is the case, make sure you are not stringifying your serialized form values to JSON (using, for example, JSON.stringify) needlessly as this will hinder the server from finding the token.
When creating values on your own, it’s simple to forget about the verification token.
There are two manual ways to manually add the verification token to the post: either in a header or as a part of the request body. RequestVerificationToken is the default name for both the header and the form field. However, you can customize them by configuring the AntiforgeryOptions in ConfigureServices, for example.
services.AddAntiforgery(o => o.HeaderName = "CSRF-TOKEN");
OWASP states that it is more secure to use JavaScript to add the CSRF token to the HTTP request header rather than the hidden field form parameter. Use the $.ajax method rather than $.post if you’re using jQuery, as it gives you access to more options, such as setting headers:
$.ajax({
    type: "POST",
    url: "/",
    data: { foo: "bar" },
    headers: { "RequestVerificationToken": $('input[name="__RequestVerificationToken"]').val() },
    success: function (response) {
        ...
Here’s how you can accomplish the same thing using Fetch:
var token = document.querySelector('input[name="__RequestVerificationToken"]').getAttribute("value");
fetch("", {
    method: "post",
    headers: {
        "RequestVerificationToken": token
    },
    body: { foo: "bar" }
}).then(() => {
    ...
});
The header value is used if the CSRF token is included as both a form field and a header value. The system won’t revert to the form field if the header value cannot be verified. It will produce a 400 response code and simply return a BadRequestResult.
Summary
After offering some general advice on debugging unsuccessful AJAX post requests, this article concentrates on the most frequent offender in ASP.NET Core Razor Pages. It describes the CSRF token, how Razor Pages generates one, and how the IAntiforgery API can be used to generate one. It also shows you how to add the token manually to your AJAX post so that it can be found.


Yury Sobolev is Full Stack Software Developer by passion and profession working on Microsoft ASP.NET Core. Also he has hands-on experience on working with Angular, Backbone, React, ASP.NET Core Web API, Restful Web Services, WCF, SQL Server.

