
It’s important to keep in mind that some websites offer their visitors more than just webpages. In some cases, we might require a backend to manage functions like letting users subscribe to newsletters, getting user feedback, getting data out of a database, etc.
Version 9 of Next.js added the API routes feature, which enables us to create API endpoints as a part of our Next.js application without adding any additional custom server code.
The essential elements of the Next.js API routes will be covered in this article. We’ll demonstrate how to configure API routes, the request object, response helpers, and other ideas using Next.js.
A Brief Overview of Next.js API Routes
In order to create API routes, Next.js makes use of the folder structure of the application. An api folder has already been added by create-next-app to the pages folder at the application’s root level. Within that folder, you can create JavaScript files to represent each API route in your application.
Any file in the pages/api folder is treated as an API route rather than a page by Next.js, which maps it to /api/file-name>. A /api/products API route will be created, for instance, if a file named pages/api/products.js is created. By including a pages/api/products/index.js file, we can also create the /api/products route. Additionally, it supports an index file mechanism akin to client-side routing in Next.js.
This allows you to write backend code and add business logic to your application without having to create any additional custom server code or configure any additional API routes. Each file must export a function that takes the request and response objects as its first two parameters in order for an API route to function.
Project Setup
Create a Next.js app using the following command:
Creating an API Route
Create a new file called first-route.js in the pages/api folder and add the following to it:
Exactly, that’s it! It’s that easy to use Next.js to create an API route.
We updated the newly produced file with a function. The program acts as a controller for requests made through the (pages/api/first-route) route. Using some predefined response helpers, it takes two parameters and returns a response that includes a status and a JSON object. In later sections of this article, more information about the request object and response helpers will be provided.
Route files can contain additional backend logic, but it must always adhere to the requirement of exporting a function as default.
Open your browser and go to pages/api/first-route to view the API response to see if the API route is functional.

The Request Object
The request (req) object is one of the two arguments that the Next.js API route handler method receives, as was previously mentioned. The request information received from the client making the request is represented by the req object, an instance of http.IncomingMessage. It also contains the request method, the requested URL, and the request headers.
Additionally, built-in middlewares in Next.js are available for extending and parsing the incoming request (req) object. The middleware are as follows:
- req.body: You don’t need to install a different body-parser module from a third party because Next.js parses the request body by default.
Req.bodycontains an object that has beencontent-typeparsed according to the client’s specifications. If no body was specified,nullis used as the default. - req.query: The query string that is included with the request URL is also parsed by Next.js. If no query string was attached, the object
req.queryis empty or contains the query parameters and their values. - req.cookies: It contains the cookies sent by the request. It also defaults to an empty object
{}if no cookies are specified.
The Response Helpers
The response (res) object is one of the two necessary parameters specified in the API route handlers. It is an instance of http.ServerResponse that includes extra helper methods to improve developer productivity and hasten the development of new API endpoints.
Among the helper techniques are:
– res.json(body): It is used to send the client a JSON response. It requires a serializable object as an argument.
export default function handler(req, res) {
  res.send("Hello world!!...");
}
– res.status(code): Setting the response status code is done using this function. It will take as an argument a legitimate HTTP status code.
export default function handler(req, res) {
  res.send("Hello world!!...");
}
– res.status(code): The response status code can be set using this function. As an argument, it will take a legitimate HTTP status code.
export default function handler(req, res) {
  try {
    //some code...
    res.status(200).json({
      message: "Successful",
      data: { data },
    });
  } catch (error) {
    res.status(500).json({
      error,
    });
  }
}
According to whether an error occurs or not, the route handler function in the code above returns a different status code and response object.
Handling Multiple HTTP Verbs
Instead of using verbs in our endpoint paths when working with API routes/endpoints, it is typical to use nouns that represent the entity of the endpoint that we are retrieving or manipulating as the pathname.
For instance, we want to have a single route pages/api/users but with a different request method to specify the action we want, rather than having separate routes to get users—/pages/api/getUsers, update users—pages/api/updateUsers, and add users—pages/api/addUsers. It’s GET, PATCH, and POST in our case.
Multiple HTTP verbs can be specified for a single Next.js API route in a single file. You must use a conditional statement to distinguish between the various request methods you want to use in your API route in order to work with that.
The following is a switch statement example:
    export default function handler(req, res) {
        switch (req.method) {
          case 'GET':
            //some code...
            res.status(200).json({//response object})
            break;

          case 'POST':
            //some code...
            res.status(201).json({//response object})
            break;

          case 'PATCH':
            //some code...
            res.status(200).json({//response object})
            break;

          default:
            res.status(405).end(`${method} Not Allowed`);
            break;
        }
      }
We defined a switch statement in the code above, which enables us to execute code fragments and return various results depending on the request method. We also included a default condition that, if none of the cases are true, results in an error.
The minimal router and middleware layer for Next.js is also a library by the name of next-connect. When it comes to API routing, it takes a similar tack to Express.js. Additionally, it makes it easier to handle different HTTP verbs. Click here to learn more.
Dynamic API Routes
The convention used for client-side routing in Next.js can be applied to creating dynamic API routes. Place the name of the route file in square brackets, e.g. [id].js, to create a dynamic API route.
Make a dynamic API route first. In the page/api folder, make a file called [userId].js and add the following to it:
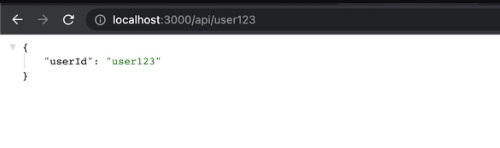
[...slug].js.Creating a catch-all route file like pages/api/products/[…slug].js will match /api/products/ball, /api/products/ball/red, /api/products/ball/red/big and so on.
Matched parameter values will not be sent as a query object but collected into an array instead. Therefore for the three routes we used as an example, we will have the objects {"slug": ["ball"]}, {"slug": ["ball", "red"]} and {"slug": ["ball", "red", "big"]}, respectively.
Additionally, catch-all API routes are given less priority than dynamic API routes and predefined API routes are given more priority than dynamic API routes.
Setting Custom Configurations
A config object is provided by Next.js and can be used to modify some of the application’s default configurations when exported. It has a nested api object for dealing with the configurations of API routes.
For instance, we could turn off Next’s built-in body parser by default.js.
export default function handler(req, res) {
  //....
}
export const config = {
  api: {
    bodyParser: false,
  },
};
We can set many other custom API configurations using the config object. Click this link to learn more.
Using Third-Party Middlewares
The runMiddleware helper function from the Next.js team enables you to run any middleware that is compatible with Connect, a middleware layer for Node.js.
function runMiddleware(req, res, fn) {
  return new Promise((resolve, reject) => {
    fn(req, res, (result) => {
      if (result instanceof Error) {
        return reject(result);
      }
      return resolve(result);
    });
  });
}
The third-party middleware instance, the request object, the response object, and the helper function’s parameters are all objects. Before continuing, it waits for middleware to complete and, in the event of a failure, throws an error.
Any middleware that is compatible with Connect may now be used in your application by using the helper function. For instance, open your terminal and run the following command to install the cors package as a dependency at the root of your application to configure CORS (Cross-Origin Resource Sharing) for your API route:
npm install cors
Next, open your API route file and add the following to it:
    import Cors from 'cors'
    const cors = Cors({
      methods: ['GET', 'HEAD', 'POST'],
    })
    function runMiddleware(req, res, fn) {
      return new Promise((resolve, reject) => {
        fn(req, res, (result) => {
          if (result instanceof Error) {
            return reject(result);
          }
          return resolve(result);
        });
      });
    }
    export default async function handler(req, res) {
      await runMiddleware(req, res, cors)
      //other api logic
      res.status(//status-code).json({//reponse object});
}runMiddleware to launch the middleware.Conclusion
We’ve looked at setting up an API route in Next.js in this article. The process of developing an API for your applications is made simpler by Next.js. It has a few benefits, including the fact that it doesn’t need configuration, isolates each handler as a separate function, has excellent middleware support, etc.


Javier is Content Specialist and also .NET developer. He writes helpful guides and articles, assist with other marketing and .NET community work

