Decorators
The use of decorators is a great way to add metadata data to a class, method, property, or parameter. They are referred to as attributes in the C# language and are implemented as classes.
public class Employee
{
    [Required]
    [MaxLength(50)]
    public string Name { get; set; }

    [Required]
    public int Age { get;set; }
}
Listing 1. Attributes in C#
TypeScript Decorators
Decorators are implemented in TypeScript using functions. In reality, it’s a function that gives back another function. The inside function is known as the decorator, while the outside one is referred to as the decorator factory. A decorator is produced by the decorator factory using some configuration values.
To represent a class as JSON serializable, use the decorator below. It adds a method to the prototype to serialize the instances into JSON strings and defines a property called isSerializable in the type with the value true.
function Serializable(replacer?: (key: string, value: any) => any, space?: string | number) {
    return function (type) {
       Object.defineProperty(type, 'isSerializable', { value: true });
       Object.defineProperty(type.prototype, 'serialize', {
            value: function () {
                return JSON.stringify(this, replacer, space);
            }
       });
    }
}
Listing 2. A simple decorator in TypeScript
@Serializable(null, 2)
class Employee {
    constructor(public name: string, public age: number) {}
}

console.log((<any>Employee).isSerializable); // true

var emp: any = new Employee('Yury', 42);
var str = emp.serialize();
console.log(str);
// Output
{
  "name": "yury",
  "age": 42
}
</any>
Listing 3. Using the sample decorator
Angular Decorators
Angular employs a sizable number of decorators. For classes, properties, methods, and even parameters, decorators exist. Important decorators include people like:
- NgModule
- Component
- Input
- Output
The Component decorator is used to add additional metadata, such as the template, selector name, styles, etc., to a class in order to decorate it as an angular component.
@Component({
   selector: 'greet',
   template: '<h1>{{greeting}}</h1>
})
class GreetingComponent {
    @Input()
    public greeting: string;
}
Listing 4. A simple angular component
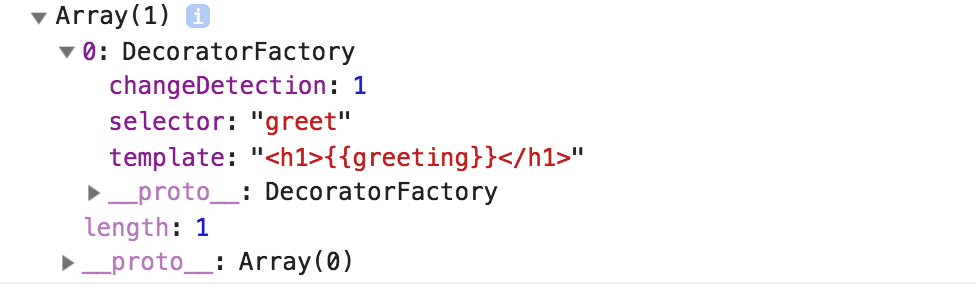
What Component decorator does?
The following tasks are performed by the Component decorator.
- Creates an instance of a function called DecoratorFactory (derived from Directive).
- Fills that instance with the passed arguments (selector, template etc).
- Defines a static property in the component type with name “__annotations__” and assign the instance to it.
Run the statement below to confirm this.
console.log(GreetingComponent['__annotations__']);
Listing 5. Displaying GreetingComponent’s Annotations
You’ll see the below output.
Extending the built-in Component decorator
There are times when you must pass the Component decorator extra options, read them, and take appropriate action.
All of the components in my most recent project are model-driven, so I need to add each one to a unique registry with a descriptive name and the model type it belongs to. In order to do this, I need to give the Component decorator a few extra options, like “name” and “model.”
Let’s take the following model and component class as an example.
class ButtonModel {
}

@Component({
    selector: 'btn',
    templateUrl: './button.html
})
class ButtonComponent {
}
Listing 6. A sample component with model
Without decorators I would be doing like this,
componentRegistry.register('button', ButtonComponent, ButtonModel);
Listing 7. Registering the component and the model
@MyComponent({
    selector: 'btn',
    templateUrl: './button.html,
    name: 'button',
    model: 'ButtonModel'
})
class ButtonComponent {
}
Notably, I’ve passed extra options called “name” and “model” that are necessary for registration along with my own decorator, MyComponent. I want MyComponent to wrap the built-in component decorator rather than implementing all of its features.
Let’s examine the MyComponent decorator’s implementation.
import { Component } from '@angular/core';
import componentRegistry from './ComponentRegistry';

function MyComponent(args: any = {}): (cls: any) => any {
  const ngCompDecorator = Component(args);

  return function (compType: any) {
    ngCompDecorator(compType);
    args.type && componentRegistry.register(args.type, compType, args.model);
  }
}

export default MyComponent;
Listing 9. Custom decorator
As you can see from the code above, I first called the built-in angular Component decorator factory and saved the decorator function it returned in a variable. In my actual decorator function, I first called the Component decorator function before writing my own custom code that registers the component and reads the extra options from the passed arguments. The appeal of decorators is that you can decorate one yourself!
Conclusion
A class, property, or method can be decorated to add new information. Although JavaScript does not currently support them, a future version might. Fortunately, TypeScript allows us to use them immediately.


Yury Sobolev is Full Stack Software Developer by passion and profession working on Microsoft ASP.NET Core. Also he has hands-on experience on working with Angular, Backbone, React, ASP.NET Core Web API, Restful Web Services, WCF, SQL Server.