
Using Web API controllers, you could create Web Services thanks to the ASP.NET Framework and ASP.NET Core. You get a new tool with ASP.NET Core 6 and later versions called “minimal APIs.” While utilizing much of the knowledge you have gained from creating Web API controllers, minimal APIs do enable you to create a Web Service with fewer files and less code than with a Web API controller. Here is a case study about developing a minimal Web Service that retrieves and updates warehouse data using minimal APIs to illustrate that.
Create Your Project
An ASP.NET Core project’s program.cs file is where you add your code to create a simple API method. Calling one of the Map* methods (MapGet, MapPost, MapDelete, etc.) from the WebApplication object used in the program defines each method in your service.cs file (typically, a variable called “app” holds the WebApplication object).
You supply the Map* method of your choice with the following two parameters to define a Web Service method:
- The routing template for your Web Service method’s URL, using the same syntax that you’d use in adding a Route attribute to a Web API controller method
- A lambda expression containing the code for your method
My default first method when building a Web Service is almost always a “GetAll” request, which in this case study returns all the objects in my Warehouse. My service code is merely a wrapper around some pre-existing objects, like the majority of Web Service methods. The object I’m wrapping in this instance is my WarehouseRepo object, which has a method called GetAllAsync that returns a list of all the warehouses.
Use the MapGet method of the WebApplication to add a GET request method to a simple API. My site’s URL with “/warehouses/” appended at the end serves as the endpoint for my Get All method, so I pass that as the first parameter to the MapGet method:
Then in the lambda expression, I:
- Flag the lambda expression with the async keyword because I’ll be calling an Async method in the expression
- Retrieve my WarehouseRepo object from the application’s Services collection by leveraging dependency injection in the method’s parameters list
- Use my WarehouseRepo’s GetAllAsync method to retrieve a collection of all of the Warehouse objects
- Use the Results object’s static Ok method to create an IResult object that wraps the collection of Warehouse objects in a HTTP response with a 200 status code
- Return the IResult object
Get All Method Example
Combining everything, I have all the code I require to define my Get All method:
app.MapGet("/warehouses/",
    async (IWarehouseRepo whRepo) =>
    {
       ICollection<Warehouse> whs = await whRepo.GetAllAsync();
       return Results.Ok(whs);
    });
Testing My Method
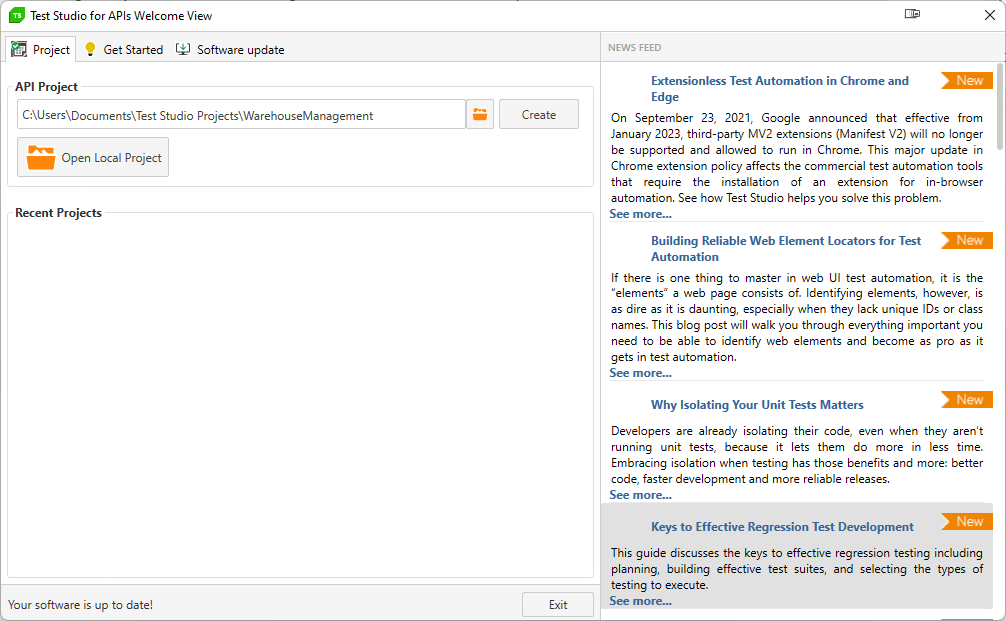
It’s simple to test my new procedure: I simply launch Test Studio for APIs, select the Create button, and set the file path to the directory where I want my test project to be stored (I give it the name “WarehouseManagement”).
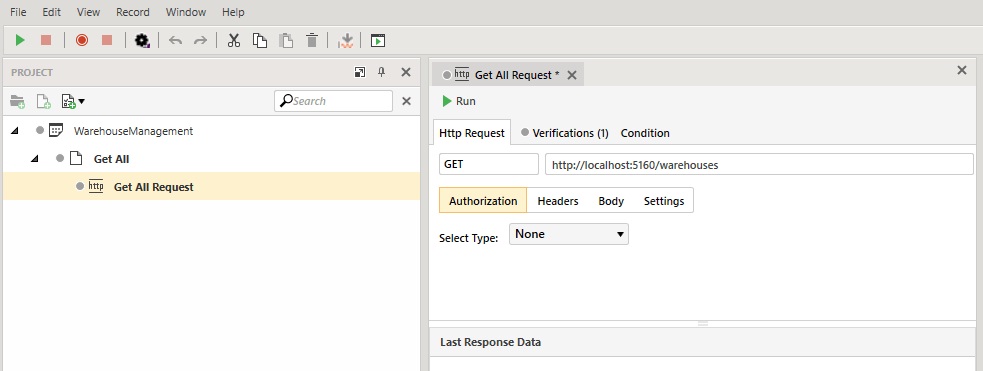
This project as a result contains a test case with the initial name “Test Case” (I renamed it “Get All”) and a test step with the initial name “Http Request” (I renamed it “Get All Request”).
The dialog for defining an HTTP request appears when you double-click on my Get All Request. The sample test is already a GET request, so all I need to do to complete the test creation is enter the URL for my minimal method in the textbox to the right of the GET verb.
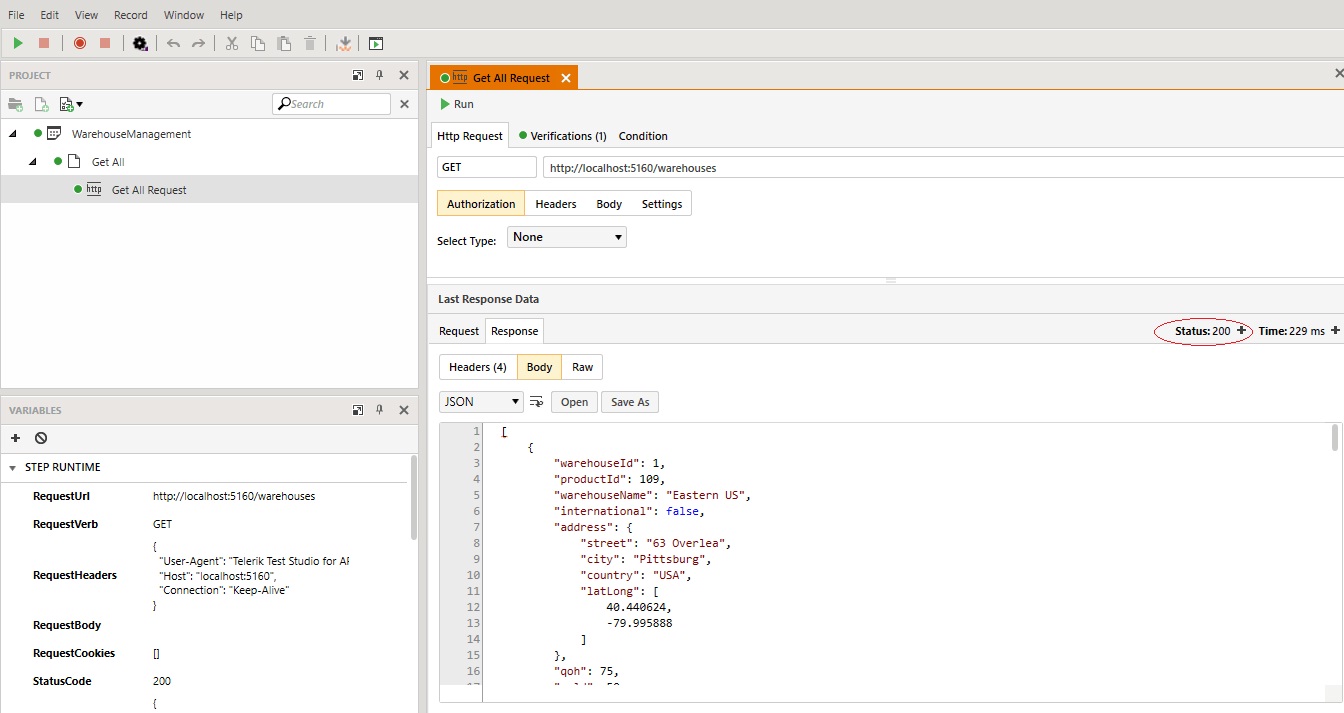
I first launch my Web Service in Visual Studio by pressing F5, and then I switch to Test Studio for APIs and press F5 once more to launch my test. The outcome of my test is shown by Test Studio a few seconds later.
The good news is that it was successful: I can see a 200 status code at the top of the Response box and a test box below it that shows the list of warehouses returned by my Web Service method in JSON format.
Second Get Request
Usually, when a primary key value is passed, my second Web Service method retrieves a single item; in my case, I can use my WarehouseRepo’s GetByIdAsync method and pass it a warehouse Id to retrieve a particular warehouse.
There aren’t many differences between my Get All method and this new one. As follows:
- The routing template includes a parameter called wId, enclosed in French braces (“{….}”)
- The lambda expression accepts a nullable integer parameter (the parameter is also called wId to match the parameter name in the routing template)
I call my WarehouseRepo’s GetByIdAsync method inside the lambda expression and pass it the wId parameter (the GetByIdAsync method returns a single, nullable warehouse object).
My code checks to see if the returned warehouse is null, which denotes that my WarehouseRepo was unable to find a matching warehouse, after calling the GetByIdAsync method. In that case, I send an HTTP NotFound (404) message using the Results object’s NotFound method. However, I return the warehouse encased in the Ok method of the Results object if it is not null.
The code is still quite straightforward:
app.MapGet("/warehouses/{wId}",
    async (IWarehouseRepo whRepo, int? wId) =>
    {
       Warehouse? wh = await whRepo.GetByIdAsync(wId.GetValueOrDefault());
       if (wh == null)
       {
            return Results.NotFound();
       }
       return Results.Ok(wh);
    });
Testing for Success
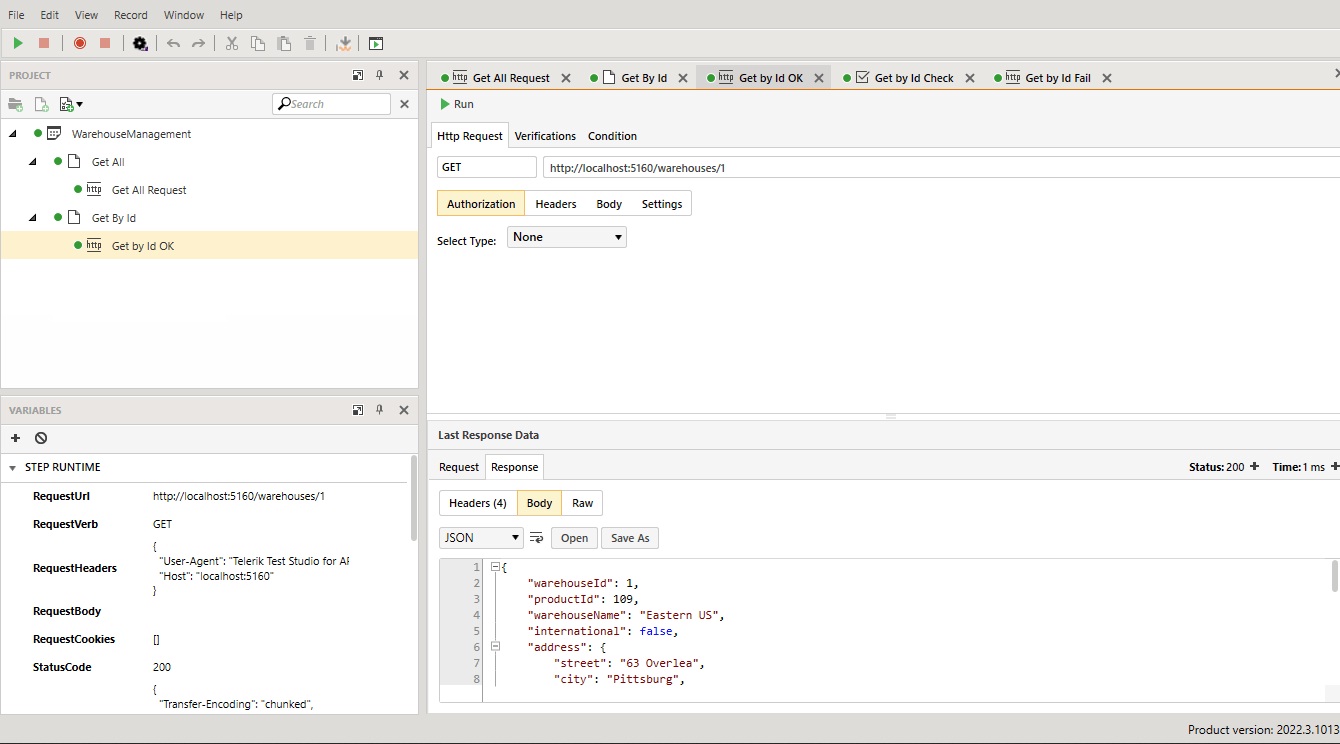
Returning to Test Studio for APIs, I right-click on my project and choose Add New Test to add a new test case to the project. I call the new test case “Get by Id” in order to test this method. Then, after selecting Add Step | Http Request with the right mouse click, I name the resulting step “Get by Id OK” on the new test case. I enter the URL to request a warehouse already in existence and start my test.
The day is great! Additionally, that test succeeds, as I can see one JSON object in my Response area.
I want my test cases to validate the response from my Web Service; however, I don’t want to constantly check the test results to make sure my tests are passing. For this test, for instance, I want to know if, when I asked the Web Service for warehouse number 1, it responded with warehouse number 1.
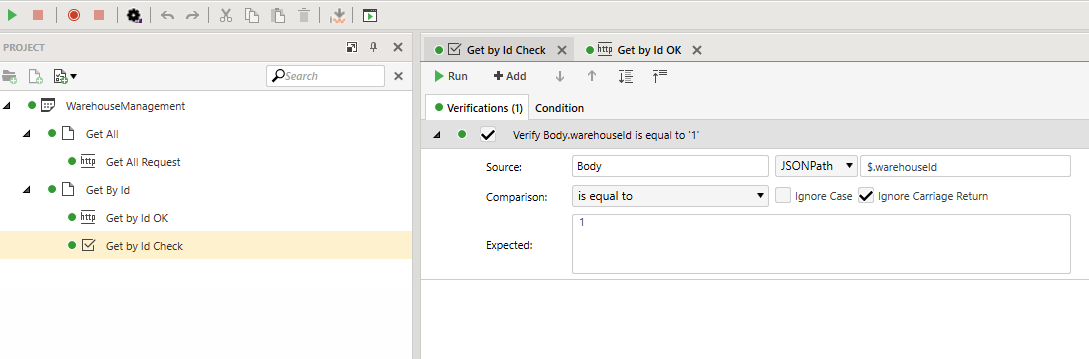
To account for this, I must include a verification step in my test case. It’s simple: I simply select Add Step | Verification by performing a right-click on my Get by Id test case. The resulting verification step is given the name “Get by Id Check” and when double-clicked, a form for creating a verification test appears.
For this test, I want to confirm that the warehouseId value in the JSON response to my request was 1. There are many ways I can check my results in a Test Studio for APIs verification step, but using a JSONPath statement enables me to retrieve a value from the JSON document returned in the previous step’s response body. I might choose JSONPath as my search tool and type “$.warehouseId” to retrieve the value of the warehouseId property, for instance.
I then changed the expected value to “1” and the comparison operator in the verification step to “is equal to.” My verification step looks like this when I’m finished:

Now, when I press F5 to run my tests, all I have to do is see if everything worked by looking at the green dot next to my test project (if any step fails, both the project and the failing step(s) receive red dots).
Checking for Failure
However, I still need to run one more test to make sure I receive a 404 error if I request a warehouse that doesn’t exist. I right-click on my current Get by Id OK test and choose Copy to create this test. Then I choose Paste by using the right-click menu on my Get by Id test case. As a result, I’ve added a new test to my test case that I’ve named “Get by Id Fail.” I open my new test by double-clicking it and change the URL to request a warehouse that doesn’t exist.
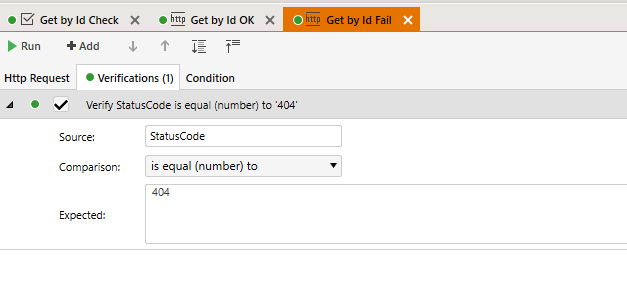
I now require a verification step that marks a 404 return code as successful. Each Http Request step includes a verification that flags the step as failing if the response’s status code is not 200, so I don’t need to create it as a separate step. Simply change the verification test so it looks for a status code of 404 rather than 200.
I simply select the step’s verification tab in my new test and change the anticipated value to 404. This is the end result:
Now, when I press F5, I not only call my Web Service but check its results.
Testing Updates
The next thing I’ll do is develop my first basic API update method. I’ll make a PUT request for this. Again, there aren’t many differences between a PUT request and my earlier minimal API GET methods—the route template, for instance, is “warehouses/wId,” just like in my Get By Id method.
To change a GET request into a PUT request, I make the following three adjustments:
- Use the WebApplication’s MapPut method instead of MapGet
- Have the lambda expression accept a Warehouse object in addition to the warehouseId (that warehouse object will be loaded from my PUT request’s body)
- Pass that Warehouse object to my WarehouseRepo’s UpdateWarehouseAsync method
Here’s the resulting code:
app.MapPut("/warehouses/{warehouseId}",
    async (IWarehouseRepo whRepo, int? warehouseId, Warehouse wh) =>
    {
       Warehouse updWh = await whRepo.UpdateWarehouseAsync(wh);
       return Results.Ok(updWh);
   });
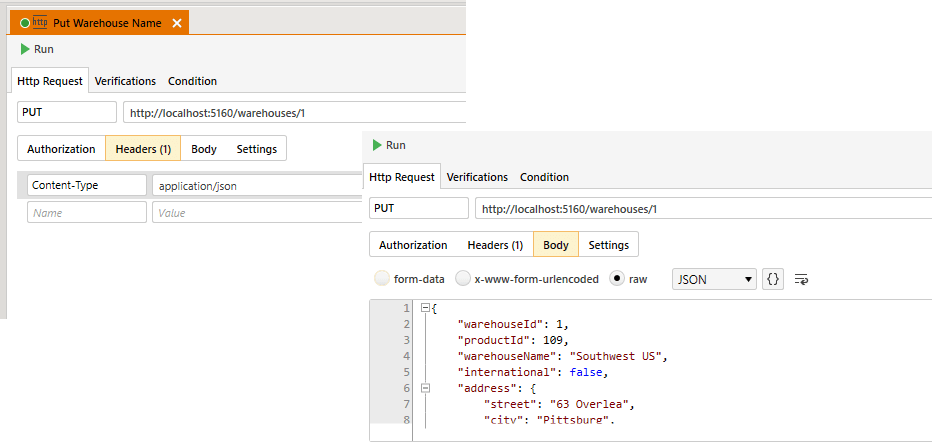
In the JSON object I’m sending to the service for this test, I change the name of the warehouse from “Eastern US” to “Southwest US.”
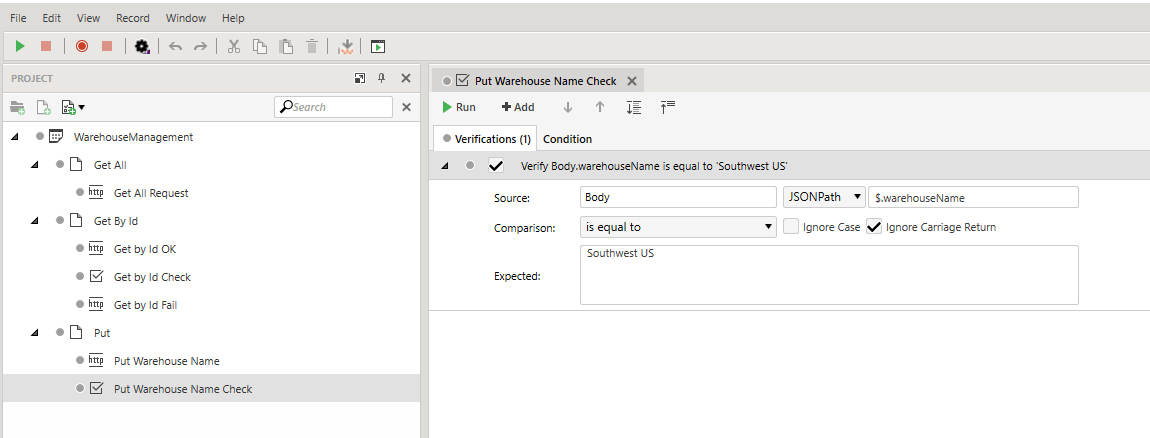
This time, before I run my test, I’ll add my verification test. I’ll simply copy the verification step from my Get by Id test case and paste it into my Put test case to accomplish that. Other than changing the step’s name (I called it “Put Warehouse Name Check”), I only need to change two things to adapt this verification step to its new role:
- Instead of my JSONPath requesting the warehouseId property, I ask for the warehouseName property
- I set the expected value to “Southwest US” to see if the previous Web Service call successfully changed the warehouse name
I run the test, and it passes with green dots for both my PUT request and my verification test.
Of course, I’m not finished with this service yet; I still need to write the POST and DELETE methods as well as the tests for them. My GET method will probably also require a few more tweaks. However, it’s really just more of the same going forward.
The important thing to remember is that when I’m finished, I’ll have a Web Service that not only has a small carbon footprint, but one that I can test to make sure it functions “as intended.”


Yury Sobolev is Full Stack Software Developer by passion and profession working on Microsoft ASP.NET Core. Also he has hands-on experience on working with Angular, Backbone, React, ASP.NET Core Web API, Restful Web Services, WCF, SQL Server.

